
"2024 Approved Creating Classical Cinematography A Modern Tutorial"
Creating Classical Cinematography: A Modern Tutorial
How to Create Vintage Videos: A Comprehensive Tutorial
 HD Video Converter Factory Pro

Richard Bennett
Mar 27, 2024• Proven solutions
“Every accomplishment starts with a decision to try.” – A Vintage Thought

Vintage videos are ultimately the retro videos you have ever imagined. The look is highly inspirational in itself. The vintage effect in photography and videos results in a must-see look that everyone wants to capture all day long. The meaning of vintage is ‘the time when something of quality was produced.’ When something is called retro, it means old, recognized, and essential. Vintage also resembles love apart from videos and photos. All in all, it’s a positive and result-oriented thing to carry on in your videos. And this is what we want to mention in this post relating to the creation of vintage videos.
Here are some vintage-style video ideas for you to have a look at.
- Part 1: What to Consider When Shooting a Vintage Video?
- Part 2: How to Create a Stunning Vintage Video?
- Part 3: Tips to Make Your Vintage Videos Stand Out
What to Consider When Shooting a Vintage Video?
Vintage videos are kind of old school vibes and must be shooting accordingly by keeping in mind the following points. These are a sort of expert tips given by photographers based on their practical experience. First of all, you have to understand that a video can be made vintage, but you can’t change the actual environment of shooting. Some editing always involves there in every project out there. Still, the tips given below will help you a lot in creating a retro look.
Use Vintage Lenses
The very first helpful tip is to use a vintage lens. They allow chromatic aberration by distorting colors around the frame. Furthermore, you can find various kinds of lenses in terms of a vintage effect.
Decrease Contrast
Do the correct color grading by reducing the contrast a little bit. You must not level the retro videos in black or white or like-new videos. You can simply add a contrasting effect and then reduce it to have that vintage look.
Keep it a little soft
If you have ever noticed, the vintage videos are a little soft and look like degraded with time. It’s a result of decreased sharpness in the camera’s menu settings. You can even add a slight blur to the final video or simply use recognized software made for video editing .
Brighten up the black levels
Lots of black points in the video are not ideal for a vintage effect. The suitable approach is to bring up black levels and make it dark gray instead of inky black. This look can be achieved either by levels effect or curves effect in your editing software.
Reduce Saturation levels
Bringing down the saturation levels is another tip to create a vintage effect. The old videos are also absent in bright colors. Don’t go too crazy about reduction as 20%-30% saturation level is more than enough.
How to Create a Stunning Vintage Video?
What you need to get started as both beginner and professional is Wondershare Filmora Video Editor. It is a highly recommended software to create vintage videos. The intuitive user interface and lots of editing functions are helpful for a video editor. It has both primary as well as advanced editing programs to check. It has various advanced color tuning tools to promote the making of original videos. It features tint, temperature, Vignette, 3D Luts, Lights, and so on.


Steps for the vintage effect to videos on Wondershare Filmora Video Editor
Step 1: Upload video & make specific changes

The very step is to add the video by clicking the + icon. We have added the three sample videos from the library of Wondershare Filmora itself. Adjust them in the timeline as per your requirements.
After doing all the essential editing functions, click on the Effects tab given at the upper-left corner. Simply type the word Old in the Search tab.
The Old Video filter will immediately appear in the list of filters. Tap the “+” icon in Old Video filter to add to the timeline. Drag its ends right or left to adjust the duration.
Step 2: Apply White & Black Filters

The second step is to apply the Black & White filters. Go to the Effects tab and explore five Black & White filters available. Each of these filters is quite different and must be applied accordingly. Check the aesthetic of your video clip before any filter application to retro videos.
Step 3: Add the Sun Kissed or Sepia Tone Rise Filters to the video clip

There are various other categories of filters you can apply, such as Retro, Sun Kissed, and Sepia Tone, etc. The features of Filmora also present several subcategories such as Faux Film or Shake.


On the other hand, the subcategory of Sepia Tone features Sun-Kissed & Rise Filters to stimulate sepia-tinted texture and recreate the old visual style. The Sun Kissed filter presents brown and red colors to give that warm image atmosphere.
Step 4: Desaturate Video Clip


Now, you need to desaturate the video clip with Ash & Willow filters. We have typed Ash in the Search bar, and you can see the filter below. These filters are essential to desaturate the video with preset contrast, brightness, or exposure values.

Then, we have combined the black & white filter with an overlay of Film Reel Horizontal. It will help you sell the effect and make the video look more authentic. However, the only application of Black & White or Ash & Willow filters is not going to make any creative thing in terms of vintage videos. You have to mix overlays with features such as Random Dust or Film Reel Horizontal.
Step 5: Apply Black & White and Old Film Color Correction Presets to the video
You can also access the Advanced color correction Tab of Filmora from the Color button. It also features Preset and Adjusts Tabs to desaturate footage. The Preset presents a variety of options, including Black & White and Old Film. You just need to right-click the particular preset and select the Apply option.


Tips to Make Your Vintage Videos Stand Out
Following the helpful tips would assist you in creating awesome retro videos.
- You can use various vintage apps such as Retro VHS, RTRO Camera, 8mm, Camcorder, VSCO, etc. Or, despite using these limited apps, you can directly use our preferred video editing software called Wondershare Filmora.
- If you use a specific vintage camera, keep it on low highlights and low contrasts. Use color grading, as we have discussed above. They help to provide the ultimate old-school effect.
- Always keep low saturation settings for shooting vintage videos. Take control over Saturation, Hue, and Luminance of video.
- Add overlays and respective filters to recreate a required vintage look. You must add things that dust, scratch, and grain the heck out from the video that you have created.
- Lower the frame rate or FPS to create an excellent vintage look. You can make it to 18 or 14 FPS depending upon the aesthetic requirements.
- Keep an eye on black and white filters you have used. It’s because more of a black and white can ruin the actual vintage experience.
Conclusion
So, this is an ultimate tutorial on the creation of vintage videos. We Hope you have admired the steps and our recommended video editing software. Vintage means grand, and thus you should make it amazing as well. It is the reason we have stated all facts regarding the vintage effect in our post above. Wondering how to add such effect in FCPX? check this article:How to Create a Vignette in Final Cut Pro X?
Surely give a read and thank us later!
 Video Converter Factory Pro
Richard Bennett
Richard Bennett is a writer and a lover of all things video.
Follow @Richard Bennett
Richard Bennett
Mar 27, 2024• Proven solutions
“Every accomplishment starts with a decision to try.” – A Vintage Thought
Vintage videos are ultimately the retro videos you have ever imagined. The look is highly inspirational in itself. The vintage effect in photography and videos results in a must-see look that everyone wants to capture all day long. The meaning of vintage is ‘the time when something of quality was produced.’ When something is called retro, it means old, recognized, and essential. Vintage also resembles love apart from videos and photos. All in all, it’s a positive and result-oriented thing to carry on in your videos. And this is what we want to mention in this post relating to the creation of vintage videos.
Here are some vintage-style video ideas for you to have a look at.
- Part 1: What to Consider When Shooting a Vintage Video?
- Part 2: How to Create a Stunning Vintage Video?
- Part 3: Tips to Make Your Vintage Videos Stand Out
What to Consider When Shooting a Vintage Video?
Vintage videos are kind of old school vibes and must be shooting accordingly by keeping in mind the following points. These are a sort of expert tips given by photographers based on their practical experience. First of all, you have to understand that a video can be made vintage, but you can’t change the actual environment of shooting. Some editing always involves there in every project out there. Still, the tips given below will help you a lot in creating a retro look.
Use Vintage Lenses
The very first helpful tip is to use a vintage lens. They allow chromatic aberration by distorting colors around the frame. Furthermore, you can find various kinds of lenses in terms of a vintage effect.
Decrease Contrast
Do the correct color grading by reducing the contrast a little bit. You must not level the retro videos in black or white or like-new videos. You can simply add a contrasting effect and then reduce it to have that vintage look.
Keep it a little soft
If you have ever noticed, the vintage videos are a little soft and look like degraded with time. It’s a result of decreased sharpness in the camera’s menu settings. You can even add a slight blur to the final video or simply use recognized software made for video editing .
Brighten up the black levels
Lots of black points in the video are not ideal for a vintage effect. The suitable approach is to bring up black levels and make it dark gray instead of inky black. This look can be achieved either by levels effect or curves effect in your editing software.
Reduce Saturation levels
Bringing down the saturation levels is another tip to create a vintage effect. The old videos are also absent in bright colors. Don’t go too crazy about reduction as 20%-30% saturation level is more than enough.
How to Create a Stunning Vintage Video?
What you need to get started as both beginner and professional is Wondershare Filmora Video Editor. It is a highly recommended software to create vintage videos. The intuitive user interface and lots of editing functions are helpful for a video editor. It has both primary as well as advanced editing programs to check. It has various advanced color tuning tools to promote the making of original videos. It features tint, temperature, Vignette, 3D Luts, Lights, and so on.

Steps for the vintage effect to videos on Wondershare Filmora Video Editor
Step 1: Upload video & make specific changes
The very step is to add the video by clicking the + icon. We have added the three sample videos from the library of Wondershare Filmora itself. Adjust them in the timeline as per your requirements.
After doing all the essential editing functions, click on the Effects tab given at the upper-left corner. Simply type the word Old in the Search tab.
The Old Video filter will immediately appear in the list of filters. Tap the “+” icon in Old Video filter to add to the timeline. Drag its ends right or left to adjust the duration.
Step 2: Apply White & Black Filters
The second step is to apply the Black & White filters. Go to the Effects tab and explore five Black & White filters available. Each of these filters is quite different and must be applied accordingly. Check the aesthetic of your video clip before any filter application to retro videos.
Step 3: Add the Sun Kissed or Sepia Tone Rise Filters to the video clip
There are various other categories of filters you can apply, such as Retro, Sun Kissed, and Sepia Tone, etc. The features of Filmora also present several subcategories such as Faux Film or Shake.
On the other hand, the subcategory of Sepia Tone features Sun-Kissed & Rise Filters to stimulate sepia-tinted texture and recreate the old visual style. The Sun Kissed filter presents brown and red colors to give that warm image atmosphere.
Step 4: Desaturate Video Clip
Now, you need to desaturate the video clip with Ash & Willow filters. We have typed Ash in the Search bar, and you can see the filter below. These filters are essential to desaturate the video with preset contrast, brightness, or exposure values.

Then, we have combined the black & white filter with an overlay of Film Reel Horizontal. It will help you sell the effect and make the video look more authentic. However, the only application of Black & White or Ash & Willow filters is not going to make any creative thing in terms of vintage videos. You have to mix overlays with features such as Random Dust or Film Reel Horizontal.
Step 5: Apply Black & White and Old Film Color Correction Presets to the video
You can also access the Advanced color correction Tab of Filmora from the Color button. It also features Preset and Adjusts Tabs to desaturate footage. The Preset presents a variety of options, including Black & White and Old Film. You just need to right-click the particular preset and select the Apply option.
Tips to Make Your Vintage Videos Stand Out
Following the helpful tips would assist you in creating awesome retro videos.
- You can use various vintage apps such as Retro VHS, RTRO Camera, 8mm, Camcorder, VSCO, etc. Or, despite using these limited apps, you can directly use our preferred video editing software called Wondershare Filmora.
- If you use a specific vintage camera, keep it on low highlights and low contrasts. Use color grading, as we have discussed above. They help to provide the ultimate old-school effect.
- Always keep low saturation settings for shooting vintage videos. Take control over Saturation, Hue, and Luminance of video.
- Add overlays and respective filters to recreate a required vintage look. You must add things that dust, scratch, and grain the heck out from the video that you have created.
- Lower the frame rate or FPS to create an excellent vintage look. You can make it to 18 or 14 FPS depending upon the aesthetic requirements.
- Keep an eye on black and white filters you have used. It’s because more of a black and white can ruin the actual vintage experience.
Conclusion
So, this is an ultimate tutorial on the creation of vintage videos. We Hope you have admired the steps and our recommended video editing software. Vintage means grand, and thus you should make it amazing as well. It is the reason we have stated all facts regarding the vintage effect in our post above. Wondering how to add such effect in FCPX? check this article:How to Create a Vignette in Final Cut Pro X?
Surely give a read and thank us later!
Richard Bennett
Richard Bennett is a writer and a lover of all things video.
Follow @Richard Bennett
Richard Bennett
Mar 27, 2024• Proven solutions
“Every accomplishment starts with a decision to try.” – A Vintage Thought

Vintage videos are ultimately the retro videos you have ever imagined. The look is highly inspirational in itself. The vintage effect in photography and videos results in a must-see look that everyone wants to capture all day long. The meaning of vintage is ‘the time when something of quality was produced.’ When something is called retro, it means old, recognized, and essential. Vintage also resembles love apart from videos and photos. All in all, it’s a positive and result-oriented thing to carry on in your videos. And this is what we want to mention in this post relating to the creation of vintage videos.
Here are some vintage-style video ideas for you to have a look at.
- Part 1: What to Consider When Shooting a Vintage Video?
- Part 2: How to Create a Stunning Vintage Video?
- Part 3: Tips to Make Your Vintage Videos Stand Out
What to Consider When Shooting a Vintage Video?
Vintage videos are kind of old school vibes and must be shooting accordingly by keeping in mind the following points. These are a sort of expert tips given by photographers based on their practical experience. First of all, you have to understand that a video can be made vintage, but you can’t change the actual environment of shooting. Some editing always involves there in every project out there. Still, the tips given below will help you a lot in creating a retro look.
Use Vintage Lenses
The very first helpful tip is to use a vintage lens. They allow chromatic aberration by distorting colors around the frame. Furthermore, you can find various kinds of lenses in terms of a vintage effect.
Decrease Contrast
Do the correct color grading by reducing the contrast a little bit. You must not level the retro videos in black or white or like-new videos. You can simply add a contrasting effect and then reduce it to have that vintage look.
Keep it a little soft
If you have ever noticed, the vintage videos are a little soft and look like degraded with time. It’s a result of decreased sharpness in the camera’s menu settings. You can even add a slight blur to the final video or simply use recognized software made for video editing .
Brighten up the black levels
Lots of black points in the video are not ideal for a vintage effect. The suitable approach is to bring up black levels and make it dark gray instead of inky black. This look can be achieved either by levels effect or curves effect in your editing software.
Reduce Saturation levels
Bringing down the saturation levels is another tip to create a vintage effect. The old videos are also absent in bright colors. Don’t go too crazy about reduction as 20%-30% saturation level is more than enough.

How to Create a Stunning Vintage Video?
What you need to get started as both beginner and professional is Wondershare Filmora Video Editor. It is a highly recommended software to create vintage videos. The intuitive user interface and lots of editing functions are helpful for a video editor. It has both primary as well as advanced editing programs to check. It has various advanced color tuning tools to promote the making of original videos. It features tint, temperature, Vignette, 3D Luts, Lights, and so on.
Steps for the vintage effect to videos on Wondershare Filmora Video Editor
Step 1: Upload video & make specific changes
The very step is to add the video by clicking the + icon. We have added the three sample videos from the library of Wondershare Filmora itself. Adjust them in the timeline as per your requirements.
After doing all the essential editing functions, click on the Effects tab given at the upper-left corner. Simply type the word Old in the Search tab.
The Old Video filter will immediately appear in the list of filters. Tap the “+” icon in Old Video filter to add to the timeline. Drag its ends right or left to adjust the duration.
Step 2: Apply White & Black Filters
The second step is to apply the Black & White filters. Go to the Effects tab and explore five Black & White filters available. Each of these filters is quite different and must be applied accordingly. Check the aesthetic of your video clip before any filter application to retro videos.
Step 3: Add the Sun Kissed or Sepia Tone Rise Filters to the video clip
There are various other categories of filters you can apply, such as Retro, Sun Kissed, and Sepia Tone, etc. The features of Filmora also present several subcategories such as Faux Film or Shake.
On the other hand, the subcategory of Sepia Tone features Sun-Kissed & Rise Filters to stimulate sepia-tinted texture and recreate the old visual style. The Sun Kissed filter presents brown and red colors to give that warm image atmosphere.
Step 4: Desaturate Video Clip
Now, you need to desaturate the video clip with Ash & Willow filters. We have typed Ash in the Search bar, and you can see the filter below. These filters are essential to desaturate the video with preset contrast, brightness, or exposure values.
 The BootIt Collection covers multi-booting, partitioning, and disk imaging on traditional PC’s using the standard BIOS and newer PC’s using UEFI. The collection includes BootIt Bare Metal (BIBM) for standard BIOS systems and BootIt UEFI (BIU) for UEFI system.
Then, we have combined the black & white filter with an overlay of Film Reel Horizontal. It will help you sell the effect and make the video look more authentic. However, the only application of Black & White or Ash & Willow filters is not going to make any creative thing in terms of vintage videos. You have to mix overlays with features such as Random Dust or Film Reel Horizontal.
Step 5: Apply Black & White and Old Film Color Correction Presets to the video
You can also access the Advanced color correction Tab of Filmora from the Color button. It also features Preset and Adjusts Tabs to desaturate footage. The Preset presents a variety of options, including Black & White and Old Film. You just need to right-click the particular preset and select the Apply option.

Tips to Make Your Vintage Videos Stand Out
Following the helpful tips would assist you in creating awesome retro videos.
- You can use various vintage apps such as Retro VHS, RTRO Camera, 8mm, Camcorder, VSCO, etc. Or, despite using these limited apps, you can directly use our preferred video editing software called Wondershare Filmora.
- If you use a specific vintage camera, keep it on low highlights and low contrasts. Use color grading, as we have discussed above. They help to provide the ultimate old-school effect.
- Always keep low saturation settings for shooting vintage videos. Take control over Saturation, Hue, and Luminance of video.
- Add overlays and respective filters to recreate a required vintage look. You must add things that dust, scratch, and grain the heck out from the video that you have created.
- Lower the frame rate or FPS to create an excellent vintage look. You can make it to 18 or 14 FPS depending upon the aesthetic requirements.
- Keep an eye on black and white filters you have used. It’s because more of a black and white can ruin the actual vintage experience.
Conclusion
So, this is an ultimate tutorial on the creation of vintage videos. We Hope you have admired the steps and our recommended video editing software. Vintage means grand, and thus you should make it amazing as well. It is the reason we have stated all facts regarding the vintage effect in our post above. Wondering how to add such effect in FCPX? check this article:How to Create a Vignette in Final Cut Pro X?
Surely give a read and thank us later!
Richard Bennett
Richard Bennett is a writer and a lover of all things video.
Follow @Richard Bennett
Richard Bennett
Mar 27, 2024• Proven solutions
“Every accomplishment starts with a decision to try.” – A Vintage Thought

Vintage videos are ultimately the retro videos you have ever imagined. The look is highly inspirational in itself. The vintage effect in photography and videos results in a must-see look that everyone wants to capture all day long. The meaning of vintage is ‘the time when something of quality was produced.’ When something is called retro, it means old, recognized, and essential. Vintage also resembles love apart from videos and photos. All in all, it’s a positive and result-oriented thing to carry on in your videos. And this is what we want to mention in this post relating to the creation of vintage videos.
Here are some vintage-style video ideas for you to have a look at.
- Part 1: What to Consider When Shooting a Vintage Video?
- Part 2: How to Create a Stunning Vintage Video?
- Part 3: Tips to Make Your Vintage Videos Stand Out
 Easy and Safe Partition Software & Hard Disk Manager
What to Consider When Shooting a Vintage Video?
Vintage videos are kind of old school vibes and must be shooting accordingly by keeping in mind the following points. These are a sort of expert tips given by photographers based on their practical experience. First of all, you have to understand that a video can be made vintage, but you can’t change the actual environment of shooting. Some editing always involves there in every project out there. Still, the tips given below will help you a lot in creating a retro look.
Use Vintage Lenses
The very first helpful tip is to use a vintage lens. They allow chromatic aberration by distorting colors around the frame. Furthermore, you can find various kinds of lenses in terms of a vintage effect.
Decrease Contrast
Do the correct color grading by reducing the contrast a little bit. You must not level the retro videos in black or white or like-new videos. You can simply add a contrasting effect and then reduce it to have that vintage look.
Keep it a little soft
If you have ever noticed, the vintage videos are a little soft and look like degraded with time. It’s a result of decreased sharpness in the camera’s menu settings. You can even add a slight blur to the final video or simply use recognized software made for video editing .
Brighten up the black levels
Lots of black points in the video are not ideal for a vintage effect. The suitable approach is to bring up black levels and make it dark gray instead of inky black. This look can be achieved either by levels effect or curves effect in your editing software.
Reduce Saturation levels
Bringing down the saturation levels is another tip to create a vintage effect. The old videos are also absent in bright colors. Don’t go too crazy about reduction as 20%-30% saturation level is more than enough.
How to Create a Stunning Vintage Video?
What you need to get started as both beginner and professional is Wondershare Filmora Video Editor. It is a highly recommended software to create vintage videos. The intuitive user interface and lots of editing functions are helpful for a video editor. It has both primary as well as advanced editing programs to check. It has various advanced color tuning tools to promote the making of original videos. It features tint, temperature, Vignette, 3D Luts, Lights, and so on.
Steps for the vintage effect to videos on Wondershare Filmora Video Editor
Step 1: Upload video & make specific changes
The very step is to add the video by clicking the + icon. We have added the three sample videos from the library of Wondershare Filmora itself. Adjust them in the timeline as per your requirements.
After doing all the essential editing functions, click on the Effects tab given at the upper-left corner. Simply type the word Old in the Search tab.
The Old Video filter will immediately appear in the list of filters. Tap the “+” icon in Old Video filter to add to the timeline. Drag its ends right or left to adjust the duration.
Step 2: Apply White & Black Filters
The second step is to apply the Black & White filters. Go to the Effects tab and explore five Black & White filters available. Each of these filters is quite different and must be applied accordingly. Check the aesthetic of your video clip before any filter application to retro videos.
Step 3: Add the Sun Kissed or Sepia Tone Rise Filters to the video clip
There are various other categories of filters you can apply, such as Retro, Sun Kissed, and Sepia Tone, etc. The features of Filmora also present several subcategories such as Faux Film or Shake.
On the other hand, the subcategory of Sepia Tone features Sun-Kissed & Rise Filters to stimulate sepia-tinted texture and recreate the old visual style. The Sun Kissed filter presents brown and red colors to give that warm image atmosphere.
Step 4: Desaturate Video Clip
 Forex Robotron Basic Package
Now, you need to desaturate the video clip with Ash & Willow filters. We have typed Ash in the Search bar, and you can see the filter below. These filters are essential to desaturate the video with preset contrast, brightness, or exposure values.
Then, we have combined the black & white filter with an overlay of Film Reel Horizontal. It will help you sell the effect and make the video look more authentic. However, the only application of Black & White or Ash & Willow filters is not going to make any creative thing in terms of vintage videos. You have to mix overlays with features such as Random Dust or Film Reel Horizontal.
Step 5: Apply Black & White and Old Film Color Correction Presets to the video
You can also access the Advanced color correction Tab of Filmora from the Color button. It also features Preset and Adjusts Tabs to desaturate footage. The Preset presents a variety of options, including Black & White and Old Film. You just need to right-click the particular preset and select the Apply option.
Tips to Make Your Vintage Videos Stand Out
Following the helpful tips would assist you in creating awesome retro videos.
- You can use various vintage apps such as Retro VHS, RTRO Camera, 8mm, Camcorder, VSCO, etc. Or, despite using these limited apps, you can directly use our preferred video editing software called Wondershare Filmora.
- If you use a specific vintage camera, keep it on low highlights and low contrasts. Use color grading, as we have discussed above. They help to provide the ultimate old-school effect.
- Always keep low saturation settings for shooting vintage videos. Take control over Saturation, Hue, and Luminance of video.
- Add overlays and respective filters to recreate a required vintage look. You must add things that dust, scratch, and grain the heck out from the video that you have created.
- Lower the frame rate or FPS to create an excellent vintage look. You can make it to 18 or 14 FPS depending upon the aesthetic requirements.
- Keep an eye on black and white filters you have used. It’s because more of a black and white can ruin the actual vintage experience.
Conclusion
So, this is an ultimate tutorial on the creation of vintage videos. We Hope you have admired the steps and our recommended video editing software. Vintage means grand, and thus you should make it amazing as well. It is the reason we have stated all facts regarding the vintage effect in our post above. Wondering how to add such effect in FCPX? check this article:How to Create a Vignette in Final Cut Pro X?
Surely give a read and thank us later!
Richard Bennett
Richard Bennett is a writer and a lover of all things video.
Follow @Richard Bennett
The Breakdown of YouTube’s Shorts Initiative
YouTube offers content creators a platform for creating a lucrative career. Of the major developments made in the recent past is the introduction of Shorts. These short vertical videos have grown in popularity as more people view videos on their phones. With this development, the YouTube Shorts fund was launched to reward creators for their efforts. The fund allows creators to monetize their Shorts quickly, supporting and incentivizing them to create high-quality Shorts content. In this article, we will explore the YouTube Shorts Fund 2023, including YouTube shorts fund eligibility.
YouTube Shorts Monetization A cross-platform for taking your overexposed footage to cinema-quality Shorts video!
Free Download Free Download Learn More

Part 1. YouTube Shorts Fund: Introduction and Benefits
YouTube launched YouTube Shorts Funds in 2021 to financially support creators who produce engaging and popular Shorts content. The monetization scheme would distribute $100 million to high-performing creators on the platform. The creators would receive high engagement and views from their Shorts for funding.

The main objective of the YouTube Shorts fund is to encourage creativity, diversity, and innovation in Shorts content creation. The fund operated between 2021 and 2022. It lets creators earn $100 - $10,000 a month for their content.

Participating in YouTube Shorts Funds offer several benefits to the creators:
- Additional Exposure: YouTube Shorts are predominately featured on the homepage, allowing creators to reach more people.
- Recognition: YouTube recognizes top Shorts creators through the Shorts Funding program, encouraging them to create more quality content.
- Potential Earnings: Creators can monetize their Shorts content in several ways including adding and other unique features.
YouTube incorporated monetization of Shorts in its YouTube Partner Program (YPP). Therefore, YouTube merged the Shorts Fund with the YPP in February 2023. This led to YouTube Shorts Fund 2023 which now offers creators more opportunities to make money quickly on YouTube.
Part 2. Making Money with YouTube Shorts: Eligibility and Earnings
The new YouTube Shorts monetization policy means that content creators on YouTube with access to the YPP can also earn from Shorts. The revenue-sharing model has now taken the place of the YouTube Shorts Fund, which only rewarded creators using YouTube’s money. However, creators don’t have to be members of the YPP to start receiving YouTube Shorts funding. They only need to meet certain requirements, make unique content, and adhere to Community Guidelines.
- YouTube Shorts Fund Eligibility
- Additional Steps of Actions to Activate YouTube Shorts Funding
- What the YPP Shorts Fund Entails
- How Much Can You Make with Short

YouTube Shorts Fund Eligibility
As of 2023, YouTube offers Shorts Funding as a monetization option. Creators can also choose to monetize with YPP combined with Shorts Fundings.
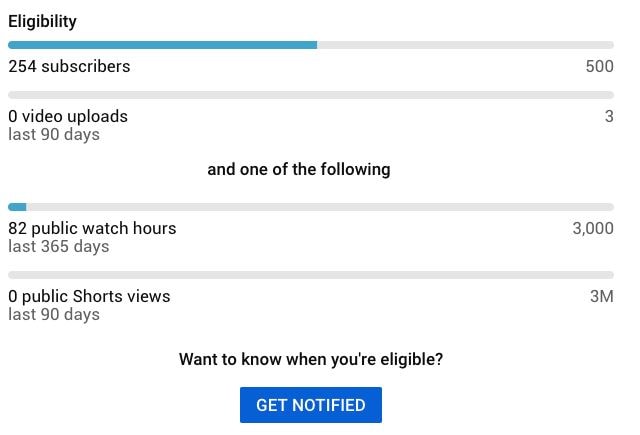
The eligibility requirements for Shorts funding include:
- At least 1,000 subscribers
- At least 10 million public Shorts views in the last 90 days
To become a member of the YPP and start accessing Shorts funding this way, the minimum requirements are as follows:
- At least 500 subscribers (You previously needed 1,000)
- At least 3,000 public watch hours over the last 13 months (You previously needed 4,000)
Additional Steps of Actions to Activate YouTube Shorts Funding
In addition to the basic eligibility requirements, creators are also required to take additional measures to comply with YouTube’s requirements. Additional steps include:
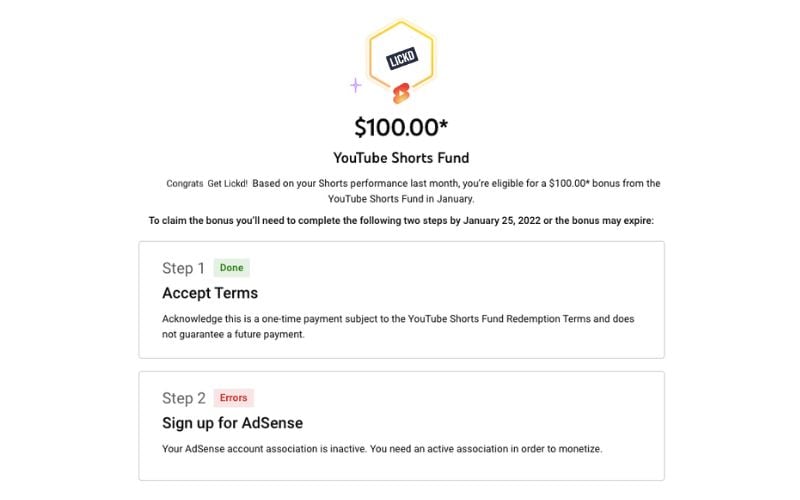
- Ensuring AdSense Account is active and in good standing: Since ad revenue will be paid through AdSense, you need to make sure your account is in good standing.
- Review and Accept the Terms of Shorts Monetization Module: In the YouTube Studio, head over to the Shorts Fund section and click on the Terms and Conditions link.
- Enable Monetization for Individual Shorts: Edit the monetization settings for each Short to start generating ad revenue.
- Comply with YouTube Policies and Guidelines: Visit the YouTube Creator Academy to learn more about the platform’s policies and guidelines.
What the YPP Shorts Fund Entails
The YPP Shorts Fund program includes the following features:
- Watch Page Monetization – Creators earn ad revenue from long-form content, YouTube Premium content, and live streams
- Shorts Monetization Module – Creators earn money from ads that play between YouTube Shorts.
- Commerce Product Addendum – Additional monetization features, including Super Chats. Channel Memberships, Super Thanks, and Super Stickers.
How Much Can You Make with Short s
The amount of money you can make on Shorts often varies. It can be hard to make decent money on Shorts sometimes, and other times it brings in a nice chunk of revenue. Unfortunately, the earnings are not as spectacular as the long YouTube videos. Most creators agree that the revenue per thousand views (RPM) for shorts is around $0.05 - $0.07. This would translate to about $50 - $70 for a million Shorts views. Although the ad revenue is relatively lower, you can generate more revenue with the shopping features. This will depend on how wee you keep your audience active and engaged.
Part 3. How to Use YouTube Shorts Funding: Application and Activation
The process of applying for and activating YouTube Short Funding is simple. You need to accept the Shorts Monetization Module in your terms and conditions. After activating, monetization starts immediately.

Head over to the YouTube Studio. Sign in to your account to accept the terms. Be sure to use a web browser because the YouTube app will not allow you to make these changes. Accept the terms and follow these steps to turn on the ads:
- Setp 1: Click the Content button at the bottom of the menu in the YouTube Studio
- Setp 2: Pick the video you want to monetize, and click Edit
- Setp 3: Select the Earn tab pick on, and choose the ads you want to turn on.
- Setp 4: Save your settings and the ads will be active.
Part 4. Editing YouTube Shorts for More Revenue with Wondershare Filmora
The best way to earn from the YouTube Shorts Fund is to create quality content. With good video editing software, you can achieve this and build a community of subscribers. Wondershare Filmora is a video editing software that is effective in creating quality Shorts videos. It supports various video resolutions, including vertical videos. It also has some fascinating features that make every creation unique and exciting. Take your overexposed footage to cinema-quality Shorts video that will keep your audience engaged.
Free Download For Win 7 or later(64-bit)
Free Download For macOS 10.14 or later
Filmora can help create visually appealing and engaging videos, ultimately increasing the chances of monetization on YouTube. The following features make editing videos on Filmora quick and easy.
1. Auto Reframe
You may have recorded horizontal videos and want to upload them as Shorts. The Auto Reframe feature allows you to automatically resize the video in seconds. You only need to choose the clip you want to resize and reframe it. No editing skills are required to do this.
2. Add Text to Video
Texts tell the audience what is happening in the video. It is also a great way to highlight major events in YouTube Shorts. The Add Text to Video feature on Filmora makes it easy to add text or captions to your videos.
3. Auto Synchronization
When editing Shorts, you will likely add many footage in a short video. It is common for the audio to end up being where it is not supposed to. The Auto Synchronization feature is the ultimate audio sync. It effortlessly matches your audio with the video, making sure viewers see what they hear
4. Mask & Blend
Creativity is a major component of YouTube Shorts content. The Filmora Masking and Blending mode helps you make creative video clips. It comes with a pen tool for creating free-form shapes on the go. Make your videos more impressive to your audience.
5. Auto Beat Sync
With YouTube Shorts, you need to entertain your audience in under a minute. A combination of visual and audio elements makes the video more entertaining. The Auto Beat Sync feature matches the footage with the music automatically. Be sure every beat corresponds to the scene.
 vMix Basic HD - Software based live production. vMix Basic HD includes 4 inputs, 3 cameras, streaming, recording, playlist.
Conclusion
The YouTube Shorts Fund offers an exceptional for creators to make additional income on the platform. Although the original Funds program has been updated with the latest monetization policy, creators can still generate nice revenue amount. As a creator, you need to publish quality and highly engaging content. With Wondershare Filmora, you can create content that will generate more revenue on the Shorts platform. The video editing software offers fantastic features that make video editing quick and fun.
Free Download Free Download Learn More
 Project Manager - Asset Browser for 3Ds Max
Part 1. YouTube Shorts Fund: Introduction and Benefits
YouTube launched YouTube Shorts Funds in 2021 to financially support creators who produce engaging and popular Shorts content. The monetization scheme would distribute $100 million to high-performing creators on the platform. The creators would receive high engagement and views from their Shorts for funding.
 Jet Profiler for MySQL, Enterprise Version: Jet Profiler for MySQL is real-time query performance and diagnostics tool for the MySQL database server. Its detailed query information, graphical interface and ease of use makes this a great tool for finding performance bottlenecks in your MySQL databases.
The main objective of the YouTube Shorts fund is to encourage creativity, diversity, and innovation in Shorts content creation. The fund operated between 2021 and 2022. It lets creators earn $100 - $10,000 a month for their content.

Participating in YouTube Shorts Funds offer several benefits to the creators:
- Additional Exposure: YouTube Shorts are predominately featured on the homepage, allowing creators to reach more people.
- Recognition: YouTube recognizes top Shorts creators through the Shorts Funding program, encouraging them to create more quality content.
- Potential Earnings: Creators can monetize their Shorts content in several ways including adding and other unique features.
YouTube incorporated monetization of Shorts in its YouTube Partner Program (YPP). Therefore, YouTube merged the Shorts Fund with the YPP in February 2023. This led to YouTube Shorts Fund 2023 which now offers creators more opportunities to make money quickly on YouTube.
 EmEditor Professional (Lifetime License, non-store app)
Part 2. Making Money with YouTube Shorts: Eligibility and Earnings
The new YouTube Shorts monetization policy means that content creators on YouTube with access to the YPP can also earn from Shorts. The revenue-sharing model has now taken the place of the YouTube Shorts Fund, which only rewarded creators using YouTube’s money. However, creators don’t have to be members of the YPP to start receiving YouTube Shorts funding. They only need to meet certain requirements, make unique content, and adhere to Community Guidelines.
- YouTube Shorts Fund Eligibility
- Additional Steps of Actions to Activate YouTube Shorts Funding
- What the YPP Shorts Fund Entails
- How Much Can You Make with Short
YouTube Shorts Fund Eligibility
As of 2023, YouTube offers Shorts Funding as a monetization option. Creators can also choose to monetize with YPP combined with Shorts Fundings.
The eligibility requirements for Shorts funding include:
- At least 1,000 subscribers
- At least 10 million public Shorts views in the last 90 days
To become a member of the YPP and start accessing Shorts funding this way, the minimum requirements are as follows:
- At least 500 subscribers (You previously needed 1,000)
- At least 3,000 public watch hours over the last 13 months (You previously needed 4,000)
Additional Steps of Actions to Activate YouTube Shorts Funding
In addition to the basic eligibility requirements, creators are also required to take additional measures to comply with YouTube’s requirements. Additional steps include:
- Ensuring AdSense Account is active and in good standing: Since ad revenue will be paid through AdSense, you need to make sure your account is in good standing.
- Review and Accept the Terms of Shorts Monetization Module: In the YouTube Studio, head over to the Shorts Fund section and click on the Terms and Conditions link.
- Enable Monetization for Individual Shorts: Edit the monetization settings for each Short to start generating ad revenue.
- Comply with YouTube Policies and Guidelines: Visit the YouTube Creator Academy to learn more about the platform’s policies and guidelines.
What the YPP Shorts Fund Entails
The YPP Shorts Fund program includes the following features:
- Watch Page Monetization – Creators earn ad revenue from long-form content, YouTube Premium content, and live streams
- Shorts Monetization Module – Creators earn money from ads that play between YouTube Shorts.
- Commerce Product Addendum – Additional monetization features, including Super Chats. Channel Memberships, Super Thanks, and Super Stickers.
How Much Can You Make with Short s
The amount of money you can make on Shorts often varies. It can be hard to make decent money on Shorts sometimes, and other times it brings in a nice chunk of revenue. Unfortunately, the earnings are not as spectacular as the long YouTube videos. Most creators agree that the revenue per thousand views (RPM) for shorts is around $0.05 - $0.07. This would translate to about $50 - $70 for a million Shorts views. Although the ad revenue is relatively lower, you can generate more revenue with the shopping features. This will depend on how wee you keep your audience active and engaged.
Part 3. How to Use YouTube Shorts Funding: Application and Activation
The process of applying for and activating YouTube Short Funding is simple. You need to accept the Shorts Monetization Module in your terms and conditions. After activating, monetization starts immediately.
Head over to the YouTube Studio. Sign in to your account to accept the terms. Be sure to use a web browser because the YouTube app will not allow you to make these changes. Accept the terms and follow these steps to turn on the ads:
- Setp 1: Click the Content button at the bottom of the menu in the YouTube Studio
- Setp 2: Pick the video you want to monetize, and click Edit
- Setp 3: Select the Earn tab pick on, and choose the ads you want to turn on.
- Setp 4: Save your settings and the ads will be active.
Part 4. Editing YouTube Shorts for More Revenue with Wondershare Filmora
The best way to earn from the YouTube Shorts Fund is to create quality content. With good video editing software, you can achieve this and build a community of subscribers. Wondershare Filmora is a video editing software that is effective in creating quality Shorts videos. It supports various video resolutions, including vertical videos. It also has some fascinating features that make every creation unique and exciting. Take your overexposed footage to cinema-quality Shorts video that will keep your audience engaged.
Free Download For Win 7 or later(64-bit)
Free Download For macOS 10.14 or later
Filmora can help create visually appealing and engaging videos, ultimately increasing the chances of monetization on YouTube. The following features make editing videos on Filmora quick and easy.
 vMix 4K - Software based live production. vMix 4K includes everything in vMix HD plus 4K support, PTZ control, External/Fullscreen output, 4 Virtual Outputs, 1 Replay, 4 vMix Call, and 2 Recorders.
1. Auto Reframe
You may have recorded horizontal videos and want to upload them as Shorts. The Auto Reframe feature allows you to automatically resize the video in seconds. You only need to choose the clip you want to resize and reframe it. No editing skills are required to do this.
2. Add Text to Video
Texts tell the audience what is happening in the video. It is also a great way to highlight major events in YouTube Shorts. The Add Text to Video feature on Filmora makes it easy to add text or captions to your videos.
3. Auto Synchronization
When editing Shorts, you will likely add many footage in a short video. It is common for the audio to end up being where it is not supposed to. The Auto Synchronization feature is the ultimate audio sync. It effortlessly matches your audio with the video, making sure viewers see what they hear
 PDF application, powered by AI-based OCR, for unified workflows with both digital and scanned documents.
 4. Mask & Blend
Creativity is a major component of YouTube Shorts content. The Filmora Masking and Blending mode helps you make creative video clips. It comes with a pen tool for creating free-form shapes on the go. Make your videos more impressive to your audience.
5. Auto Beat Sync
With YouTube Shorts, you need to entertain your audience in under a minute. A combination of visual and audio elements makes the video more entertaining. The Auto Beat Sync feature matches the footage with the music automatically. Be sure every beat corresponds to the scene.
 WinUtilities Pro
Conclusion
The YouTube Shorts Fund offers an exceptional for creators to make additional income on the platform. Although the original Funds program has been updated with the latest monetization policy, creators can still generate nice revenue amount. As a creator, you need to publish quality and highly engaging content. With Wondershare Filmora, you can create content that will generate more revenue on the Shorts platform. The video editing software offers fantastic features that make video editing quick and fun.
- Title: 2024 Approved Creating Classical Cinematography A Modern Tutorial
- Author: Steven
- Created at : 2024-08-03 03:14:58
- Updated at : 2024-08-04 03:14:58
- Link: https://youtube-clips.techidaily.com/2024-approved-creating-classical-cinematography-a-modern-tutorial/
- License: This work is licensed under CC BY-NC-SA 4.0.