
:max_bytes(150000):strip_icc()/GettyImages-640608114-590235945f9b5810dcabd4b5.jpg)
"2024 Approved Crafting Engaging YouTube Video Layouts"
Crafting Engaging YouTube Video Layouts
How to structure YouTube videos

Richard Bennett
Mar 27, 2024• Proven solutions
Creating a YouTube channel and uploading video content is only one part of the key to your success. With so much competition on the platform, it’s crucial that you stand out from the crowd with efficient, professional videos that are a pleasure to watch.
Without some planning and structure in mind before you begin filming, it’s all too easy to get a bit lost and start to ramble or fumble your words. Video’s filled with ‘umm’ and ‘err’ are neither pleasant to watch nor engaging.
If you’re serious about making a great YouTube channel and developing a loyal fan base, you’re going to need a workable structure for every video to help you stay on track. Here’s what you need to know:
Quick Jump Menu
- Why is structuring your video important?
- How should you structure YouTube Video Content?
- Ready to go out and make amazing videos?
Why is structuring your video important?
The structure of your video can make all the difference between a successful YouTube channel and a big waste of time. Your objective is to get people watching more and watching all the way to the end. A great structure can:
- Build interest and engagement: By keeping something in reserve and naturally building interest as you go along, people will be compelled to watch longer and interact more with your channel.
- Helps you rank higher: Longer and higher numbers of views will demonstrate your position as an authority well. The YouTube algorithm uses these metrics as part of their ranking factor, so the more and longer views you get, the higher you’ll rank in search.
- Builds consistency and familiarity: If all your videos follow a typical structure, your fans will come to be familiar with your format. They’ll know what to expect from your content and will watch more regularly as a result.
So, now you understand why structure is so important to your channel, let’s take a look at ways in which you can create an amazing structure for every video you produce.
How should you structure YouTube video content?
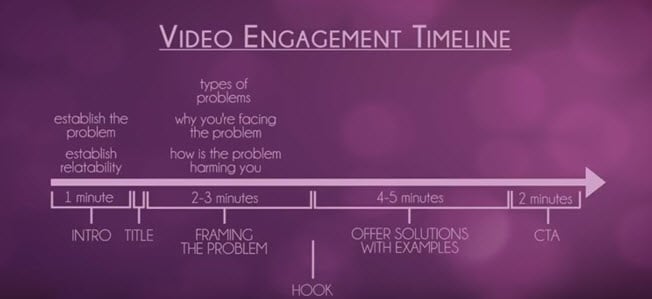
There are some key elements of a YouTube video’s structure which can make it more natural, more engaging and more fun to watch. When you’re planning your structure, you should follow a logical timeline to take the viewer from start to finish easily, and to ensure you get the actions you want at the end.
Intro
People love to be told what’s about to happen, and an intro can be a crucial step in ensuring they are going to continue watching your content. By explaining clearly what they are about to see, why it’s important to them and what problems you’re aiming to solve, you’ll keep them hooked and prevent them from browsing away to the next search result.
An introduction doesn’t need to be long or particularly involved. Remember, you don’t want to give away all your information here, as what you want is to encourage them to watch until the end. Something like “I’m going to show you … which will help you to …” is fine.
Your idea and purpose need to be conveyed fast and effectively if you’re keen to get their interest. Most viewers will decide within the first three to five seconds of a video if they want to invest their time in watching, so it’s crucial you capture their interest and engage them fast to stop them drifting away.
Main content
Once you’ve introduced your video, it’s time to start working through your content. This should be done by:
- Framing the problem
What are the types of problems that your viewers will have encountered which your video can solve? How is the problem affecting you and your viewers? Take around two to three minutes to describe the problems that you hope your video will solve, and work on being empathetic so people can relate to you and the issue you’re discussing.
- Offer solutions with examples
Move on to your solution to the problem. How did you find this solution? Is it easy to implement? Take around four to five minutes to address your solution and give examples of how it works in practice.
Now you’ve addressed the issue that your video content will solve, you’re almost ready to ask them to take the next step. Almost. There’s one more key element in your structure that you need to remember to include.
Hook
The hook can be placed anywhere in your content, although it’s most successful when placed either in the introduction or while you are framing the problem. The hook is a tidbit that aims to encourage a full viewing of your video, so don’t give away your solutions but do give them a reason to carry on watching.
If there’s a particular point where you think they might become bored or distracted, this is a great time to insert your hook. Come up with a powerful hook, for instance ‘with my solution I managed to go from ten views to two hundred in an hour’ or ‘when you hear this solution you’ll understand how I tripled my profits overnight’. Give them a reason to want to stay to the end.
Outro
Your outro shouldn’t just be about signing off in your unique way with some lovely music and visuals. This is the point at which you can ask something back from your audience, whatever that may be. We call this a ‘call to action’, and it could eb something as simple as subscribing through to something more involved like visiting your website.
Think about what you want from your audience; what should they do next? Remember to ask via a strong call to action, otherwise you’ve simply given them some free advice with very little in the way of a return for you.
Script or no script?
Many YouTubers shy away from using any sort of script, feeling that this will make them less relatable and natural. Choosing whether or not to script is entirely up to you; some people feel more comfortable with a script to hand, whereas others prefer to just wing it as they go.
If you don’t feel a script would work for you, do consider having a very rough outline of your structure and the points you want to make readily available while filming. It will help you regain control if you do happen to lose your place and will ensure you get all the information across that you’d planned to.
If you do think a full script would work better for you, make sure you are able to come across as naturally as possible while reading it. Write your script the same way you speak and run through a few times so you’re not squinting at words while you’re on camera. If you regularly wander off script, this could be a sign that a freer flowing style is more your thing.
Read More to Get : How to Loop a YouTube Video >>
Ready to go out and make amazing videos?
Having a structure to your videos might seem a little unnatural at first, but there’s plenty of evidence to show that people who take the time to plan their content get far better results than those who just improvise. If you’re unsure of the best structure for your content, watch videos made by others in your niche to see how they organize theirs.
That’s not to say you have to copy the leaders to be a success; indeed, you’ll be far more successful on YouTube if you continue to be unique. But there’s always room to learn from the best and to take inspiration from those who’ve been getting the very best results.
Richard Bennett
Richard Bennett is a writer and a lover of all things video.
Follow @Richard Bennett
Richard Bennett
Mar 27, 2024• Proven solutions
Creating a YouTube channel and uploading video content is only one part of the key to your success. With so much competition on the platform, it’s crucial that you stand out from the crowd with efficient, professional videos that are a pleasure to watch.
Without some planning and structure in mind before you begin filming, it’s all too easy to get a bit lost and start to ramble or fumble your words. Video’s filled with ‘umm’ and ‘err’ are neither pleasant to watch nor engaging.
If you’re serious about making a great YouTube channel and developing a loyal fan base, you’re going to need a workable structure for every video to help you stay on track. Here’s what you need to know:
Quick Jump Menu
- Why is structuring your video important?
- How should you structure YouTube Video Content?
- Ready to go out and make amazing videos?
Why is structuring your video important?
The structure of your video can make all the difference between a successful YouTube channel and a big waste of time. Your objective is to get people watching more and watching all the way to the end. A great structure can:
- Build interest and engagement: By keeping something in reserve and naturally building interest as you go along, people will be compelled to watch longer and interact more with your channel.
- Helps you rank higher: Longer and higher numbers of views will demonstrate your position as an authority well. The YouTube algorithm uses these metrics as part of their ranking factor, so the more and longer views you get, the higher you’ll rank in search.
- Builds consistency and familiarity: If all your videos follow a typical structure, your fans will come to be familiar with your format. They’ll know what to expect from your content and will watch more regularly as a result.
So, now you understand why structure is so important to your channel, let’s take a look at ways in which you can create an amazing structure for every video you produce.
How should you structure YouTube video content?
There are some key elements of a YouTube video’s structure which can make it more natural, more engaging and more fun to watch. When you’re planning your structure, you should follow a logical timeline to take the viewer from start to finish easily, and to ensure you get the actions you want at the end.
Intro
People love to be told what’s about to happen, and an intro can be a crucial step in ensuring they are going to continue watching your content. By explaining clearly what they are about to see, why it’s important to them and what problems you’re aiming to solve, you’ll keep them hooked and prevent them from browsing away to the next search result.
An introduction doesn’t need to be long or particularly involved. Remember, you don’t want to give away all your information here, as what you want is to encourage them to watch until the end. Something like “I’m going to show you … which will help you to …” is fine.
Your idea and purpose need to be conveyed fast and effectively if you’re keen to get their interest. Most viewers will decide within the first three to five seconds of a video if they want to invest their time in watching, so it’s crucial you capture their interest and engage them fast to stop them drifting away.
Main content
Once you’ve introduced your video, it’s time to start working through your content. This should be done by:
- Framing the problem
What are the types of problems that your viewers will have encountered which your video can solve? How is the problem affecting you and your viewers? Take around two to three minutes to describe the problems that you hope your video will solve, and work on being empathetic so people can relate to you and the issue you’re discussing.
- Offer solutions with examples
Move on to your solution to the problem. How did you find this solution? Is it easy to implement? Take around four to five minutes to address your solution and give examples of how it works in practice.
Now you’ve addressed the issue that your video content will solve, you’re almost ready to ask them to take the next step. Almost. There’s one more key element in your structure that you need to remember to include.
Hook
The hook can be placed anywhere in your content, although it’s most successful when placed either in the introduction or while you are framing the problem. The hook is a tidbit that aims to encourage a full viewing of your video, so don’t give away your solutions but do give them a reason to carry on watching.
If there’s a particular point where you think they might become bored or distracted, this is a great time to insert your hook. Come up with a powerful hook, for instance ‘with my solution I managed to go from ten views to two hundred in an hour’ or ‘when you hear this solution you’ll understand how I tripled my profits overnight’. Give them a reason to want to stay to the end.
Outro
Your outro shouldn’t just be about signing off in your unique way with some lovely music and visuals. This is the point at which you can ask something back from your audience, whatever that may be. We call this a ‘call to action’, and it could eb something as simple as subscribing through to something more involved like visiting your website.
Think about what you want from your audience; what should they do next? Remember to ask via a strong call to action, otherwise you’ve simply given them some free advice with very little in the way of a return for you.
Script or no script?
Many YouTubers shy away from using any sort of script, feeling that this will make them less relatable and natural. Choosing whether or not to script is entirely up to you; some people feel more comfortable with a script to hand, whereas others prefer to just wing it as they go.
If you don’t feel a script would work for you, do consider having a very rough outline of your structure and the points you want to make readily available while filming. It will help you regain control if you do happen to lose your place and will ensure you get all the information across that you’d planned to.
If you do think a full script would work better for you, make sure you are able to come across as naturally as possible while reading it. Write your script the same way you speak and run through a few times so you’re not squinting at words while you’re on camera. If you regularly wander off script, this could be a sign that a freer flowing style is more your thing.
Read More to Get : How to Loop a YouTube Video >>
Ready to go out and make amazing videos?
Having a structure to your videos might seem a little unnatural at first, but there’s plenty of evidence to show that people who take the time to plan their content get far better results than those who just improvise. If you’re unsure of the best structure for your content, watch videos made by others in your niche to see how they organize theirs.
That’s not to say you have to copy the leaders to be a success; indeed, you’ll be far more successful on YouTube if you continue to be unique. But there’s always room to learn from the best and to take inspiration from those who’ve been getting the very best results.
Richard Bennett
Richard Bennett is a writer and a lover of all things video.
Follow @Richard Bennett
Mastering YouTube Video Transformation Into Animated GIFs (No Save)
How to Convert YouTube Videos to GIFs

Shanoon Cox
Mar 27, 2024• Proven solutions
A GIF adds an extra element to any conversation and makes the reader feel connected to the post. Using GIF can turn useful if done rightly. It narrates a story in a single animated image for social media conversation. In this article, we will brief you about how to convert YouTube to gif, various GIF converters, their uses, and the pros and cons of each converter.
Let’s get started!
How to Convert a YouTube Video into GIFs?
1. YouTube to GIF Directly
Here is a quick way to convert the YouTube video to GIFs without typing a YouTube to GIF website.
Gif.com is a free and easy-to-use video editor available with multiple effects. This converter was created keeping in mind how people spend hours and money on paid platforms.
Follow the below steps to convert a YouTube video into gifs.
- In the YouTube video page, add gif before youtube.com. For example, I want to convert the YouTube video https://www.youtube.com/watch?v=40fuGLmwHwk to GIFs, here is how it looks like after adding gif at the beginning: https://www.gifyoutube.com/watch?v=40fuGLmwHwk . Press the enter button on your keyboard and you will enter the gifs.com directly.

- In gifs.com, you can play and pause the YouTube video and drag the bar to select a desired moment for gif. Press the “Create Gif” button on the top right side to convert the specific part of the YouTube video to gif.
- You will then be directed to the result page to see your GIF created using the YouTube video, and you can change the GIF title and the tag.
- Lastly, you need to copy the link and share it!
Pros of converting YouTube to GIFs with Gifs.com:
- The interface is easy to use and it provides lots of tools to adjust.
- Simple functionality.
Cons:
- The watermark on your created GIF can be removed only after purchasing the premium version.
- GIFs can be downloaded only by registered users.
2. FreeGifMaker.me
FreeGifMaker is one simple online tool that allows the creation of animated Gifs for free. A minimum of two pictures has to be uploaded out of ten. It takes few seconds and is super easy to make a GIF from a YouTube video. You can use FreeGifMaker.me in some easy steps.
- Open the website http://freegifmaker.me/youtube-to-gif/ on your desktop.
- Go to YouTube and copy the video URL you want to create a GIF of and paste it on the website mentioned above.
- Then click “Load YouTube Video” below the URL and wait for a few seconds while the tool checks the video source.
- Once the YouTube video is loaded, enter the gif duration, start time, and click on the “Make a GIF button.” It will redirect you to the result page.
- Pros:
- Conversion size is unlimited**.**
- There is no usage of ads.
- Easy to make Gifs.
- Cons:
- The upload speed is slow.
- The converter gives limited options for editing.
3. Wondershare Online UniConverter
Online UniConverter converts video into a high-quality animated GIF and allows editing. It is a simple converter with unique features.
If you want to convert your YouTube video into a GIF, follow the steps.
- You need to upload your video through the “Choose Files” option. You can also copy the link from YouTube.
- Wait for some time once you upload the file; you can then set your start time, end time, frame rate according to your needs.
- Lastly, click on “Create GIF” and download your GIF. You can also save it through the dropdown option available besides “Download.”
- Pros:
- Easy to handle.
- A wide range of customization tools is available.
- Zero ads.
- Cons:
- Upload speed is slow.
- Conversion size is limited.
4. GifRun
It is a video maker that started in 2013, and GifRun converts videos from YouTube, Facebook, and other sources to high-quality GIFs. You can create Gifs free of cost from GifRun.
Here is how you can use Gifrun.
- Open the website and paste the URL you want to convert into Gif. Later, press “Get Video” option below the URL box.
- In this step, you can adjust the duration, start time, add text, and also pause and preview the video. Once you’re done altering the video, click “Create GIF.”
- Lastly, click on the “Download” button beside the add text button, or share the link directly.
- Pros:
- Fast conversion and download.
- There is no upload limit.
- The video preview feature is available.
- Cons:
- UI is ad-infested.
- Supports YouTube videos only.
5. Makeagif
This GIF converter creates high-quality GIFs in no time. You need to paste the URL in Makeagif and nothing much. It can make GIFs from Instagram, Facebook, Twitter, and other platforms easily.
The only issue is that it supports one type of conversion with a maximum limit of 25MB.
Here is how you can make your favorite GIF in few steps.
- Open makeagif.com and paste the YouTube URL in the box available.
- Once you paste the URL, the website will automatically take you to the edit page to edit GIF length, start time, speed, and add caption and stickers. The next step is to select the category to which the video belongs available on the left side of the screen.
- After editing, click on “Continue to publishing” then “Create GIF” at the lower right corner of the screen. Voila! Your GIF is ready to use.
- Pros:
- The UI is user-friendly.
- Ads are minimal
- Various GIF conversions are supported.
- Cons:
- The conversion size is small.
- Batch conversions are not available.
6. ImgFlip
It is a creative GIF website supporting various videos from other websites such as Vimeo and YouTube. ImgFlip has innovative customization tools for cropping, reshaping, adding text and, a lot more, but you just need to be aware of the ads.
Want to know how to create GIF? Go through these simple steps.
- You can make GIFs both from Video and Images. To make GIF from a video, paste the YouTube URL in the box at the top, upload the tape from your device’s file.
- After pasting the URL, you will be given lots of customization options. Choose the effect of your choice for your GIF.
- Lastly, click on “Generate GIF” available on the right side of the screen. You can now share the GIF via your device or download it.
- Pros:
- Plenty of customization options.
- Fast conversion.
- Easy to upload and use.
- Cons:
- Ads pop up frequently.
- Offline conversion is unavailable.
7. GIPHY
It is a free GIF converter that helps you download free YouTube GIFs. You can also make GIFs from your photos, videos available on your device along with video URLs and images. The only problem is, to use Giphy you first have to log in to the app.
Follow the below steps to create a GIF from YouTube videos with Giphy:
- Open Giphy on your device and click on “Create” on the top right-side of your screen.
- Paste the URL in the space given below. A pop-up will tell you to log in. Log in to the website to continue.
- The video you choose should be less than 15 seconds and under 100MB. You will be given editing options from which you can select the start time and duration of your GIF along with Captions and Tags.
- In the end, press the “Create GIF” button to make the GIF. When it’s done, you will be redirected to the GIF page. You can then share your GIF on any social media site.
- Pros:
- Ads are absent
- Uploading is fast
- Wide range of free GIFs available
- Cons:
- Not perfect for green hands
8. Imgur
It is one of the best apps that offers tons of images, memes, and GIFs. You can make GIFs of less than 60 seconds with high quality, which you can share anywhere.
Here are three easy steps to make GIFs
- Visit the page “imgur.com/vidgif” and paste your YouTube URL there.
- Set a start time by clicking or dragging on the timeline. The total runtime is also adjustable, with 60 seconds as the maximum time for GIFs.
- Lastly, press on “Create GIF” to see the magic. The GIF is converted from the YouTube video.
- Pros:
- The users can share the post of their choice
- Users can save posts.
- Great collection of short GIFs and videos.
- Cons:
- During loading, the screen flashes.
9 VEED.IO
Veed is a simple YouTube video converter that makes your work super easy. It converts YouTube videos into GIFs with various editing options like crop, trim, text ads, and many more.
Check out how to use VEED in 3 steps.
- Start by pasting the URL of your YouTube video into VEED, Your video will be ready to convert into GIF.
- Now you are all set to edit your video. You have the option to crop and trim the video. You can also include different font styles, colors, and sizes of your choice.
- Lastly, download the GIF you made in VEED.
- Pros:
- Downloading the software is not mandatory.
- UI is simple and easy to navigate.
- The subtitle option is present.
- Cons:
- It takes a lot of time to upload video.
- Many basic tools.
10. Kapwing
Kapwing is a helpful video converter that can easily turn any video into GIFs with a click. It can also convert different files such as 3GP, GIF, WEBM.
To create beautiful GIFs with this video editor, follow these easy steps.
- Open Kapwing video editor and upload your video from YouTube.
- Choose the “Export dropdown” option and choose the format you wish to convert.
You can also preview the GIF and customize it as per your choice.
- In the final step, export the video by clicking the “Export Video” button. Save and download the newly created GIF and share it anywhere with your friends.
- Pros:
- Great editing tools.
- Easy to use.
- Cons:
- Available only on the website.
- Too many tools for the same purpose.
Final Thoughts
With the increased use of GIFs on social media, you can now easily convert your favorite YouTube videos into GIFs on your own. All you have to do is simply choose the tools mentioned above and share it with your friends.
Shanoon Cox
Shanoon Cox is a writer and a lover of all things video.
Follow @Shanoon Cox
Shanoon Cox
Mar 27, 2024• Proven solutions
A GIF adds an extra element to any conversation and makes the reader feel connected to the post. Using GIF can turn useful if done rightly. It narrates a story in a single animated image for social media conversation. In this article, we will brief you about how to convert YouTube to gif, various GIF converters, their uses, and the pros and cons of each converter.
Let’s get started!
How to Convert a YouTube Video into GIFs?
1. YouTube to GIF Directly
Here is a quick way to convert the YouTube video to GIFs without typing a YouTube to GIF website.
Gif.com is a free and easy-to-use video editor available with multiple effects. This converter was created keeping in mind how people spend hours and money on paid platforms.
Follow the below steps to convert a YouTube video into gifs.
- In the YouTube video page, add gif before youtube.com. For example, I want to convert the YouTube video https://www.youtube.com/watch?v=40fuGLmwHwk to GIFs, here is how it looks like after adding gif at the beginning: https://www.gifyoutube.com/watch?v=40fuGLmwHwk . Press the enter button on your keyboard and you will enter the gifs.com directly.
- In gifs.com, you can play and pause the YouTube video and drag the bar to select a desired moment for gif. Press the “Create Gif” button on the top right side to convert the specific part of the YouTube video to gif.
- You will then be directed to the result page to see your GIF created using the YouTube video, and you can change the GIF title and the tag.
- Lastly, you need to copy the link and share it!
Pros of converting YouTube to GIFs with Gifs.com:
- The interface is easy to use and it provides lots of tools to adjust.
- Simple functionality.
Cons:
- The watermark on your created GIF can be removed only after purchasing the premium version.
- GIFs can be downloaded only by registered users.
2. FreeGifMaker.me
FreeGifMaker is one simple online tool that allows the creation of animated Gifs for free. A minimum of two pictures has to be uploaded out of ten. It takes few seconds and is super easy to make a GIF from a YouTube video. You can use FreeGifMaker.me in some easy steps.
- Open the website http://freegifmaker.me/youtube-to-gif/ on your desktop.
- Go to YouTube and copy the video URL you want to create a GIF of and paste it on the website mentioned above.
- Then click “Load YouTube Video” below the URL and wait for a few seconds while the tool checks the video source.
- Once the YouTube video is loaded, enter the gif duration, start time, and click on the “Make a GIF button.” It will redirect you to the result page.
- Pros:
- Conversion size is unlimited**.**
- There is no usage of ads.
- Easy to make Gifs.
- Cons:
- The upload speed is slow.
- The converter gives limited options for editing.
3. Wondershare Online UniConverter
Online UniConverter converts video into a high-quality animated GIF and allows editing. It is a simple converter with unique features.
If you want to convert your YouTube video into a GIF, follow the steps.
- You need to upload your video through the “Choose Files” option. You can also copy the link from YouTube.
- Wait for some time once you upload the file; you can then set your start time, end time, frame rate according to your needs.
- Lastly, click on “Create GIF” and download your GIF. You can also save it through the dropdown option available besides “Download.”
- Pros:
- Easy to handle.
- A wide range of customization tools is available.
- Zero ads.
- Cons:
- Upload speed is slow.
- Conversion size is limited.
4. GifRun
It is a video maker that started in 2013, and GifRun converts videos from YouTube, Facebook, and other sources to high-quality GIFs. You can create Gifs free of cost from GifRun.
Here is how you can use Gifrun.
- Open the website and paste the URL you want to convert into Gif. Later, press “Get Video” option below the URL box.
- In this step, you can adjust the duration, start time, add text, and also pause and preview the video. Once you’re done altering the video, click “Create GIF.”
- Lastly, click on the “Download” button beside the add text button, or share the link directly.
- Pros:
- Fast conversion and download.
- There is no upload limit.
- The video preview feature is available.
- Cons:
- UI is ad-infested.
- Supports YouTube videos only.
5. Makeagif
This GIF converter creates high-quality GIFs in no time. You need to paste the URL in Makeagif and nothing much. It can make GIFs from Instagram, Facebook, Twitter, and other platforms easily.
The only issue is that it supports one type of conversion with a maximum limit of 25MB.
Here is how you can make your favorite GIF in few steps.
- Open makeagif.com and paste the YouTube URL in the box available.
- Once you paste the URL, the website will automatically take you to the edit page to edit GIF length, start time, speed, and add caption and stickers. The next step is to select the category to which the video belongs available on the left side of the screen.
- After editing, click on “Continue to publishing” then “Create GIF” at the lower right corner of the screen. Voila! Your GIF is ready to use.
- Pros:
- The UI is user-friendly.
- Ads are minimal
- Various GIF conversions are supported.
- Cons:
- The conversion size is small.
- Batch conversions are not available.
6. ImgFlip
It is a creative GIF website supporting various videos from other websites such as Vimeo and YouTube. ImgFlip has innovative customization tools for cropping, reshaping, adding text and, a lot more, but you just need to be aware of the ads.
Want to know how to create GIF? Go through these simple steps.
- You can make GIFs both from Video and Images. To make GIF from a video, paste the YouTube URL in the box at the top, upload the tape from your device’s file.
- After pasting the URL, you will be given lots of customization options. Choose the effect of your choice for your GIF.
- Lastly, click on “Generate GIF” available on the right side of the screen. You can now share the GIF via your device or download it.
- Pros:
- Plenty of customization options.
- Fast conversion.
- Easy to upload and use.
- Cons:
- Ads pop up frequently.
- Offline conversion is unavailable.
7. GIPHY
It is a free GIF converter that helps you download free YouTube GIFs. You can also make GIFs from your photos, videos available on your device along with video URLs and images. The only problem is, to use Giphy you first have to log in to the app.
Follow the below steps to create a GIF from YouTube videos with Giphy:
- Open Giphy on your device and click on “Create” on the top right-side of your screen.
- Paste the URL in the space given below. A pop-up will tell you to log in. Log in to the website to continue.
- The video you choose should be less than 15 seconds and under 100MB. You will be given editing options from which you can select the start time and duration of your GIF along with Captions and Tags.
- In the end, press the “Create GIF” button to make the GIF. When it’s done, you will be redirected to the GIF page. You can then share your GIF on any social media site.
- Pros:
- Ads are absent
- Uploading is fast
- Wide range of free GIFs available
- Cons:
- Not perfect for green hands
8. Imgur
It is one of the best apps that offers tons of images, memes, and GIFs. You can make GIFs of less than 60 seconds with high quality, which you can share anywhere.
Here are three easy steps to make GIFs
- Visit the page “imgur.com/vidgif” and paste your YouTube URL there.
- Set a start time by clicking or dragging on the timeline. The total runtime is also adjustable, with 60 seconds as the maximum time for GIFs.
- Lastly, press on “Create GIF” to see the magic. The GIF is converted from the YouTube video.
- Pros:
- The users can share the post of their choice
- Users can save posts.
- Great collection of short GIFs and videos.
- Cons:
- During loading, the screen flashes.
9 VEED.IO
Veed is a simple YouTube video converter that makes your work super easy. It converts YouTube videos into GIFs with various editing options like crop, trim, text ads, and many more.
Check out how to use VEED in 3 steps.
- Start by pasting the URL of your YouTube video into VEED, Your video will be ready to convert into GIF.
- Now you are all set to edit your video. You have the option to crop and trim the video. You can also include different font styles, colors, and sizes of your choice.
- Lastly, download the GIF you made in VEED.
- Pros:
- Downloading the software is not mandatory.
- UI is simple and easy to navigate.
- The subtitle option is present.
- Cons:
- It takes a lot of time to upload video.
- Many basic tools.
10. Kapwing
Kapwing is a helpful video converter that can easily turn any video into GIFs with a click. It can also convert different files such as 3GP, GIF, WEBM.
To create beautiful GIFs with this video editor, follow these easy steps.
- Open Kapwing video editor and upload your video from YouTube.
- Choose the “Export dropdown” option and choose the format you wish to convert.
You can also preview the GIF and customize it as per your choice.
- In the final step, export the video by clicking the “Export Video” button. Save and download the newly created GIF and share it anywhere with your friends.
- Pros:
- Great editing tools.
- Easy to use.
- Cons:
- Available only on the website.
- Too many tools for the same purpose.
Final Thoughts
With the increased use of GIFs on social media, you can now easily convert your favorite YouTube videos into GIFs on your own. All you have to do is simply choose the tools mentioned above and share it with your friends.
Shanoon Cox
Shanoon Cox is a writer and a lover of all things video.
Follow @Shanoon Cox
Also read:
- Novel Vlog Talk Points Everyday
- [Updated] Comprerante Titling Matrix for Multiple Platforms
- High-Quality Game Capture Apps Reviewed
- Mastering Mobile Uploads IOS Guide for YouTube Sharing
- Elevate Your Media Content via YouTube Studio Editing Skills for 2024
- 2024 Approved Audiovisual Excellence The Premier Video Formats for YouTube
- Excellent 7 DSLRs Elevating Live-Stream Cinematic Style
- [New] Audio Extraction Made Easy YouTube Music on Your Mac
- [Updated] Amplify Views & Engagement Through Google Analytics Expertise
- [Updated] Comedic Counterpoints Funny Song Flips
- Crafting the Perfect End Screen - YouTube Template Guidebook for 2024
- [New] Amp Up Your Audio Game with Top 4 Budget Convert Apps
- [Updated] Crafting Perfect YouTube Music Sets
- Culinary Connoisseurs Must-Watch Food Content for 2024
- Breakdown of Profit From a Million Youtube Watches for 2024
- Decoding Monetization How Much Creators Earn Per Ad on YouTube?
- Unlocking the Power of Hashtags in YouTube Gaming Culture
- [New] Download and Save YouTube Thumbnails with Simplicity & Speed
- Transforming Your Channel URL Step-by-Step Instructions
- Best 3D Entrance Makers for YouTube Creators
- 2024 Approved Dissecting Mr. Beast's Fortune Portfolio
- In 2024, Engage More, Dissuade Less Top 6 Ways to Increase Watch Time and Stayers
- [Updated] Enhancing Visual Impact of YouTube Thumbnails - Neon Edition
- [Updated] Avoid Common Pitfalls with Proper Use of YouTube Tags
- [Updated] Digital Dominion Rise as a YouTube Guru
- Must-Watch ASMR Video Gems Online
- Charting New Frontiers in YouTube Ad Craftsmanship for 2024
- [New] Best 3D Entrance Makers for YouTube Creators
- Efficacy of Monetized YouTube Engagement for Content Creators for 2024
- Transforming Viewers Into Revenue YouTube Money Secrets Unveiled
- [Updated] Boost Engagement Adding Dynamic Backgrounds to Your Thumbnails
- 4 Feasible Ways to Fake Location on Facebook For your Xiaomi Civi 3 Disney 100th Anniversary Edition | Dr.fone
- Android Unlock Code Sim Unlock Your Nubia Red Magic 9 Pro+ Phone and Remove Locked Screen
- In 2024, Full Guide to Fix iToolab AnyGO Not Working On Vivo V27 Pro | Dr.fone
- New 2024 Approved The Best Ways to Convert Soundcloud Tracks T
- Navigating Soundscape Dilution via Audacity Tools
- Stuck at Android System Recovery Of Tecno Phantom V Fold ? Fix It Easily | Dr.fone
- [Updated] How to Turn Videos Reverse-Wave Style on Snapchat
- [New] In 2024, Master Video Presentation Implement LC and BB Techniques on Facebook
- [Updated] How to Turn Your Videos Into Money with Vimeo Expertise
- [New] Expert Advice for Capturing Evening Images for 2024
- 2024 Approved Feed Flourish Elevating Engagement From Ordinary Posts
- [New] 2024 Approved Ad-Free Desktop Recorder at No Cost
- [Updated] In 2024, Instagram Story Perfection Seamless Emoji Integration Techniques
- 5 Efficient Ways to Store Movies & Videos (.mov) in Windows
- Fix App Not Available in Your Country Play Store Problem on Samsung Galaxy F34 5G | Dr.fone
- Title: "2024 Approved Crafting Engaging YouTube Video Layouts"
- Author: Steven
- Created at : 2024-05-25 18:31:54
- Updated at : 2024-05-26 18:31:54
- Link: https://youtube-clips.techidaily.com/2024-approved-crafting-engaging-youtube-video-layouts/
- License: This work is licensed under CC BY-NC-SA 4.0.
