
:max_bytes(150000):strip_icc():format(webp)/012_how-to-make-video-call-on-android-bd93ab594aa648c7977f4c1ecf42c85b.jpg)
"2024 Approved Charisma in Characters Two Ways to Enliven Text"
Charisma in Characters: Two Ways to Enliven Text
How to Create Animated Bouncing Text

Liza Brown
Mar 27, 2024• Proven solutions
Earlier, you learned how to have a bounce text effect in Adobe After Effects . However, because AE is a complex application and has a steep learning curve, this section explains the two alternative ways to get the same effect on your existing video footage.
Method 1: How to Create Bouncing Text in Filmora Video Editor?
When talking about Wondershare Filmora , the application is populated with several presets for texts and titles, animations, effects, filters, and much more.
These pre-built templates not only make your task easier, they also save your decent amount of time that you would spend while working with After Effects or any other similar app that requires you to build things from scratch.
You can follow the instructions given below to add animated bounce text to any of your video footages with Filmora:
Step 1: Add a Footage to Timeline
Launch Wondershare Filmora on your Windows or Mac PC. By default, the aspect ratio of the project is set to 16:9. Click anywhere inside the Media window at the upper-left section, and select and import footage you want to add bounce text to.
Step 2: Insert Text and Add Bounce Effect
Click Titles from the standard toolbar at the top, and click and drag your preferred title template from the Library to the timeline. In case you don’t want any specific animation or style on the title, you can use the default title.
In the timeline, double-click the title you just added, use the upper-left section to edit the text, go to the Animation tab from the left pane, scroll down the list, and double-click the Up Down 1 or Up Down 2 preset to apply the bounce effect to the credits. Click OK to save the changes and to get back to the main window.

Step 3: Add Shake Filters
Go to Effects from the standard toolbar, expand the Filters category from the left pane, and click Shake. From the Library window, click and drag your preferred shake filter to the timeline. Here, I will choose Mild.

You can customize the default effect by double-clicking the shake filter in the timeline, using the sliders in the upper-left area of the interface to make necessary adjustments, and then clicking OK to save the changes and to get back to the previous interface.

Step 4: Export the Final Output
Click EXPORT from the top of the interface, go to the Local tab in the Export box, choose your preferred output format from the list in the left, make required customizations from the right pane, and click EXPORT from the bottom-right corner to export the video.

Now, you can add the bouncing text video and the background video to the timeline, and then place the bouncing text video above the background video track.
Double click the text track, go to the Chroma Key effect, select the Color Picker tool, and click anywhere in the Preview window to get things right. Finally, export the entire project to your preferred output format as explained in Step 4.
As explained before, Wondeshare Filmora makes the entire process of creating and adding bounce text effect pretty simple. With all the pre-build templates, and the versatility of the options that can be used to customize those presets, you can come up with the effects that are usually obtained when you start generating them from the scratch.


Method 2: Generate Animated Bouncing Texts Online
If you don’t want any heavy and resource-intensive app on your PC merely for some special text effects, you can try any of the online solutions instead. The benefit of using any such web app is that all the processing is done on site’s server, and it is only a web browser and an Internet connection that you need to have at your side.
Some most trusted websites to generate bounce text are listed below:
1. ENGFTO
Website: https://engfto.com/index/create%5Fanimated%5Fbouncing%5Ftext/0-26

You can follow the instructions given below to use Engfto to generate bouncing text for your footages:
Step 1: Get to the Animated Bouncing Text Page
Launch your favorite web browser, and go to the link given above to get to the Engfto’s animated bouncing text page.
Step 2: Customize Text and Preferences
Modify the values in the fields under the SIZE AREA and TEXT sections to customize the text area, the text itself, its size, and font. Next, adjust the values in the fields under the EFFECT PARAMETERS section to get the required bounce effect. Also, use the fields under the BACKGROUND section to either change the background color, or pick a background image from your PC.
Step 3: Obtain the Animated Text
Click the SAVE GIF ANIMATION button from the lower section of the page to download the animated text to your PC.
2. Loading.io
The instructions given below explain how to use Loading.io to get animated bounce text effect for your footages:
Step 1: Get to the Loading.io Webpage
Launch your favorite web browser and go to https://loading.io/animation/text/ .
Step 2: Customize the Text and Choose Animation Effect

Use the options available on the webpage to type your text, and change its font, color, background, transparency level etc. Select Bounce (or any of its variants) from the Animation drop-down list, and adjust the speed using the Speed slider.
Step 3: Obtain the Text
Click your preferred option from next to the Download As section to download the animated text to your PC.
Note: Regardless of the web solution you choose to generate and obtain animated bounce text, you will still need a post-production tool to add the downloaded text to your footage.
Conclusion
Generating bounce text effect is much simpler when you use Wondershare Filmora or any of the online solutions as explained in Method 2. While the former gives you more flexibility when it comes to customizations, the latter doesn’t require any app to be installed on your PC. In addition, many times the web apps offer their services for free, and therefore they are preferred by the novice users who are not much into post-production processes.
Liza Brown
Liza Brown is a writer and a lover of all things video.
Follow @Liza Brown
Liza Brown
Mar 27, 2024• Proven solutions
Earlier, you learned how to have a bounce text effect in Adobe After Effects . However, because AE is a complex application and has a steep learning curve, this section explains the two alternative ways to get the same effect on your existing video footage.
Method 1: How to Create Bouncing Text in Filmora Video Editor?
When talking about Wondershare Filmora , the application is populated with several presets for texts and titles, animations, effects, filters, and much more.
These pre-built templates not only make your task easier, they also save your decent amount of time that you would spend while working with After Effects or any other similar app that requires you to build things from scratch.
You can follow the instructions given below to add animated bounce text to any of your video footages with Filmora:
Step 1: Add a Footage to Timeline
Launch Wondershare Filmora on your Windows or Mac PC. By default, the aspect ratio of the project is set to 16:9. Click anywhere inside the Media window at the upper-left section, and select and import footage you want to add bounce text to.
Step 2: Insert Text and Add Bounce Effect
Click Titles from the standard toolbar at the top, and click and drag your preferred title template from the Library to the timeline. In case you don’t want any specific animation or style on the title, you can use the default title.
In the timeline, double-click the title you just added, use the upper-left section to edit the text, go to the Animation tab from the left pane, scroll down the list, and double-click the Up Down 1 or Up Down 2 preset to apply the bounce effect to the credits. Click OK to save the changes and to get back to the main window.
Step 3: Add Shake Filters
Go to Effects from the standard toolbar, expand the Filters category from the left pane, and click Shake. From the Library window, click and drag your preferred shake filter to the timeline. Here, I will choose Mild.
You can customize the default effect by double-clicking the shake filter in the timeline, using the sliders in the upper-left area of the interface to make necessary adjustments, and then clicking OK to save the changes and to get back to the previous interface.
Step 4: Export the Final Output
Click EXPORT from the top of the interface, go to the Local tab in the Export box, choose your preferred output format from the list in the left, make required customizations from the right pane, and click EXPORT from the bottom-right corner to export the video.
Now, you can add the bouncing text video and the background video to the timeline, and then place the bouncing text video above the background video track.
Double click the text track, go to the Chroma Key effect, select the Color Picker tool, and click anywhere in the Preview window to get things right. Finally, export the entire project to your preferred output format as explained in Step 4.
As explained before, Wondeshare Filmora makes the entire process of creating and adding bounce text effect pretty simple. With all the pre-build templates, and the versatility of the options that can be used to customize those presets, you can come up with the effects that are usually obtained when you start generating them from the scratch.
Method 2: Generate Animated Bouncing Texts Online
If you don’t want any heavy and resource-intensive app on your PC merely for some special text effects, you can try any of the online solutions instead. The benefit of using any such web app is that all the processing is done on site’s server, and it is only a web browser and an Internet connection that you need to have at your side.
Some most trusted websites to generate bounce text are listed below:
1. ENGFTO
Website: https://engfto.com/index/create%5Fanimated%5Fbouncing%5Ftext/0-26
You can follow the instructions given below to use Engfto to generate bouncing text for your footages:
Step 1: Get to the Animated Bouncing Text Page
Launch your favorite web browser, and go to the link given above to get to the Engfto’s animated bouncing text page.
Step 2: Customize Text and Preferences
Modify the values in the fields under the SIZE AREA and TEXT sections to customize the text area, the text itself, its size, and font. Next, adjust the values in the fields under the EFFECT PARAMETERS section to get the required bounce effect. Also, use the fields under the BACKGROUND section to either change the background color, or pick a background image from your PC.
Step 3: Obtain the Animated Text
Click the SAVE GIF ANIMATION button from the lower section of the page to download the animated text to your PC.
2. Loading.io
The instructions given below explain how to use Loading.io to get animated bounce text effect for your footages:
Step 1: Get to the Loading.io Webpage
Launch your favorite web browser and go to https://loading.io/animation/text/ .
Step 2: Customize the Text and Choose Animation Effect
Use the options available on the webpage to type your text, and change its font, color, background, transparency level etc. Select Bounce (or any of its variants) from the Animation drop-down list, and adjust the speed using the Speed slider.
Step 3: Obtain the Text
Click your preferred option from next to the Download As section to download the animated text to your PC.
Note: Regardless of the web solution you choose to generate and obtain animated bounce text, you will still need a post-production tool to add the downloaded text to your footage.
Conclusion
Generating bounce text effect is much simpler when you use Wondershare Filmora or any of the online solutions as explained in Method 2. While the former gives you more flexibility when it comes to customizations, the latter doesn’t require any app to be installed on your PC. In addition, many times the web apps offer their services for free, and therefore they are preferred by the novice users who are not much into post-production processes.
Liza Brown
Liza Brown is a writer and a lover of all things video.
Follow @Liza Brown
Behind the Curtains: A Guide to YouTube’s Hidden Videos
Complete Guide: What Does Unlisted Mean on YouTube

Richard Bennett
Mar 27, 2024• Proven solutions
Whether personal or professional purposes, YouTube is a great platform for sharing videos but, there are times, when you don’t wish to share it with each and everyone across the globe. The YouTube unlisted meaning is a video which can be viewed only by the users having the link to it. At the back of your mind, you may be wondering how safe an unlisted video is. Let’s learn in detail what does unlisted mean on YouTube.
- Part 1: What is Unlisted Video on YouTube
- Part 2: How to Make YouTube Videos Unlisted
- Part 3: How to Share Unlisted Video
Wondershare Filmora video editor is one of the most widely used video editing software for YouTubers, it makes the video editing simplified with the pre-programmed effects and templates. You can download the free trial version to check.
Part 1: What Does Unlisted Video Mean on YouTube
The YouTube unlisted meaning is that your video will neither come up in the search results nor on your channel. Only the users who have the link to the video can view it. The link can be shared with anyone and everyone, even with the users who do not have a YouTube account. Many people don’t know the difference between private and unlisted YouTube videos . In order to understand what does unlisted mean on YouTube in a detailed way, let’s dive deeper into it and know the difference between public videos, unlisted videos, and private videos.
1. What is Unlisted YouTube Video
Between private and public, you can find the unlisted videos. What does unlisted mean on YouTube? An unlisted video does not appear in the search results, suggestions or video tab. If you unlist a new video, your subscribers won’t receive any notification informing about it. You can share an unlisted video with the people you wish to share and the users having a link to the video can see it. It can also be viewed by the friend of friends if they share the link with their friends.
The unlisted videos are treated like public videos by YouTube. This means that you cannot use the copyright audio or video and it will be reviewed by the YouTube team if other users flag it as inappropriate content within a timeframe of 24-hours .
What Unlisted YouTube Videos Can Do
The unlisted videos can be shared with family and friends. If you are conducting a webinar and wish to share the video with only the registered users, an unlisted video can be used. You may also use the unlisted video for giving access to the people who embedded it while cleaning the YouTube page. For getting feedback from closed groups for market research or to share online resume link for job applications, the unlisted videos can be of great help.
Takeaway: Unlisted videos are a great way to share personal videos with just your family and friends, or to get feedback from people you trust on videos before you decide whether to make them public.
2. What is Private YouTube Video
The videos that do not appear in the recommendations, search options in YouTube or in your tab are the private videos. When you select the private setting for a video, the subscribers don’t get a notification. The private videos can be seen only by the uploader and the mentioned Google accounts. It is not available for friends of friends which mean if you share a private video with a friend, only that person can see it. If your friend shares it with someone, it won’t be visible to others. If anyone wishes to view a private video, the person has to request permission to view to the uploader.

What Private Youtube Videos Can Do
By using private YouTube videos, the internal company information can be kept confidential, the family videos can be shared safely with the people you wish to, and also store your personal data without worrying about being hacked by the strangers. By choosing the private setting, you may upload and schedule the date and time when a video can be made public on YouTube. It helps in saving storage space on your phone.
Takeaway: A private YouTube video is only available to YouTube users that you invite to view it.
3. What are Public Youtube Videos
The Public setting in the YouTube video is a default setting which allows everyone to see the video you post. When you want your video to appear in the search engine results and want more and more viewers and traffic on your video, you can keep the Public default setting on.
What Public YouTube Videos Can Do
Do you wish to grow your brand awareness? Select the Public default setting as it is the best way to do it. You may use the Public setting in any of these situations below:
- Having a video sharing business like explainer videos, product reviews, commercials, etc. with customers or prospective viewers
- Targeting at earning money through YouTube videos
- Looking forward to the growing personal brand by a YouTuber
- Looking for more and more subscribers on YouTube
But, you must remember that once you post the video, it will be available for everyone throughout the world on YouTube. Even if you decide to change the settings or delete the video, later on, you will be subjected to judgment, professionally and personally. While posting a video with Public setting, you must have an answer to questions like-
- Shall the senior or your boss see this video?
- Can your job prospect hamper with this video?
- Does the video contain harassing or offensive content?
- Can your friends ridicule you after seeing the video content?
If all the questions are answered in YES… then it is better to think hard and long before uploading the video content with Public setting on YouTube. You may upload the content with unlisted or private settings.
Takeaway: If you make a video public, anyone will be able to find and watch it. When uploading a video using default settings through YouTube, it will always default to being a public video.
Below is a brief comparison table about the differences among YouTube Unlisted, Private and Public video settings.
| Feature | Unlisted | Private | Public |
|---|---|---|---|
| Can I share video URL to friends? | Yes | No | Yes |
| Can I add video to YouTube channel? | Yes | No | Yes |
| Can I shows up video in YouTube platform? | No | No | Yes |
| Can I post video on my channel? | No | No | Yes |
| Can I leave a comment? | Yes | No | Yes |
| Can I see it in landing page? | Yes | No | Yes |
| Do People need an account to watch it? | No | No | Yes |
Part 2: How to Make an Unlisted YouTube Video
Follow the below-mentioned steps to make an unlisted YouTube video -
- Log in to your YouTube channel
- In the top right corner, click the add video button
- Find the drop-down menu and choose Upload Video
- Select the setting by clicking on Public and a drop-down menu appears to unlisted
- Search the instruction select files to upload your video
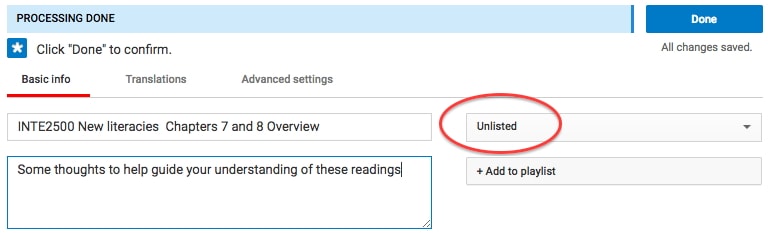
- When you start uploading your video, a message box appears, Click Public on the right side corner and select unlisted from the drop-down menu
- Once you have selected unlisted, click Done in the top right corner and your video is published
Part 3: How to Share Your Unlisted Video
If you wish to share the unlisted video , just share the published video link with anyone you wish to share. A Google account is not required to see the video. So, if the person you shared the link with is not logged in to his Google account, still the video can be viewed. The people who have the link to your video can also share and re-share the link in a number of ways. It can be shared on the social media or just forwarded amongst their friends. But, if you don’t want your friends to re-share it, change the settings to Private.
You can see a message showing “this video is unlisted” on YouTube when you want to share someone else’s unlisted video on social platforms. Think before you consider sharing an unlisted video.
Conclusion
Now, that you clearly know what does unlisted mean on YouTube, consider the option while uploading a video. It helps in retaining the privacy of your video.
Richard Bennett
Richard Bennett is a writer and a lover of all things video.
Follow @Richard Bennett
Richard Bennett
Mar 27, 2024• Proven solutions
Whether personal or professional purposes, YouTube is a great platform for sharing videos but, there are times, when you don’t wish to share it with each and everyone across the globe. The YouTube unlisted meaning is a video which can be viewed only by the users having the link to it. At the back of your mind, you may be wondering how safe an unlisted video is. Let’s learn in detail what does unlisted mean on YouTube.
- Part 1: What is Unlisted Video on YouTube
- Part 2: How to Make YouTube Videos Unlisted
- Part 3: How to Share Unlisted Video
Wondershare Filmora video editor is one of the most widely used video editing software for YouTubers, it makes the video editing simplified with the pre-programmed effects and templates. You can download the free trial version to check.
Part 1: What Does Unlisted Video Mean on YouTube
The YouTube unlisted meaning is that your video will neither come up in the search results nor on your channel. Only the users who have the link to the video can view it. The link can be shared with anyone and everyone, even with the users who do not have a YouTube account. Many people don’t know the difference between private and unlisted YouTube videos . In order to understand what does unlisted mean on YouTube in a detailed way, let’s dive deeper into it and know the difference between public videos, unlisted videos, and private videos.
1. What is Unlisted YouTube Video
Between private and public, you can find the unlisted videos. What does unlisted mean on YouTube? An unlisted video does not appear in the search results, suggestions or video tab. If you unlist a new video, your subscribers won’t receive any notification informing about it. You can share an unlisted video with the people you wish to share and the users having a link to the video can see it. It can also be viewed by the friend of friends if they share the link with their friends.
The unlisted videos are treated like public videos by YouTube. This means that you cannot use the copyright audio or video and it will be reviewed by the YouTube team if other users flag it as inappropriate content within a timeframe of 24-hours .
What Unlisted YouTube Videos Can Do
The unlisted videos can be shared with family and friends. If you are conducting a webinar and wish to share the video with only the registered users, an unlisted video can be used. You may also use the unlisted video for giving access to the people who embedded it while cleaning the YouTube page. For getting feedback from closed groups for market research or to share online resume link for job applications, the unlisted videos can be of great help.
Takeaway: Unlisted videos are a great way to share personal videos with just your family and friends, or to get feedback from people you trust on videos before you decide whether to make them public.
2. What is Private YouTube Video
The videos that do not appear in the recommendations, search options in YouTube or in your tab are the private videos. When you select the private setting for a video, the subscribers don’t get a notification. The private videos can be seen only by the uploader and the mentioned Google accounts. It is not available for friends of friends which mean if you share a private video with a friend, only that person can see it. If your friend shares it with someone, it won’t be visible to others. If anyone wishes to view a private video, the person has to request permission to view to the uploader.
What Private Youtube Videos Can Do
By using private YouTube videos, the internal company information can be kept confidential, the family videos can be shared safely with the people you wish to, and also store your personal data without worrying about being hacked by the strangers. By choosing the private setting, you may upload and schedule the date and time when a video can be made public on YouTube. It helps in saving storage space on your phone.
Takeaway: A private YouTube video is only available to YouTube users that you invite to view it.
3. What are Public Youtube Videos
The Public setting in the YouTube video is a default setting which allows everyone to see the video you post. When you want your video to appear in the search engine results and want more and more viewers and traffic on your video, you can keep the Public default setting on.
What Public YouTube Videos Can Do
Do you wish to grow your brand awareness? Select the Public default setting as it is the best way to do it. You may use the Public setting in any of these situations below:
- Having a video sharing business like explainer videos, product reviews, commercials, etc. with customers or prospective viewers
- Targeting at earning money through YouTube videos
- Looking forward to the growing personal brand by a YouTuber
- Looking for more and more subscribers on YouTube
But, you must remember that once you post the video, it will be available for everyone throughout the world on YouTube. Even if you decide to change the settings or delete the video, later on, you will be subjected to judgment, professionally and personally. While posting a video with Public setting, you must have an answer to questions like-
- Shall the senior or your boss see this video?
- Can your job prospect hamper with this video?
- Does the video contain harassing or offensive content?
- Can your friends ridicule you after seeing the video content?
If all the questions are answered in YES… then it is better to think hard and long before uploading the video content with Public setting on YouTube. You may upload the content with unlisted or private settings.
Takeaway: If you make a video public, anyone will be able to find and watch it. When uploading a video using default settings through YouTube, it will always default to being a public video.
Below is a brief comparison table about the differences among YouTube Unlisted, Private and Public video settings.
| Feature | Unlisted | Private | Public |
|---|---|---|---|
| Can I share video URL to friends? | Yes | No | Yes |
| Can I add video to YouTube channel? | Yes | No | Yes |
| Can I shows up video in YouTube platform? | No | No | Yes |
| Can I post video on my channel? | No | No | Yes |
| Can I leave a comment? | Yes | No | Yes |
| Can I see it in landing page? | Yes | No | Yes |
| Do People need an account to watch it? | No | No | Yes |
Part 2: How to Make an Unlisted YouTube Video
Follow the below-mentioned steps to make an unlisted YouTube video -
- Log in to your YouTube channel
- In the top right corner, click the add video button
- Find the drop-down menu and choose Upload Video
- Select the setting by clicking on Public and a drop-down menu appears to unlisted
- Search the instruction select files to upload your video
- When you start uploading your video, a message box appears, Click Public on the right side corner and select unlisted from the drop-down menu
- Once you have selected unlisted, click Done in the top right corner and your video is published
Part 3: How to Share Your Unlisted Video
If you wish to share the unlisted video , just share the published video link with anyone you wish to share. A Google account is not required to see the video. So, if the person you shared the link with is not logged in to his Google account, still the video can be viewed. The people who have the link to your video can also share and re-share the link in a number of ways. It can be shared on the social media or just forwarded amongst their friends. But, if you don’t want your friends to re-share it, change the settings to Private.
You can see a message showing “this video is unlisted” on YouTube when you want to share someone else’s unlisted video on social platforms. Think before you consider sharing an unlisted video.
Conclusion
Now, that you clearly know what does unlisted mean on YouTube, consider the option while uploading a video. It helps in retaining the privacy of your video.
Richard Bennett
Richard Bennett is a writer and a lover of all things video.
Follow @Richard Bennett
Also read:
- [New] Boost Video Quality on YouTube - The Essential Webcams Guide
- [Updated] Channel Growth on a Dime Attracting Sponsors with Simplicity
- Behind-the-Camera Glory Spotlight on Top 10 Female YouTubers
- Navigating the Intricacies of Transferring Videos to YouTube
- Can Subforsub Help Increase My YouTube Subscribers Without Risk for 2024
- Pro-Level 7 Cameras Perfect for Professional Broadcasting Vloggers
- 2024 Approved Elevate Your Content YouTube Video Editing Secrets Revealed
- Elevating Video Quality Sharing iMovie Work via YouTube
- 2024 Approved Command Center Redefined Your Pathway Through Studio
- Self-Balancing Snap Shots Without Supports
- [New] A Guide to Gathering Creative Themes Using Google Trends
- In 2024, Boost Visibility Selecting the Right YouTube Thumbnail Dimensions
- Top 8 Gratis Video Cutting Tools For Online Content Creation
- 2024 Approved Channel Transformation Unleash Potential with TubeBuddy
- 2024 Approved Boosting Audio Quality in Social Media Recordings
- [New] 2024 Approved Sequential Image Storytelling on IG
- Selecting the Premier Windows Application for Auditory Emptying in Videos
- Melody Manual Grab, Listen & Scrutinize Songs for 2024
- Full Guide to Unlock Your Vivo Y27s
- New The Ultimate Guide to Vertical Video Editing on Mobile Devices
- 2024 Approved Android Tips Flipping Video Images
- Updated In 2024, 5 Best Apps for Voice Translation From English to Bangla
- [New] Crafting Perfection An Essential Guide to HDR Imaging
- In 2024, Ultimate guide to get the meltan box pokemon go For Oppo Reno 9A | Dr.fone
- [New] A Beginner's Guide to Starting a Professional Account on IG for 2024
- In 2024, Will Pokémon Go Ban the Account if You Use PGSharp On Honor X7b | Dr.fone
- Android Screen Stuck General Oppo A59 5G Partly Screen Unresponsive | Dr.fone
- [Updated] 2024 Approved Empire's Edge Scoring the Ultimate 7 Grand Wars
- Title: "2024 Approved Charisma in Characters Two Ways to Enliven Text"
- Author: Steven
- Created at : 2024-05-25 18:29:40
- Updated at : 2024-05-26 18:29:40
- Link: https://youtube-clips.techidaily.com/2024-approved-charisma-in-characters-two-ways-to-enliven-text/
- License: This work is licensed under CC BY-NC-SA 4.0.
