
:max_bytes(150000):strip_icc():format(webp)/iphonedefaultalerttone-15a2b7bd66de41878765af23bd0d6c6f.png)
"2024 Approved Brevity in Action The Process of Shortening YouTube Videos"
Brevity in Action: The Process of Shortening YouTube Videos
How to Trim YouTube Videos?

Richard Bennett
Mar 27, 2024• Proven solutions
The world’s largest video sharing platform currently has nearly two billion active monthly users who upload over 400 hours of video content to their channels each minute. It is to see from these statistics why every video aspiring YouTubers post on their channels has to be perfect in every way in order to reach a wide audience. Fortunately, trimming a video even after you’ve uploaded it to YouTube is a quick and easy process, and in this article, we are going to show you a few different methods you can use to trim the videos you upload to YouTube. So, let’s get started.
In this article
- How to Trim a Video After You Upload it to Your YouTube Channel?
- Trimming a Video Before Posting On YouTube with Filmora Video Editor [4 Ways]
- Using Online Video Editing Platforms to Trim YouTube Videos
How to Trim a Video After You Upload it to Your YouTube Channel?
The YouTube Studio is no longer in beta phase, which means that the feature is here to stay. This is good news for all video creators who frequently update their YouTube videos after they upload them, as they no longer have to go through the endless uploads just because they wanted to trim a video.
Make sure that you’re signed into your YouTube channel, then click on your profile picture and select the YouTube Studio (Beta) option. On the left side of the screen, you’ll be able to see a menu that contains different subcategories like Analytics, Dashboard or Videos, so just click on the Videos option and proceed to select a video you’d like to trim. After the Videos submenu appears on the screen you should click on the Editor option and the video you selected will open in the YouTube’s video editor.

Click on the Trim button to start trimming the video and drag the blue bars located at the start and the end of the file to designate the portion of the video you’d like to remove. Preview the changes and confirm what you’ve made by clicking on the Save button located in the upper right corner of the screen and the new shortened version of the video will become available within a couple of hours.

In this way, you don’t need to take down the original video, edit it and re-upload. One of the benefits of trimming YouTube videos with the Trim feature in YouTube Editor is that this will keep your video URL and views and ranks etc.
Trimming a Video Before Posting On YouTube with Filmora Video Editor [4 Ways]


Method 1: Trim on Timeline
YouTubers who don’t want to rely on YouTube’s video editing capabilities can trim their footage with Filmora (to be honest, the Editor in YouTube platform has limited features). Filmora video editing software for PC and Mac computers offers a few different tools for trimming videos. After you’ve created a new project in Filmora, you should import a video clip into the editor by clicking on the Import drop-down menu and select the Import Media Files option. Each file you add to a project will be displayed in the Media tab, and you can just drag and drop it to a video track on the timeline.
All you have to do in order to trim a video after you’ve placed it on the timeline is drag one of its ends to the left or to the right. As you drag one of the clip’s edges the editor will only display the remaining footage while rendering the rest invisible. If at any point you want to access a portion of the video you’ve trimmed you just have to extend the file by dragging it until you’re able to see the segment you’re searching for.

Method 2: Using Filmora Split Tool
Filmora’s Split tool can help you separate the portion of the clip you want to remove from the segment you’d like to keep. Simply place the playhead at the exact location in the video clip where you want to make a cut, and click on the Split icon that looks like a pair of scissors. After the video is split, you should click on the clip you no longer need in order to select it and then hit the Delete button on your keyboard to remove it from the timeline.
Method 3: Using Scene Detection
Wondershare’s video editor also offers an automatic way to split a video clip into a number of separate scenes. Right-click on the video file located in the Filmora’s Media tab, and select the Scene Detection option from the menu and proceed to click on the Detect button, after the Scene Detection window pops up on the screen. The software will then automatically analyze the footage and divide it into separate scenes. Simply click on the Add to Timeline button once the process is completed to continue editing the video clip you’ve just split.

Method 4: Using Instant Cutter Tool
The Instant Cutter Tool enables you to quickly trim or merge high-resolution files recorded on action cameras as soon as you import them into a project in Filmora. Select the Import with Instant Cutter Tool option from the Import drop-down menu and wait for the Filmora Instant Cutter window to appear on the screen. In the upper left corner of this window, you will be able to see Trim and Merge tabs. Make sure that the Trim tab is selected and then click on the Open File button to import a video clip you’d like to trim. You can then use the trimming sliders to designate the parts of the video you’d like to remove or the set the In and Out points by clicking on the Set In Point or Set Out Point icons. Click on the Export button to save the new version of the video clip and click OK to complete the process.

Using Online Video Editing Platforms to Trim YouTube Videos
In case you’re looking for a tool that lets you save extracts of scenes from YouTube to your computer free of charge YT Cutter may be one of your best options.

This online video editing platform is remarkably easy to use since you just have to copy the link to the YouTube video you’d like to trim into YT Cutter’s URL box and then select how long the new video should be. Click on the Start and End buttons to set the duration of the video and click on the Download button to choose if you want to create a video, GIF or an audio file. The trimmed YouTube video will be available for download as soon as the platform processes it, and you just need to specify a folder on your hard drive before clicking on the Save button.
There’re many online video trimmers available on the market, some of them are totally free to use, check our guide about How to Trim Videos for Free Online .
Read More to Get : How to Download YouTube Videos without Any Software Easily >>
Conclusion
Trimming a video online or with a video editing software like Filmora is an effortless task that can be completed in just a couple of minutes. However, it is better to complete the entire video editing process before you upload a video to your YouTube channel because YouTube Studio and other online video editing platforms still offer only a limited amount of video editing tools. Which method of trimming YouTube videos do you like using the most? Leave a comment and share your opinions with us.
Richard Bennett
Richard Bennett is a writer and a lover of all things video.
Follow @Richard Bennett
Richard Bennett
Mar 27, 2024• Proven solutions
The world’s largest video sharing platform currently has nearly two billion active monthly users who upload over 400 hours of video content to their channels each minute. It is to see from these statistics why every video aspiring YouTubers post on their channels has to be perfect in every way in order to reach a wide audience. Fortunately, trimming a video even after you’ve uploaded it to YouTube is a quick and easy process, and in this article, we are going to show you a few different methods you can use to trim the videos you upload to YouTube. So, let’s get started.
In this article
- How to Trim a Video After You Upload it to Your YouTube Channel?
- Trimming a Video Before Posting On YouTube with Filmora Video Editor [4 Ways]
- Using Online Video Editing Platforms to Trim YouTube Videos
How to Trim a Video After You Upload it to Your YouTube Channel?
The YouTube Studio is no longer in beta phase, which means that the feature is here to stay. This is good news for all video creators who frequently update their YouTube videos after they upload them, as they no longer have to go through the endless uploads just because they wanted to trim a video.
Make sure that you’re signed into your YouTube channel, then click on your profile picture and select the YouTube Studio (Beta) option. On the left side of the screen, you’ll be able to see a menu that contains different subcategories like Analytics, Dashboard or Videos, so just click on the Videos option and proceed to select a video you’d like to trim. After the Videos submenu appears on the screen you should click on the Editor option and the video you selected will open in the YouTube’s video editor.
Click on the Trim button to start trimming the video and drag the blue bars located at the start and the end of the file to designate the portion of the video you’d like to remove. Preview the changes and confirm what you’ve made by clicking on the Save button located in the upper right corner of the screen and the new shortened version of the video will become available within a couple of hours.
In this way, you don’t need to take down the original video, edit it and re-upload. One of the benefits of trimming YouTube videos with the Trim feature in YouTube Editor is that this will keep your video URL and views and ranks etc.
Trimming a Video Before Posting On YouTube with Filmora Video Editor [4 Ways]
Method 1: Trim on Timeline
YouTubers who don’t want to rely on YouTube’s video editing capabilities can trim their footage with Filmora (to be honest, the Editor in YouTube platform has limited features). Filmora video editing software for PC and Mac computers offers a few different tools for trimming videos. After you’ve created a new project in Filmora, you should import a video clip into the editor by clicking on the Import drop-down menu and select the Import Media Files option. Each file you add to a project will be displayed in the Media tab, and you can just drag and drop it to a video track on the timeline.
All you have to do in order to trim a video after you’ve placed it on the timeline is drag one of its ends to the left or to the right. As you drag one of the clip’s edges the editor will only display the remaining footage while rendering the rest invisible. If at any point you want to access a portion of the video you’ve trimmed you just have to extend the file by dragging it until you’re able to see the segment you’re searching for.
Method 2: Using Filmora Split Tool
Filmora’s Split tool can help you separate the portion of the clip you want to remove from the segment you’d like to keep. Simply place the playhead at the exact location in the video clip where you want to make a cut, and click on the Split icon that looks like a pair of scissors. After the video is split, you should click on the clip you no longer need in order to select it and then hit the Delete button on your keyboard to remove it from the timeline.
Method 3: Using Scene Detection
Wondershare’s video editor also offers an automatic way to split a video clip into a number of separate scenes. Right-click on the video file located in the Filmora’s Media tab, and select the Scene Detection option from the menu and proceed to click on the Detect button, after the Scene Detection window pops up on the screen. The software will then automatically analyze the footage and divide it into separate scenes. Simply click on the Add to Timeline button once the process is completed to continue editing the video clip you’ve just split.
Method 4: Using Instant Cutter Tool
The Instant Cutter Tool enables you to quickly trim or merge high-resolution files recorded on action cameras as soon as you import them into a project in Filmora. Select the Import with Instant Cutter Tool option from the Import drop-down menu and wait for the Filmora Instant Cutter window to appear on the screen. In the upper left corner of this window, you will be able to see Trim and Merge tabs. Make sure that the Trim tab is selected and then click on the Open File button to import a video clip you’d like to trim. You can then use the trimming sliders to designate the parts of the video you’d like to remove or the set the In and Out points by clicking on the Set In Point or Set Out Point icons. Click on the Export button to save the new version of the video clip and click OK to complete the process.
Using Online Video Editing Platforms to Trim YouTube Videos
In case you’re looking for a tool that lets you save extracts of scenes from YouTube to your computer free of charge YT Cutter may be one of your best options.
This online video editing platform is remarkably easy to use since you just have to copy the link to the YouTube video you’d like to trim into YT Cutter’s URL box and then select how long the new video should be. Click on the Start and End buttons to set the duration of the video and click on the Download button to choose if you want to create a video, GIF or an audio file. The trimmed YouTube video will be available for download as soon as the platform processes it, and you just need to specify a folder on your hard drive before clicking on the Save button.
There’re many online video trimmers available on the market, some of them are totally free to use, check our guide about How to Trim Videos for Free Online .
Read More to Get : How to Download YouTube Videos without Any Software Easily >>
Conclusion
Trimming a video online or with a video editing software like Filmora is an effortless task that can be completed in just a couple of minutes. However, it is better to complete the entire video editing process before you upload a video to your YouTube channel because YouTube Studio and other online video editing platforms still offer only a limited amount of video editing tools. Which method of trimming YouTube videos do you like using the most? Leave a comment and share your opinions with us.
Richard Bennett
Richard Bennett is a writer and a lover of all things video.
Follow @Richard Bennett
Masterminds of Immersive Marvellous Marvel Spheres
Top 4 Marvel Intro Makers Online
Richard Bennett
Mar 27, 2024• Proven solutions
Are you a fan of Marvel’s Tv series? If yes, you must have watched the intro that Marvel includes at the starting of its every video, and you may be looking for a marvel intro maker for yourself. The intro has some cool sound effects with amazing animations. Different superheroes appear on the screen and then fade away. It also features some scenes from other tv series. Overall it is a power-packed intro that grabs the users’ attention, and it becomes difficult to take your eyes off the screen when this intro is played.
When watching this intro, you may get excited and want to make your intro if you are a true Marvel fan. But you might be thinking that how it is possible to blend so many elements and characters in a single video and make the smooth transitions so that everything seems to be going in a flow. The answer to your question is straightforward. You can either use Marlvel intro makers online to make it or use Filmora to make it according to our tutorial. Either way, we get you covered!
Top 4 Marvel Online Intro Makers:
This article will share the top 4 online marvel intro makers that you can use to create your own intros similar to Marvel’s intro easily. So, let’s get started with our main topic.
1. Introchamp.com
Price: $8.38 for 1080p version/ $6.98 for 720p version

Intro champ is a website that allows you to create video intros in just a few minutes. It is one of the best online intro maker websites out there. If you want to make Marvel’s Intro video, then you can create it using this website. Just click the title to the website, and you will see the screen displayed in the above picture. You will see a search bar on the top right side of your screen. Type “Modern Marvel” in this search bar and hit the enter button. You will see a Marvel intro template that you can use to create your video.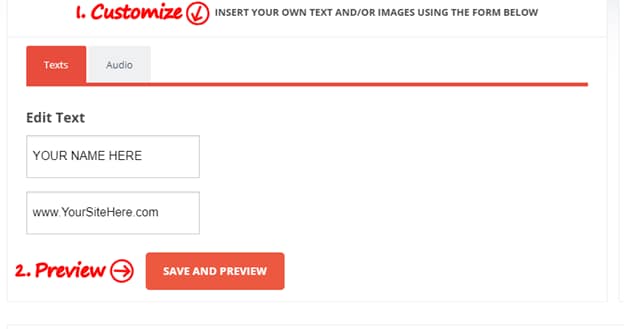
Creating your video is a straightforward process. You need to enter your desired text displayed in two different fields and click on the Save & Preview button. It allows you to try the intro video to have an idea how it will look like. There will be a watermark on the video. If you want to remove that watermark, you need to purchase this template. The 1080p version will cost you around $8.38, and the 780p version will cost around $6.98.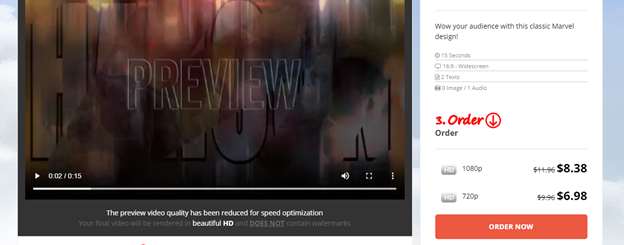
2. Videohive.com
Price: from $10 to $20
The third website that can help you to create online Marvel’s intro videos is Video Hive. It is a website where you can find stock images and stock videos. Just search Marvel Intro in the search bar of the website, and it will display different stock videos that you can use to create intros. 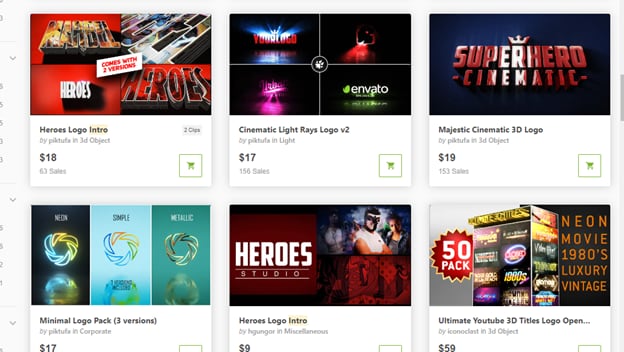
Every stock video has a different price, and you may need to hire a video editor online to create your intro video using this template. It is a bit expensive option, but the results are more convincing at the same time.
3. Tubearsenal.com
Price: $13 for 1080p version/ $9 for 720p version

Tube Arsenal is also one of the best and premium intro makers online. It is effortless to use, and you don’t need to download any software or effects because everything here is online. You also don’t need to have any prior experience because it is easy to use platform. 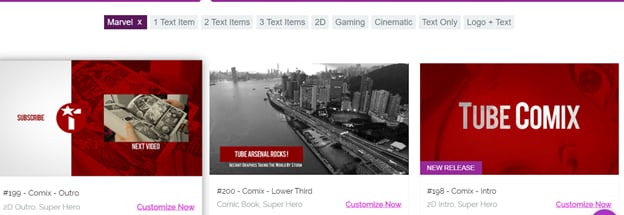
This website contains thousands of intro video templates that you can customize according to your videos’ needs and use. If you want to create Marvel’s intro video, then all you have to do is search “Marvel Intro” in the search bar and select “Comix Intro Template” from the results.
Click on the customize now button, and it will take you to a page where you will find plenty of customization options. You can add your desired text and choose the color of your text. You can also customize the background color and choose a custom music track played with your intro.
4. Filmora X
The fourth option that you have is to create Marvel’s intro video by using Filmora X. Filmora X is one of the latest and premium video editing software out there. You will develop your intro video manually on Filmora X by following a step-by-step procedure. Now you may think that it is not easy, but it is straightforward. You can include the elements that you want and exclude unwanted elements. Overall you can have an excellent experience by using this software.
Conclusion
Many intro maker programs and websites are available online. The websites are easier to use, and you can create your intros in just a few minutes, but they have some limitations. You cannot do much customization on those templates. However, if you use Filmora X, you have many options and can customize your intro how you want. We recommend you give it a try, and we assure you that you won’t regret your decision.
Richard Bennett
Richard Bennett is a writer and a lover of all things video.
Follow @Richard Bennett
Richard Bennett
Mar 27, 2024• Proven solutions
Are you a fan of Marvel’s Tv series? If yes, you must have watched the intro that Marvel includes at the starting of its every video, and you may be looking for a marvel intro maker for yourself. The intro has some cool sound effects with amazing animations. Different superheroes appear on the screen and then fade away. It also features some scenes from other tv series. Overall it is a power-packed intro that grabs the users’ attention, and it becomes difficult to take your eyes off the screen when this intro is played.
When watching this intro, you may get excited and want to make your intro if you are a true Marvel fan. But you might be thinking that how it is possible to blend so many elements and characters in a single video and make the smooth transitions so that everything seems to be going in a flow. The answer to your question is straightforward. You can either use Marlvel intro makers online to make it or use Filmora to make it according to our tutorial. Either way, we get you covered!
Top 4 Marvel Online Intro Makers:
This article will share the top 4 online marvel intro makers that you can use to create your own intros similar to Marvel’s intro easily. So, let’s get started with our main topic.
1. Introchamp.com
Price: $8.38 for 1080p version/ $6.98 for 720p version
Intro champ is a website that allows you to create video intros in just a few minutes. It is one of the best online intro maker websites out there. If you want to make Marvel’s Intro video, then you can create it using this website. Just click the title to the website, and you will see the screen displayed in the above picture. You will see a search bar on the top right side of your screen. Type “Modern Marvel” in this search bar and hit the enter button. You will see a Marvel intro template that you can use to create your video.
Creating your video is a straightforward process. You need to enter your desired text displayed in two different fields and click on the Save & Preview button. It allows you to try the intro video to have an idea how it will look like. There will be a watermark on the video. If you want to remove that watermark, you need to purchase this template. The 1080p version will cost you around $8.38, and the 780p version will cost around $6.98.
2. Videohive.com
Price: from $10 to $20
The third website that can help you to create online Marvel’s intro videos is Video Hive. It is a website where you can find stock images and stock videos. Just search Marvel Intro in the search bar of the website, and it will display different stock videos that you can use to create intros.
Every stock video has a different price, and you may need to hire a video editor online to create your intro video using this template. It is a bit expensive option, but the results are more convincing at the same time.
3. Tubearsenal.com
Price: $13 for 1080p version/ $9 for 720p version
Tube Arsenal is also one of the best and premium intro makers online. It is effortless to use, and you don’t need to download any software or effects because everything here is online. You also don’t need to have any prior experience because it is easy to use platform.
This website contains thousands of intro video templates that you can customize according to your videos’ needs and use. If you want to create Marvel’s intro video, then all you have to do is search “Marvel Intro” in the search bar and select “Comix Intro Template” from the results.
Click on the customize now button, and it will take you to a page where you will find plenty of customization options. You can add your desired text and choose the color of your text. You can also customize the background color and choose a custom music track played with your intro.
4. Filmora X
The fourth option that you have is to create Marvel’s intro video by using Filmora X. Filmora X is one of the latest and premium video editing software out there. You will develop your intro video manually on Filmora X by following a step-by-step procedure. Now you may think that it is not easy, but it is straightforward. You can include the elements that you want and exclude unwanted elements. Overall you can have an excellent experience by using this software.
Conclusion
Many intro maker programs and websites are available online. The websites are easier to use, and you can create your intros in just a few minutes, but they have some limitations. You cannot do much customization on those templates. However, if you use Filmora X, you have many options and can customize your intro how you want. We recommend you give it a try, and we assure you that you won’t regret your decision.
Richard Bennett
Richard Bennett is a writer and a lover of all things video.
Follow @Richard Bennett
Also read:
- [Updated] Best Vocal Modification Software for Content Creators
- In 2024, Essential ASMR Channel Discoveries
- [Updated] Brand Consistency in Action Inserting Logos/Watermarks Into Videos
- Best Audio Modification Methods for YouTube Stars
- [Updated] Elevate Your Content Game with These Powerful YouTube Shortcuts
- SplitScreen Designer
- Eliminated Non-Display of Shorts Videos for 2024
- [Updated] Elevate Your YouTube Presence with These 8 Free Courses
- In 2024, Enjoy Your Favorite Songs Anytime Convert YouTube to MP3 Now
- In 2024, Elevate Your Channel Techniques for Logo Insertion in Videos
- [New] Emulating Old Hollywood Style in Modern Videos
- The Ultimate Breakdown of 12 YouTube's Best-in-Class Gaming Openings
- The Year's Most Loved YouTube Music Video Responses
- Unlocking YouTube's Central Hub for Video Crafting
- Crafting Fast Fortnite Icons in Minutes
- 2024 Approved Enhancing Video Discoverability with Effective Titles & Tags
- [New] Achieving Professional-Level Youtube Streams Using WireCast
- [New] Effortless Resolution of Mac's Green Screen Problem for YouTubers
- [New] Dissecting YouTube's Criteria for Featured Community Inputs
- [New] Emoji Mastery for Engaging YouTube Discussions
- [New] Boost Your YouTube Success with Free, High-Quality Audio
- In 2024, Adaptive Gaming Techniques by Pros
- 2024 Approved Accelerated Sizing YouTube Content for MACs
- 80+ Catchy Cooking Channel Names to Attract More Audience
- Crafting a Winning Edge Mastering Keywords in Digital Marketing for 2024
- Essential Templates & Makers' Insights for End Credits
- In 2024, Behind the Scenes The Genesis of a Mukbang Video
- Maximize YouTube Traction Affordable Audience Expansion
- In 2024, Elevating Youtube Prominence with Expert Use of the Hub
- [Updated] Capture Stillness on the Go without Tripods
- [Updated] Convert & Edit Wonders Select 10 Best YouTube Converters
- [Updated] A Compreehensive Guide to YouTube Thumbnail Creation (Mac)
- Leading Ad Creators on YouTube Unveiled
- [New] Discovering Your YouTube Unique Slot
- 2024 Approved Economic Elders YouTube's Most Knowledgeable Financial Stations
- YouTube Thumbnail 101 Phones Edition
- 2024 Approved A Deep Dive Into YouTube View Counts and More
- Mastering the Art of Divergence in Channels' Identities and Names
- [New] Elite Influencer Economy Leaders
- Mobile Mastery in Thumbnail Creation for Engaging YouTube Videos
- Efficiency Boost Discover the Top 5 YouTube Shorteners
- In 2024, Cutting-Edge Gadgets for Elite Gamers
- Televised Content Ease YouTube Loop Integration Guide
- Your Treasure Trove of Free Marketing 50+ YouTube Ads Ready to Go
- In 2024, Capitalizing on Hairstyle Demonstrations
- [New] Channel Makeovers Made Easy - Top 10 Online Tools for Artists
- [Updated] Conquering the Labyrinth of Lesser-Known YouTube Content
- Comprehensive Tips for Monitoring Subscriber Engagement
- In 2024, Double Down on Viewership YouTube + Twitch Strategy
- New In 2024, The Lowdown on VN Video Editor for PC A Brief but Informative Review
- Editor's Choice 17 Software Pick to Perfect Picture Backgrounds
- Easy Guide to Xiaomi 14 FRP Bypass With Best Methods
- Guide to Mirror Your Nokia G22 to Other Android devices | Dr.fone
- In 2024, From Beginner to B-Girl/Boy Selecting the Best Beat Backdrops and Background Music for Rapping
- In 2024, Best Free iPhone 6s Plus IMEI Checker
- In 2024, Unova Stone Pokémon Go Evolution List and How Catch Them For Vivo Y36i | Dr.fone
- In 2024, New Guide How To Check iCloud Activation Lock Status On Your Apple iPhone 6s Plus
- How To Restore Missing Contacts Files from Honor 100.
- How To Transfer WhatsApp From iPhone 7 to other iPhone 11 devices? | Dr.fone
- In 2024, How to Transfer Contacts from Samsung Galaxy A05s to Other Android Devices Using Bluetooth? | Dr.fone
- New 2024 Approved Serene Sound Sanctuary High-Fidelity Audio Management Application to Banish Background Noise From Your Phones
- 2024 Approved Infuse Harmonies Into Motion Picture Sequences Using Media Encrypter
- 2024 Approved Top 10 Best Gimbals for 4K DSRL/Mirrorless Cameras
- [New] Essential List Top 9 Multi-Device Collaboration Apps iOS/Android Reviewed
- 4 Ways to Fix Android Blue Screen of Death On Samsung Galaxy A05s | Dr.fone
- [New] How to Make a Game Streaming Video With AI Portrait for 2024
- In 2024, Unmatched Guide The Ultimate 11 Streaming Recorders
- New 2024 Approved Innovative Approaches to Minimize Audio and Video File Size
- Updated In 2024, Transform Your Audio The Experts Guide to Wav Conversion
- Title: "2024 Approved Brevity in Action The Process of Shortening YouTube Videos"
- Author: Steven
- Created at : 2024-05-25 18:28:05
- Updated at : 2024-05-26 18:28:05
- Link: https://youtube-clips.techidaily.com/2024-approved-brevity-in-action-the-process-of-shortening-youtube-videos/
- License: This work is licensed under CC BY-NC-SA 4.0.
