
:max_bytes(150000):strip_icc()/oura-ring-2-6e4a655bf1204877b33c125fe0f2fff4.jpg)
"2024 Approved Boosting YouTube Interaction with Emojis"
Boosting YouTube Interaction with Emojis
How to Add Emojis on YouTube Comments

Richard Bennett
Mar 27, 2024• Proven solutions
Emojis are a great way to make your videos and comments stand out from the rest. You may also be able to catch the attention of millennials and improve your YouTube and Google ranking. Beginners can use emojis as a great strategy to improve YouTube SEO performance and get ahead of others. Experts suggest using emojis wisely; that is not to overload or spam whole titles or comments with smileys!
Here are some great ways to add YouTube comments emojis:
Part 1: How to Type Emojis in a YouTube Comment on Windows
Here are several ways to type emojis in YouTube comments. Follow the instructions below to write YouTube comments with emojis:
1. Adding Emojis to YouTube Videos on Windows with Keyboard
If you are using Windows 10, then you can use the keyboard shortcut to open the emoji icons. Press Windows + ; (semi-colon) or Windows + . (period) to open the emoji keyboard. And you will see the emojis.
Currently, there are 6 types of emojis you can add on Windows, including smiley faces and animals, people, celebrities and objects, foods and plants, transportation and places, and symbols.
You can then click the emoji that you’d like to add to the YouTube video directly.
2. Copy and Paste Emojis from Websites
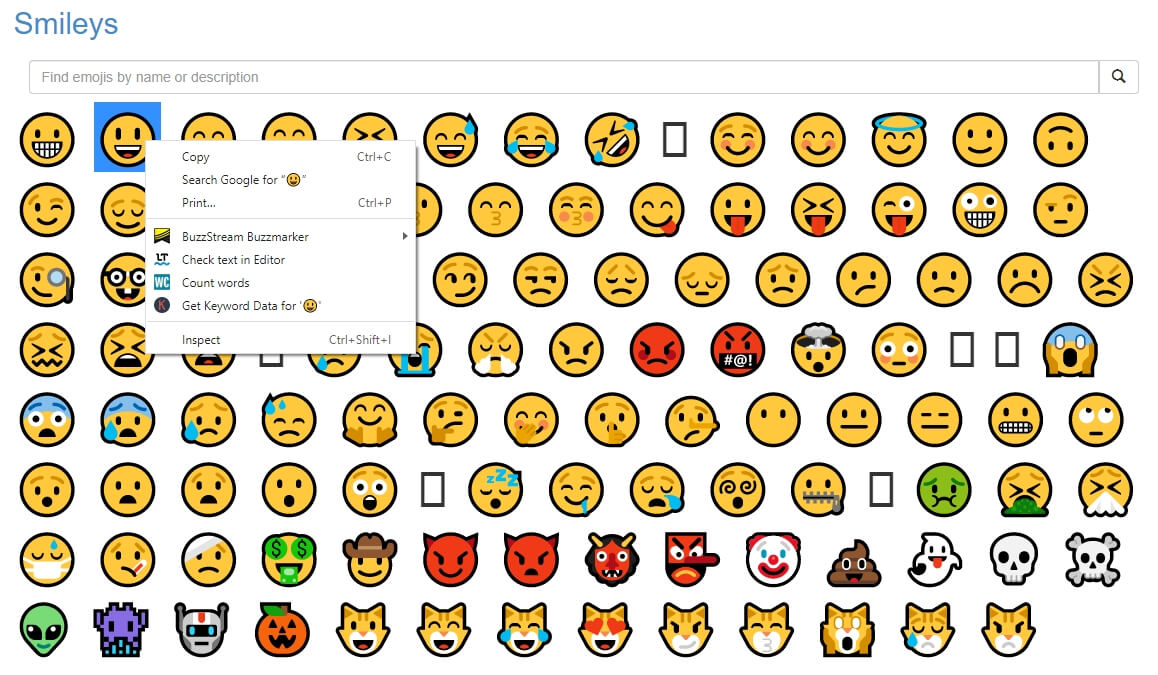
One of the easiest ways to add emojis to YouTube comments is to copy-paste them from an emoji database. You can right-click on the emoji and then select “copy.”
Now, go to your YouTube comment and right-click again. Scroll down and click on “paste” to use the emoji.
Here are some of the best websites to download emojis that you may need. In these websites, you can get a range of smileys and icons to use for your YouTube comments. You can start with smiley faces that help you express many emotions. Then you can get emojis of objects like cars, mountains, drinks, fruits, bells, guitars, and more.
The list is just endless, and you will never face any shortage of emojis.
Part 2: How to Add Emojis to YouTube Comments on Mac?
Mac users enjoy a wide selection of emojis without any hassles and can easily add emojis to comments they type on YouTube. Just follow the steps below to add emoji to YouTube comments.
You can select any emoji from the emoji resources website and ctrl-click your mouse to copy it. Now, navigate to your YouTube comment and ctrl-click your mouse. Click on “paste” to add the smiley to your comments.
If you want to use your keyboard, select the emoji and press “Command” and “C.” Now, press “Command” and “V” to paste the emoji in your YouTube comment.
Your emoji is now added to your YouTube comments.
You can also use your Mac’s inbuilt emojis in your YouTube comments. Start typing your YouTube comment and then use your keyboard shortcut Command + Control + Space to access the emoji list.
You can now double-click on any emoji to include it in your comment. The free emoji lists are full of smileys, animal faces, everyday objects and things, sports emojis, vehicles, and more. and more. You will find an emoji to suit every comment you type on YouTube.
If your Mac has a Touch Bar, then you can tap the smile face and then tap an emoji to add to YouTube video comments.
YouTuber Javier Mercedes has made a quick tutorial and introduced many more ways to typing emojis on Mac. Check it below and find the best way based on your preferences.
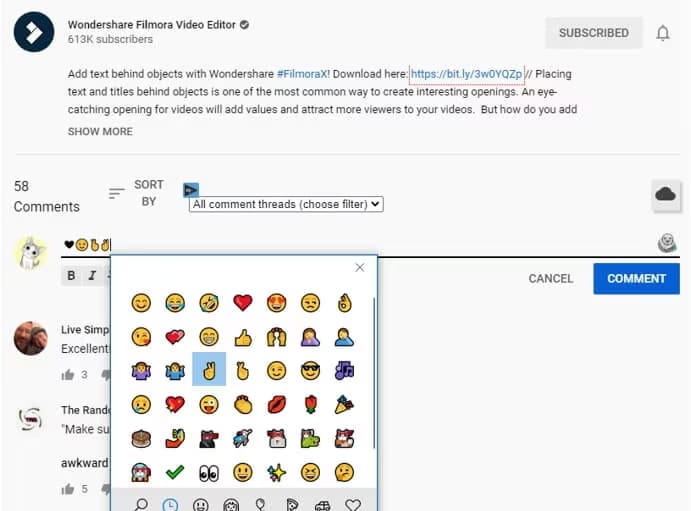
Part 3: How to Add Emoji to YouTube Comments with TubeBuddy?
TubeBuddy is a suite of tools for YouTubers to grow their success. You can access a range of tools, including YouTube comments emojis to improve your visual appeal. It is a free browser extension that you can add to Chrome, Opera, Firefox, and more.
TubeBuddy provides a large collection of emojis and smileys for you to use in your YouTube comments. Additionally, you don’t need to copy-paste anything. The plugin lets you insert emojis from a list with a click. Here are the steps to add emojis to YouTube comments using TubeBuddy:
Step 1: Install TubeBuddy
Visit the TubeBuddy website and install the plugin for your browser. TubeBuddy is available on both Chrome, FireFox, Opera, and Edge, as well as iOS and Android devices.
Step 2: Sign in to YouTube
Sign in to your YouTube account to allow TubeBuddy access to your comments. You will find the TubeBuddy icon beside the YouTube search bar on your browser.
Step 3: Add Emojis at Commenting
A window with a list of emojis will appear on YouTube as you type your comments. You can select any emoji and add it to your comments.
Types of Emojis in TubeBuddy
TubeBuddy is home to a large collection of emojis. You won’t find many emojis anywhere else on the internet. All emojis are grouped under categories like smileys, places, food and drinks, buildings, and more.
You can quickly select a category and then add emoji to YouTube comments. The tool also adds new emojis daily.
Bonus: How to Add Emojis to YouTube Video Title and Description?
You can add cool emojis to your video titles and descriptions for more innovation. People will also be more likely to choose your video as they pop-out on the search results or playlists.
Here is how you can add emojis to YouTube video titles and descriptions:
You can access any list of YouTube comments emojis and select the one you like. Then use your mouse to copy the emoji and paste it into your YouTube titles and description. Or press “Ctrl” + “C” for Windows and “Command” + “C” for Mac to copy your emoji.
Now go to your title or description and press “Ctrl” + “V” for Windows and “Command” + “V” for Mac to paste the emoji.
FAQs about YouTube Video Comments
- Are Emojis Harmful to Use for YouTube?
We all have heard rumors of using emojis in YouTube video titles or comments may damage views or reputation. However, it’s not true, and emojis have no negative consequences on YouTube.
Rather, you can attract more viewers and even improve YouTube SEO by using emojis. Google also allows emojis in search results, and data shows they rank better. You can use emojis for YouTube with complete peace of mind.
In my opinion, there will be no harmful effects on your views, subscribers, or credibility. Instead, you may be able to appeal to a younger crowd and get more clicks.
- Will adding Emojis Impact YouTube SEO?
Many people don’t use emojis in their YouTube videos, fearing a negative impact. But all the rumors out there are just rumors without any truth. YouTube doesn’t penalize you in any way if you use emojis in comments, titles, or descriptions. You will not experience any penal actions by including emojis on YouTube.
Google is also friendly with emojis, and many websites use them to stand apart from the crowd. Using emojis on YouTube can be an excellent way to improve your SEO performance. Your videos will also have a chance to show up on Google results and YouTube. Emojis also help your videos look innovative to draw in more views.
Final Thoughts
Using emojis in YouTube comments is a great way to boost the popularity of your videos. You can also use emojis in your video titles and descriptions to appear more innovative. Additionally, emojis can improve your YouTube SEO performance and even help you rank on Google search results.
Copy-pasting emojis is a simple way to use them, but you can also go for other methods. TubeBuddy is a great choice if you want to eliminate the whole copy-paste scenario and include more types of emojis in your comments directly.
Richard Bennett
Richard Bennett is a writer and a lover of all things video.
Follow @Richard Bennett
Richard Bennett
Mar 27, 2024• Proven solutions
Emojis are a great way to make your videos and comments stand out from the rest. You may also be able to catch the attention of millennials and improve your YouTube and Google ranking. Beginners can use emojis as a great strategy to improve YouTube SEO performance and get ahead of others. Experts suggest using emojis wisely; that is not to overload or spam whole titles or comments with smileys!
Here are some great ways to add YouTube comments emojis:
Part 1: How to Type Emojis in a YouTube Comment on Windows
Here are several ways to type emojis in YouTube comments. Follow the instructions below to write YouTube comments with emojis:
1. Adding Emojis to YouTube Videos on Windows with Keyboard
If you are using Windows 10, then you can use the keyboard shortcut to open the emoji icons. Press Windows + ; (semi-colon) or Windows + . (period) to open the emoji keyboard. And you will see the emojis.
Currently, there are 6 types of emojis you can add on Windows, including smiley faces and animals, people, celebrities and objects, foods and plants, transportation and places, and symbols.
You can then click the emoji that you’d like to add to the YouTube video directly.
2. Copy and Paste Emojis from Websites
One of the easiest ways to add emojis to YouTube comments is to copy-paste them from an emoji database. You can right-click on the emoji and then select “copy.”
Now, go to your YouTube comment and right-click again. Scroll down and click on “paste” to use the emoji.
Here are some of the best websites to download emojis that you may need. In these websites, you can get a range of smileys and icons to use for your YouTube comments. You can start with smiley faces that help you express many emotions. Then you can get emojis of objects like cars, mountains, drinks, fruits, bells, guitars, and more.
The list is just endless, and you will never face any shortage of emojis.
Part 2: How to Add Emojis to YouTube Comments on Mac?
Mac users enjoy a wide selection of emojis without any hassles and can easily add emojis to comments they type on YouTube. Just follow the steps below to add emoji to YouTube comments.
You can select any emoji from the emoji resources website and ctrl-click your mouse to copy it. Now, navigate to your YouTube comment and ctrl-click your mouse. Click on “paste” to add the smiley to your comments.
If you want to use your keyboard, select the emoji and press “Command” and “C.” Now, press “Command” and “V” to paste the emoji in your YouTube comment.
Your emoji is now added to your YouTube comments.
You can also use your Mac’s inbuilt emojis in your YouTube comments. Start typing your YouTube comment and then use your keyboard shortcut Command + Control + Space to access the emoji list.
You can now double-click on any emoji to include it in your comment. The free emoji lists are full of smileys, animal faces, everyday objects and things, sports emojis, vehicles, and more. and more. You will find an emoji to suit every comment you type on YouTube.
If your Mac has a Touch Bar, then you can tap the smile face and then tap an emoji to add to YouTube video comments.
YouTuber Javier Mercedes has made a quick tutorial and introduced many more ways to typing emojis on Mac. Check it below and find the best way based on your preferences.
Part 3: How to Add Emoji to YouTube Comments with TubeBuddy?
TubeBuddy is a suite of tools for YouTubers to grow their success. You can access a range of tools, including YouTube comments emojis to improve your visual appeal. It is a free browser extension that you can add to Chrome, Opera, Firefox, and more.
TubeBuddy provides a large collection of emojis and smileys for you to use in your YouTube comments. Additionally, you don’t need to copy-paste anything. The plugin lets you insert emojis from a list with a click. Here are the steps to add emojis to YouTube comments using TubeBuddy:
Step 1: Install TubeBuddy
Visit the TubeBuddy website and install the plugin for your browser. TubeBuddy is available on both Chrome, FireFox, Opera, and Edge, as well as iOS and Android devices.
Step 2: Sign in to YouTube
Sign in to your YouTube account to allow TubeBuddy access to your comments. You will find the TubeBuddy icon beside the YouTube search bar on your browser.
Step 3: Add Emojis at Commenting
A window with a list of emojis will appear on YouTube as you type your comments. You can select any emoji and add it to your comments.
Types of Emojis in TubeBuddy
TubeBuddy is home to a large collection of emojis. You won’t find many emojis anywhere else on the internet. All emojis are grouped under categories like smileys, places, food and drinks, buildings, and more.
You can quickly select a category and then add emoji to YouTube comments. The tool also adds new emojis daily.
Bonus: How to Add Emojis to YouTube Video Title and Description?
You can add cool emojis to your video titles and descriptions for more innovation. People will also be more likely to choose your video as they pop-out on the search results or playlists.
Here is how you can add emojis to YouTube video titles and descriptions:
You can access any list of YouTube comments emojis and select the one you like. Then use your mouse to copy the emoji and paste it into your YouTube titles and description. Or press “Ctrl” + “C” for Windows and “Command” + “C” for Mac to copy your emoji.
Now go to your title or description and press “Ctrl” + “V” for Windows and “Command” + “V” for Mac to paste the emoji.
FAQs about YouTube Video Comments
- Are Emojis Harmful to Use for YouTube?
We all have heard rumors of using emojis in YouTube video titles or comments may damage views or reputation. However, it’s not true, and emojis have no negative consequences on YouTube.
Rather, you can attract more viewers and even improve YouTube SEO by using emojis. Google also allows emojis in search results, and data shows they rank better. You can use emojis for YouTube with complete peace of mind.
In my opinion, there will be no harmful effects on your views, subscribers, or credibility. Instead, you may be able to appeal to a younger crowd and get more clicks.
- Will adding Emojis Impact YouTube SEO?
Many people don’t use emojis in their YouTube videos, fearing a negative impact. But all the rumors out there are just rumors without any truth. YouTube doesn’t penalize you in any way if you use emojis in comments, titles, or descriptions. You will not experience any penal actions by including emojis on YouTube.
Google is also friendly with emojis, and many websites use them to stand apart from the crowd. Using emojis on YouTube can be an excellent way to improve your SEO performance. Your videos will also have a chance to show up on Google results and YouTube. Emojis also help your videos look innovative to draw in more views.
Final Thoughts
Using emojis in YouTube comments is a great way to boost the popularity of your videos. You can also use emojis in your video titles and descriptions to appear more innovative. Additionally, emojis can improve your YouTube SEO performance and even help you rank on Google search results.
Copy-pasting emojis is a simple way to use them, but you can also go for other methods. TubeBuddy is a great choice if you want to eliminate the whole copy-paste scenario and include more types of emojis in your comments directly.
Richard Bennett
Richard Bennett is a writer and a lover of all things video.
Follow @Richard Bennett
Turning YouTube Sounds Into Text: An In-Depth, No-Cost Course
How to Transcribe a YouTube Video for FREE
Richard Bennett
Mar 27, 2024• Proven solutions
If you want to transcribe your videos to make the dialogs and speeches available in text format, you can use YouTube Transcribe feature that the streaming site offers for free. In this article, I’ll share with you a couple of methods to transcribe a YouTube video for free.
- Part 1: Transcribe YouTube Video Automatically for Free [2 Ways]
- Part 2: Transcribe YouTube Video to Text Online with Third-Party Service
- Part 3: Benefits of Transcribing YouTube Videos
- Part 4: YouTube Video Transcription FAQs
Part 1: How to Transcribe YouTube Video Automatically for Free [2 Ways]
Besides the basic video editing features on the YouTube platform, you can now quickly transcribe YouTube videos to the text as well. The good thing is, you can either use the automatic transcription feature that YouTube offers, or upload it manually while adjusting the timing as you go further.
Below are the two methods to transcribe your YouTube videos for free:
Method 1: Use the Automated Transcription Service on YouTube
As the name suggests, YouTube automatic transcription service works automatically. This means you don’t even have to click the ‘Transcribe’ button anymore to transcribe a YouTube video, and the website takes care of it on its own. All you need to do is, choose English as the language of the video when setting up subtitles. You can follow the instructions given below to do so:
Step 1 Upload a Video
Sign in to your YouTube account, click your profile picture from the top-right corner, and click YouTube Studio from the menu. Next, click CREATE from the upper-right corner, click Upload videos from the menu, and drag and drop a video from your computer to the Upload videos box that appears next.

Step 2 Select Transcription Language
On the Details page of the next box that appears, scroll down and click MORE OPTIONS, and select English in the Video language drop-down list under the Language, subtitles, and closed captions (CC) section.

Step 3 Publish the Video
Follow the on-screen instructions from this point to publish the video, and wait while YouTube automatically transcribes and adds the close captions to it.
Note: Depending on the duration of the clip, the time YouTube would take to transcribe may vary.
After YouTube has transcribed the video, you can download the transcription file in your preferred format. The instructions are given below explain how you can do so:
- Get to the Subtitles Window
While on the YouTube Studio page, click Subtitles from the left pane to go to the Channel subtitles page. And then click the video you want to modify.
- Get to Classic Studio
In the video subtitle page of the target video, hover mouse on the Published Automatic status under the Subtitles column, click the Options icon (with three vertical dots) that appears, and click Edit on Classic Studio.

- Download Transcription File
Click and open the Actions drop-down list from the top-left corner of the left pane, click your preferred transcription format including .vtt, .srt and .sbv from the list, and save the file on your local hard disk.

Method 2: Get YouTube Transcription when Watching
In addition, if you are watching any other video, you can make YouTube transcribe that for you as well. You can follow the instructions given below to get the YouTube video to text transcription:
Step 1: Play the Video
Go to the video on YouTube and start playing it. Make sure NOT to get to full-screen mode as doing so would hide the option to transcribe the clip.
Step 2: Enable Transcription
Click the More icon (with three horizontal dots) from under the bottom-right corner of the video player, and click Open transcript to see the video transcription in the Transcript pane that appears in the right.
Step 3: Manage Timestamps
Click the Options icon (with three vertical dots) from the top-right corner of the Transcript pane, and click Toggle timestamp to enable or disable the timestamps in the video transcription.
Limitations of Using YouTube Transcribe
Although YouTube’s automatic transcription is a decent feature that saves you a lot of time, since Google uses machine learning algorithms to convert the speech to text, the level of accuracy may vary depending on the accent of the speaker, and the clarity of the audio the video has. Also, even sometime you may not be satisfied with the end-results.
Alternatively, you can use Kapwing to transcribe a YouTube video and download the transcription file with the below step-by-step instructions:
Step 1: Add YouTube Video
Copy the URL of YouTube video you want to transcribe, go to https://www.kapwing.com/subtitles , paste the URL in the Paste a URL field, wait while Kapwing fetches the content of the video, and opens the Add subtitles to Video page.
Step 2: Transcribe the Video
Click Auto-generate from the right window, and follow the on-screen instructions to transcribe YouTube video to text.

Step 3: Download the Transcription File
Click Download SRT from the left pane, and follow the instructions from there to download the transcription file in *.srt format.

Pros
- Kapwing is free to use
- The auto-transcription process is quick and less tedious
- Kapwing also allows manual transcription and uploading of an existing *.srt file
Cons
- The auto-transcribed text might lack accuracy as the task is done by the speech-to-text tools that work in the background
You can follow the step-by-step instructions to transcribe a YouTube video and download the transcription file using Kapwing:
Step 1: Add YouTube Video
Copy the URL of YouTube video you want to transcribe, go to https://www.kapwing.com/subtitles , paste the URL in the Paste a URL field, wait while Kapwing fetches the content of the video, and opens the Add subtitles to Video page.
Step 2: Transcribe the Video
Click Auto-generate from the right window, and follow the on-screen instructions to transcribe YouTube video to text.
Step 3: Download the Transcription File
Click Download SRT from the left pane, and follow the instructions from there to download the transcription file in *.srt format.
Pros
- Kapwing is free to use
- The auto-transcription process is quick and less tedious
- Kapwing also allows manual transcription and uploading of an existing *.srt file
Cons
- The auto-transcribed text might lack accuracy as the task is done by the speech-to-text tools that work in the background
Part 3: Benefits of Transcribing YouTube Videos
You may need video transcriptions for several reasons, such as analyzing the summary of the entire speech in the video, extracting a single phrase or quote that was spoken in the clip, or making the video helpful even for those suffering from hearing impairment. When you transcribe a YouTube video, the transcript can be useful in many ways. Some of the most common benefits of transcribing a video include:
- Search Engine Optimization
When you add subtitles, the text can appear in Google search results when someone types a similar phrase in the search box. This helps get more views to your videos, thus giving your channel popularity, and you, monetary gains in the long run.
- Accent
If the speaker in the video is from a different region and is using an accent that you are not much comfortable with, you can turn on the subtitles and read the dialogs along with the video.
- Repurposing on Blogs
If you own a blog that you have embedded your video to, the transcription could be used to add text to it so the target audience can get a fair idea of what the video is all about. This is useful because many people prefer reading over watching.
YouTube Video Transcription FAQs
1. How to Transcribe YouTube Video to Text
Usually the transcription files have *.srt extension that are globally accepted and supported by almost all media players. However, there might be instances when you want to have the subtitles in plain text.
That said, to convert an SRT file to TXT, you can:
- Right-click the SRT file
- Go to Rename
- Replace srt with txt and press Enter
- Click OK on the confirmation box that appears next to convert SRT to TXT
After this, you can simply double-click the file, and read and modify the transcribed content as needed.
2. How to Edit and Upload Edited Transcript to YouTube
If you made any modifications to the transcript that was automatically generated by YouTube or any other third-party transcription tool, you can follow the steps given below to upload the new file to the YouTube video:
- Go to YouTube Studio and then to the Channel subtitles page as explained earlier
- Expand the Languages column of the target video
- Click the Options icon that appears under the Subtitles column when you hover mouse on to it
- Click Edit on Classic Studio
- On the next page, click Edit from the top-right corner

- Click to open the Actions drop-down list from the upper-left corner
- Click Upload a file
- Follow the on-screen instructions from there to upload the modified transcription file
- Click Save Changes from the top-right corner of the page when done
Conclusion
If you are looking for a quick and easy way of adding subtitles to your videos, letting YouTube transcribe for you could be a good approach. However, because these auto-generated transcriptions are created by machine learning algorithms, their accuracy cannot be counted on. Therefore, the best way to get the job done accurately is, let YouTube auto-transcribe your video, download the transcription file, make the necessary changes to it, and then upload the file back to the video.
Richard Bennett
Richard Bennett is a writer and a lover of all things video.
Follow @Richard Bennett
Richard Bennett
Mar 27, 2024• Proven solutions
If you want to transcribe your videos to make the dialogs and speeches available in text format, you can use YouTube Transcribe feature that the streaming site offers for free. In this article, I’ll share with you a couple of methods to transcribe a YouTube video for free.
- Part 1: Transcribe YouTube Video Automatically for Free [2 Ways]
- Part 2: Transcribe YouTube Video to Text Online with Third-Party Service
- Part 3: Benefits of Transcribing YouTube Videos
- Part 4: YouTube Video Transcription FAQs
Part 1: How to Transcribe YouTube Video Automatically for Free [2 Ways]
Besides the basic video editing features on the YouTube platform, you can now quickly transcribe YouTube videos to the text as well. The good thing is, you can either use the automatic transcription feature that YouTube offers, or upload it manually while adjusting the timing as you go further.
Below are the two methods to transcribe your YouTube videos for free:
Method 1: Use the Automated Transcription Service on YouTube
As the name suggests, YouTube automatic transcription service works automatically. This means you don’t even have to click the ‘Transcribe’ button anymore to transcribe a YouTube video, and the website takes care of it on its own. All you need to do is, choose English as the language of the video when setting up subtitles. You can follow the instructions given below to do so:
Step 1 Upload a Video
Sign in to your YouTube account, click your profile picture from the top-right corner, and click YouTube Studio from the menu. Next, click CREATE from the upper-right corner, click Upload videos from the menu, and drag and drop a video from your computer to the Upload videos box that appears next.
Step 2 Select Transcription Language
On the Details page of the next box that appears, scroll down and click MORE OPTIONS, and select English in the Video language drop-down list under the Language, subtitles, and closed captions (CC) section.
Step 3 Publish the Video
Follow the on-screen instructions from this point to publish the video, and wait while YouTube automatically transcribes and adds the close captions to it.
Note: Depending on the duration of the clip, the time YouTube would take to transcribe may vary.
After YouTube has transcribed the video, you can download the transcription file in your preferred format. The instructions are given below explain how you can do so:
- Get to the Subtitles Window
While on the YouTube Studio page, click Subtitles from the left pane to go to the Channel subtitles page. And then click the video you want to modify.
- Get to Classic Studio
In the video subtitle page of the target video, hover mouse on the Published Automatic status under the Subtitles column, click the Options icon (with three vertical dots) that appears, and click Edit on Classic Studio.
- Download Transcription File
Click and open the Actions drop-down list from the top-left corner of the left pane, click your preferred transcription format including .vtt, .srt and .sbv from the list, and save the file on your local hard disk.
Method 2: Get YouTube Transcription when Watching
In addition, if you are watching any other video, you can make YouTube transcribe that for you as well. You can follow the instructions given below to get the YouTube video to text transcription:
Step 1: Play the Video
Go to the video on YouTube and start playing it. Make sure NOT to get to full-screen mode as doing so would hide the option to transcribe the clip.
Step 2: Enable Transcription
Click the More icon (with three horizontal dots) from under the bottom-right corner of the video player, and click Open transcript to see the video transcription in the Transcript pane that appears in the right.
Step 3: Manage Timestamps
Click the Options icon (with three vertical dots) from the top-right corner of the Transcript pane, and click Toggle timestamp to enable or disable the timestamps in the video transcription.
Limitations of Using YouTube Transcribe
Although YouTube’s automatic transcription is a decent feature that saves you a lot of time, since Google uses machine learning algorithms to convert the speech to text, the level of accuracy may vary depending on the accent of the speaker, and the clarity of the audio the video has. Also, even sometime you may not be satisfied with the end-results.
Alternatively, you can use Kapwing to transcribe a YouTube video and download the transcription file with the below step-by-step instructions:
Step 1: Add YouTube Video
Copy the URL of YouTube video you want to transcribe, go to https://www.kapwing.com/subtitles , paste the URL in the Paste a URL field, wait while Kapwing fetches the content of the video, and opens the Add subtitles to Video page.
Step 2: Transcribe the Video
Click Auto-generate from the right window, and follow the on-screen instructions to transcribe YouTube video to text.
Step 3: Download the Transcription File
Click Download SRT from the left pane, and follow the instructions from there to download the transcription file in *.srt format.
Pros
- Kapwing is free to use
- The auto-transcription process is quick and less tedious
- Kapwing also allows manual transcription and uploading of an existing *.srt file
Cons
- The auto-transcribed text might lack accuracy as the task is done by the speech-to-text tools that work in the background
You can follow the step-by-step instructions to transcribe a YouTube video and download the transcription file using Kapwing:
Step 1: Add YouTube Video
Copy the URL of YouTube video you want to transcribe, go to https://www.kapwing.com/subtitles , paste the URL in the Paste a URL field, wait while Kapwing fetches the content of the video, and opens the Add subtitles to Video page.
Step 2: Transcribe the Video
Click Auto-generate from the right window, and follow the on-screen instructions to transcribe YouTube video to text.
Step 3: Download the Transcription File
Click Download SRT from the left pane, and follow the instructions from there to download the transcription file in *.srt format.
Pros
- Kapwing is free to use
- The auto-transcription process is quick and less tedious
- Kapwing also allows manual transcription and uploading of an existing *.srt file
Cons
- The auto-transcribed text might lack accuracy as the task is done by the speech-to-text tools that work in the background
Part 3: Benefits of Transcribing YouTube Videos
You may need video transcriptions for several reasons, such as analyzing the summary of the entire speech in the video, extracting a single phrase or quote that was spoken in the clip, or making the video helpful even for those suffering from hearing impairment. When you transcribe a YouTube video, the transcript can be useful in many ways. Some of the most common benefits of transcribing a video include:
- Search Engine Optimization
When you add subtitles, the text can appear in Google search results when someone types a similar phrase in the search box. This helps get more views to your videos, thus giving your channel popularity, and you, monetary gains in the long run.
- Accent
If the speaker in the video is from a different region and is using an accent that you are not much comfortable with, you can turn on the subtitles and read the dialogs along with the video.
- Repurposing on Blogs
If you own a blog that you have embedded your video to, the transcription could be used to add text to it so the target audience can get a fair idea of what the video is all about. This is useful because many people prefer reading over watching.
YouTube Video Transcription FAQs
1. How to Transcribe YouTube Video to Text
Usually the transcription files have *.srt extension that are globally accepted and supported by almost all media players. However, there might be instances when you want to have the subtitles in plain text.
That said, to convert an SRT file to TXT, you can:
- Right-click the SRT file
- Go to Rename
- Replace srt with txt and press Enter
- Click OK on the confirmation box that appears next to convert SRT to TXT
After this, you can simply double-click the file, and read and modify the transcribed content as needed.
2. How to Edit and Upload Edited Transcript to YouTube
If you made any modifications to the transcript that was automatically generated by YouTube or any other third-party transcription tool, you can follow the steps given below to upload the new file to the YouTube video:
- Go to YouTube Studio and then to the Channel subtitles page as explained earlier
- Expand the Languages column of the target video
- Click the Options icon that appears under the Subtitles column when you hover mouse on to it
- Click Edit on Classic Studio
- On the next page, click Edit from the top-right corner
- Click to open the Actions drop-down list from the upper-left corner
- Click Upload a file
- Follow the on-screen instructions from there to upload the modified transcription file
- Click Save Changes from the top-right corner of the page when done
Conclusion
If you are looking for a quick and easy way of adding subtitles to your videos, letting YouTube transcribe for you could be a good approach. However, because these auto-generated transcriptions are created by machine learning algorithms, their accuracy cannot be counted on. Therefore, the best way to get the job done accurately is, let YouTube auto-transcribe your video, download the transcription file, make the necessary changes to it, and then upload the file back to the video.
Richard Bennett
Richard Bennett is a writer and a lover of all things video.
Follow @Richard Bennett
Also read:
- Is Paying Monthly Just For Ad-Free Streaming, Or Are There More Benefits?
- Unlocking the Potential of YouTube Partnerships Tips for Successful Collabs
- [New] Are There Restrictions in Saving YouTube Videos?
- Enhance Listening Pleasure Constructing a YouTube Playlist for 2024
- [New] Carminati (Ajay) Mastering the Art and Science of Online Income
- [New] Easy Ways To Get Free Views on YouTube! Alternative Methods
- [Updated] Brief Basslines Video Music Mosaics
- The Essence of Earnings A 3-Step Expedient to Measure Your YouTube Profitability
- 2024 Approved CinemusicEditor for Elite PC Video Enthusiasts
- 5 Inspirational Winter Bgs to Heat Your Videos
- [Updated] Advanced Guide to Virtual Backgrounds in Videography
- In 2024, Elevate Your Content YouTube Thumbnail Artistry on Mac
- In 2024, Elevating Channel Excellence with Ideas & Vision
- [Updated] Achieve Video Perfection YouTube Studio Edition Tips & Tricks
- Essential Screen Recording Software List for Vloggers for 2024
- [New] 2024 Approved First Choice Firefox Recording Packages
- [Updated] Unmasking the Hype Fact-Based Insights Into Instagram's Reels
- Full Guide to Fix iToolab AnyGO Not Working On Motorola Edge 40 Pro | Dr.fone
- How To Transfer Data From Apple iPhone 12 Pro To Other iPhone 15 Pro Max devices? | Dr.fone
- In 2024, Vimeo Video Snippets Turn Into Dynamic, Shareable GIFs
- Updated Best 5 AI Voice Generators Online (Supports All Browsers) for 2024
- In 2024, Top 3 Best MP3 Volume Booster Online
- 4 Most-Known Ways to Find Someone on Tinder For Nokia C32 by Name | Dr.fone
- How to Reset a Locked Nokia C22 Phone
- [Updated] 10 Best Instagram Video Editor for Android, PC, Online
- Super Easy Ways To Deal with Nokia C300 Unresponsive Screen | Dr.fone
- In 2024, Ultimate Guide from Sony Xperia 1 V FRP Bypass
- Title: "2024 Approved Boosting YouTube Interaction with Emojis"
- Author: Steven
- Created at : 2024-05-25 18:27:40
- Updated at : 2024-05-26 18:27:40
- Link: https://youtube-clips.techidaily.com/2024-approved-boosting-youtube-interaction-with-emojis/
- License: This work is licensed under CC BY-NC-SA 4.0.
