
:max_bytes(150000):strip_icc():format(webp)/laptop-569944733df78cafda90169f.jpg)
"2024 Approved Average Profit per Stream Watcher on YouTube"
Average Profit per Stream Watcher on YouTube
How Much Money Do YouTubers Make Per View

Richard Bennett
Nov 01, 2022• Proven solutions
Can you make a living on YouTube? Everyone knows that big YouTubers get paid through the ads that play ahead of their videos. More and more YouTubers keep showing how much money they are making from YouTube via the lifestyles they lead. It begs the question - how much money do YouTubers make?
One of the main questions is “how many views do you need to start making money on YouTube?” The answer to this question is complicated. You need 4,000 hours of annual viewing time and 1,000 subscribers on your channel to sign up for monetization, but just being able to monetize your videos doesn’t mean you’re going to make money.
The reason is that YouTubers are not paid per view, they are paid per ad impression.
- Types of YouTube Ads - What is an Ad Impression?
- CPI Rates Explained
- How Much Do Big YouTubers Make?
- Why No Longer 10,000 Views?
Want a fast answer about how much money a YouTuber makes? Check out these calculators .
Types of YouTube Ads – What is an Ad Impression?
If you ask YouTubers about how much they make per thousand views, you’ll probably get a different answer depending on the person on who you ask. You may have already heard things like $5 per thousand views or $1,000 per 1 million views, but neither of these is for sure.
Google’s AdSense service, through which YouTubers make money, pays YouTubers for ad impressions. For most types of ads – including short pre-roll ads, the ads which appear at the bottoms of videos while they play, and the ads which appear as banners to the side of YouTube’s player – an ad impression means someone clicking on the ad and choosing to visit the advertiser’s site. One exception is skippable video ads, for which an impression is created when a viewer watches the ad for 30 seconds.
YouTubers do not make money on the views of their videos, because not all viewers click on ads. Many viewers bypass ads completely using ad-blockers. The amount of money YouTubers earn from a single ad impression is called their CPI or “cost per impression.”
CPI Rates Explained
YouTube advertising is currently managed inside the AdSense platform. In case you’re not familiar with AdSense, you can have 2 different kinds of ads - the cost per click (CPC) or the cost per view (CPV).
Cost Per Click ads
The advertiser pays based on how many clicks he was able to get with that particular ad. These kinds of ads usually appear on the right side of your YouTube channel or they can also appear at the bottom of the screen, during the video.
Cost Per View ads
the advertiser will pay based on the views he had of the ad and not based on the clicks he was able to generate. One of the things that many people aren’t aware of is the fact that the viewer needs to spend at least 30 seconds watching the ad or half the ad, whichever comes first. This means that a single viewer can continue clicking on the ad multiple times that the advertiser won’t be billed for all those clicks because he is only paying for views.
Never Click on the CPC ads of Your Own YouTube Videos
If any of your friends ever suggest that they are going to do so to help you out tell them not to. AdSense has a rate of ad-clicks that it considers normal and if you get significantly more clicks than that it will think you’re artificially pushing that number up by either clicking yourself or having someone do it for you. If this happens they will ban you from AdSense and, although there is an appeals process, it is unlikely you will ever get your account back and be able to monetize videos again.
How much you make from an ad on YouTube depends on your CPI, cost per impression. Simply put, this is the rate that YouTube will pay you for every 1,000 views or clicks of the ads that are attached to your videos. Even though it would be a lot simpler if YouTube had their current CPI rates available, they don’t. These rates vary depending on the ad, the types of videos you make, and how popular your channel is. It is actually against YouTube’s rules for YouTubers to share their personal CPI rates publicly.
Most people tend to assume that CPI rates are between $0.05 and $10. This huge difference is justified by YouTube by saying that they use a very complicated algorithm to determine your CPI rate. According to them, it includes evaluating factors like the ads, the type of audience who views your video, audience engagement, audience retention, and the price of the ads.
How Much Do Big YouTubers Make?
Many people are aspiring to make money as famous YouTubers, but it is not an easy task. You have a long way to go before you start making any money at all.
In general, it’s reasonable to expect to start earning some money when you get to 1 million subscribers. This is the point at which you can start treating YouTube as your job, but the truth is that you will still not be making amazing money. At 1 million subscribers you will only be starting to be seen as someone important in your industry. You won’t even necessarily be “YouTube famous” yet – there are a lot of channels with 1 million subs.
Even though most people think that YouTube channels with 1 million subscribers are already making a good amount of money and that they are already at the top, the truth is that they’ve just started climbing. They aren’t even near the top. Just to give you a better idea, there are more than 2,400 YouTube channels with more than 1 million subscribers.
According to Google, when an advertiser pays $100 to Google, Google pays $68 to the publisher (in this case, the publisher is a YouTube creator).
This graphic won’t apply to every situation because every situation is unique. It’s just an example using assumed numbers.
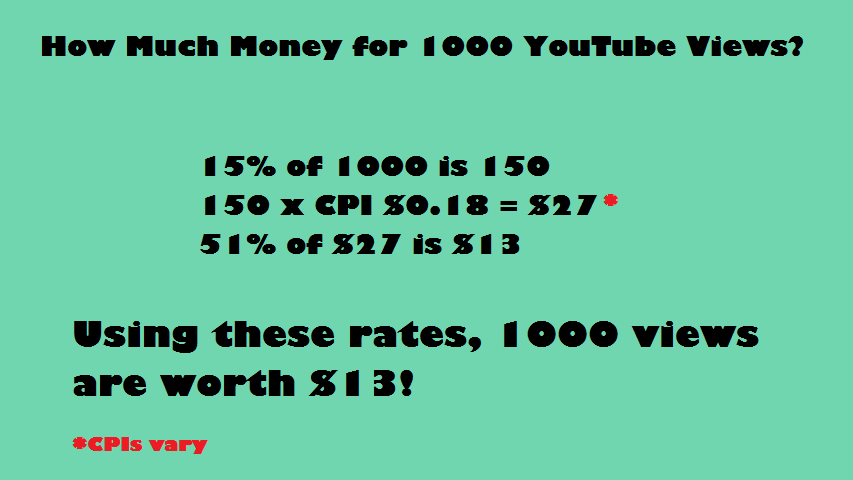
How much money for 1,000 YouTube views?
15% of 1,000 is 150
150x CPI ($0.18) = $27*
51% of $27 = $13
Using these rates, 1000 views are worth $13!
*CPI vary
Assuming that the average rate is about $0.18 per impression, you still need to factor in that most people don’t click on ads or watch skippable video ads for 30 seconds. Only about 15% of viewers tend to watch the complete ad (or, at least half of it). So, considering that you have 1,000 views on your video, only 150 viewers watched your complete ad. So, at $0.18 per view, Google will charge $27 to the advertiser and the YouTube channel will get 51% of that, meaning the creator will earn $13 per 1,000 views.
Want to know how much YouTube pays for 1 million views ?
It will take you a long time to start earning enough money to support yourself through AdSense. That’s why AdSense isn’t the primary way that huge YouTube stars make money. In addition to AdSense revenue you can (and should) also consider other opportunities such as product placement, endorsements, and brand sponsorships. Many YouTubers also make some money from selling their merchandise.
Some YouTubers earn millions of dollars every year. Although the exact numbers have never been disclosed, many different websites have made educated guesses.
Forbes publishes an annual list of the highest-paid YouTubers, which includes revenue from things like book deals and makeup lines. It is useful to look at this list gain have some perspective about how big YouTubers make their money, and how big they had to get to make it.
As of 2017, YouTube gamer Daniel Middleton (DanTDM) is the highest-paid YouTuber earning 16 million dollars. He is followed by gamer Evan Fong (Vanoss Gaming) with $15.5 million, Dude Perfect with $14 million, and Mark Fischbach (Markiplier) and Logan Paul with $12.5 million. However, as we already mentioned, even though a substantial part of the income of these YouTube stars comes from YouTube/AdSense, the bulk of it comes from things like merchandise and sponsorships.
Instead of relying on YouTube to pay them, YouTubers need to seek out other ways of leveraging the YouTube platform to earn money .
We all agree that being a YouTube star isn’t an easy path. However, if you honestly love what you do, then you will be willing to put effort into making great videos regularly. Part of that is also being willing to take the time to promote them and yourself, as well as putting time and effort into forging a good relationship with your audience.
Why No Longer 10,000 Views?
YouTube used to let anybody monetize their videos, but that has now changed. Then for a while, you’ll qualify for monetization after reaching 10,000-lifetime views on your channel. But as of 2018, the rules to YouTube monetization has gotten more challenging.
To monetize you must have:
- 4,000 of annual watch time
- 1,000 subscribers
The reason for this is that YouTube was having trouble with channels that were trying to monetize stolen or inappropriate content, besides, YouTubers are gaming the system by using automated programs to gain more views. By making creators get more watch time and subscribers before they apply for monetization, YouTube has been able to create a review process in which they can prove that the channel has a legitimate audience and stop content thieves and criminals from making money. Naturally, this new rule also makes it very difficult for new YouTubers to make money.
Are you finding it difficult to earn money on YouTube? Subscribe to the Filmora.io YouTube channel for more tips on channel monetization.
Richard Bennett
Richard Bennett is a writer and a lover of all things video.
Follow @Richard Bennett
Richard Bennett
Nov 01, 2022• Proven solutions
Can you make a living on YouTube? Everyone knows that big YouTubers get paid through the ads that play ahead of their videos. More and more YouTubers keep showing how much money they are making from YouTube via the lifestyles they lead. It begs the question - how much money do YouTubers make?
One of the main questions is “how many views do you need to start making money on YouTube?” The answer to this question is complicated. You need 4,000 hours of annual viewing time and 1,000 subscribers on your channel to sign up for monetization, but just being able to monetize your videos doesn’t mean you’re going to make money.
The reason is that YouTubers are not paid per view, they are paid per ad impression.
- Types of YouTube Ads - What is an Ad Impression?
- CPI Rates Explained
- How Much Do Big YouTubers Make?
- Why No Longer 10,000 Views?
Want a fast answer about how much money a YouTuber makes? Check out these calculators .
Types of YouTube Ads – What is an Ad Impression?
If you ask YouTubers about how much they make per thousand views, you’ll probably get a different answer depending on the person on who you ask. You may have already heard things like $5 per thousand views or $1,000 per 1 million views, but neither of these is for sure.
Google’s AdSense service, through which YouTubers make money, pays YouTubers for ad impressions. For most types of ads – including short pre-roll ads, the ads which appear at the bottoms of videos while they play, and the ads which appear as banners to the side of YouTube’s player – an ad impression means someone clicking on the ad and choosing to visit the advertiser’s site. One exception is skippable video ads, for which an impression is created when a viewer watches the ad for 30 seconds.
YouTubers do not make money on the views of their videos, because not all viewers click on ads. Many viewers bypass ads completely using ad-blockers. The amount of money YouTubers earn from a single ad impression is called their CPI or “cost per impression.”
CPI Rates Explained
YouTube advertising is currently managed inside the AdSense platform. In case you’re not familiar with AdSense, you can have 2 different kinds of ads - the cost per click (CPC) or the cost per view (CPV).
Cost Per Click ads
The advertiser pays based on how many clicks he was able to get with that particular ad. These kinds of ads usually appear on the right side of your YouTube channel or they can also appear at the bottom of the screen, during the video.
Cost Per View ads
the advertiser will pay based on the views he had of the ad and not based on the clicks he was able to generate. One of the things that many people aren’t aware of is the fact that the viewer needs to spend at least 30 seconds watching the ad or half the ad, whichever comes first. This means that a single viewer can continue clicking on the ad multiple times that the advertiser won’t be billed for all those clicks because he is only paying for views.
Never Click on the CPC ads of Your Own YouTube Videos
If any of your friends ever suggest that they are going to do so to help you out tell them not to. AdSense has a rate of ad-clicks that it considers normal and if you get significantly more clicks than that it will think you’re artificially pushing that number up by either clicking yourself or having someone do it for you. If this happens they will ban you from AdSense and, although there is an appeals process, it is unlikely you will ever get your account back and be able to monetize videos again.
How much you make from an ad on YouTube depends on your CPI, cost per impression. Simply put, this is the rate that YouTube will pay you for every 1,000 views or clicks of the ads that are attached to your videos. Even though it would be a lot simpler if YouTube had their current CPI rates available, they don’t. These rates vary depending on the ad, the types of videos you make, and how popular your channel is. It is actually against YouTube’s rules for YouTubers to share their personal CPI rates publicly.
Most people tend to assume that CPI rates are between $0.05 and $10. This huge difference is justified by YouTube by saying that they use a very complicated algorithm to determine your CPI rate. According to them, it includes evaluating factors like the ads, the type of audience who views your video, audience engagement, audience retention, and the price of the ads.
How Much Do Big YouTubers Make?
Many people are aspiring to make money as famous YouTubers, but it is not an easy task. You have a long way to go before you start making any money at all.
In general, it’s reasonable to expect to start earning some money when you get to 1 million subscribers. This is the point at which you can start treating YouTube as your job, but the truth is that you will still not be making amazing money. At 1 million subscribers you will only be starting to be seen as someone important in your industry. You won’t even necessarily be “YouTube famous” yet – there are a lot of channels with 1 million subs.
Even though most people think that YouTube channels with 1 million subscribers are already making a good amount of money and that they are already at the top, the truth is that they’ve just started climbing. They aren’t even near the top. Just to give you a better idea, there are more than 2,400 YouTube channels with more than 1 million subscribers.
According to Google, when an advertiser pays $100 to Google, Google pays $68 to the publisher (in this case, the publisher is a YouTube creator).
This graphic won’t apply to every situation because every situation is unique. It’s just an example using assumed numbers.
How much money for 1,000 YouTube views?
15% of 1,000 is 150
150x CPI ($0.18) = $27*
51% of $27 = $13
Using these rates, 1000 views are worth $13!
*CPI vary
Assuming that the average rate is about $0.18 per impression, you still need to factor in that most people don’t click on ads or watch skippable video ads for 30 seconds. Only about 15% of viewers tend to watch the complete ad (or, at least half of it). So, considering that you have 1,000 views on your video, only 150 viewers watched your complete ad. So, at $0.18 per view, Google will charge $27 to the advertiser and the YouTube channel will get 51% of that, meaning the creator will earn $13 per 1,000 views.
Want to know how much YouTube pays for 1 million views ?
It will take you a long time to start earning enough money to support yourself through AdSense. That’s why AdSense isn’t the primary way that huge YouTube stars make money. In addition to AdSense revenue you can (and should) also consider other opportunities such as product placement, endorsements, and brand sponsorships. Many YouTubers also make some money from selling their merchandise.
Some YouTubers earn millions of dollars every year. Although the exact numbers have never been disclosed, many different websites have made educated guesses.
Forbes publishes an annual list of the highest-paid YouTubers, which includes revenue from things like book deals and makeup lines. It is useful to look at this list gain have some perspective about how big YouTubers make their money, and how big they had to get to make it.
As of 2017, YouTube gamer Daniel Middleton (DanTDM) is the highest-paid YouTuber earning 16 million dollars. He is followed by gamer Evan Fong (Vanoss Gaming) with $15.5 million, Dude Perfect with $14 million, and Mark Fischbach (Markiplier) and Logan Paul with $12.5 million. However, as we already mentioned, even though a substantial part of the income of these YouTube stars comes from YouTube/AdSense, the bulk of it comes from things like merchandise and sponsorships.
Instead of relying on YouTube to pay them, YouTubers need to seek out other ways of leveraging the YouTube platform to earn money .
We all agree that being a YouTube star isn’t an easy path. However, if you honestly love what you do, then you will be willing to put effort into making great videos regularly. Part of that is also being willing to take the time to promote them and yourself, as well as putting time and effort into forging a good relationship with your audience.
Why No Longer 10,000 Views?
YouTube used to let anybody monetize their videos, but that has now changed. Then for a while, you’ll qualify for monetization after reaching 10,000-lifetime views on your channel. But as of 2018, the rules to YouTube monetization has gotten more challenging.
To monetize you must have:
- 4,000 of annual watch time
- 1,000 subscribers
The reason for this is that YouTube was having trouble with channels that were trying to monetize stolen or inappropriate content, besides, YouTubers are gaming the system by using automated programs to gain more views. By making creators get more watch time and subscribers before they apply for monetization, YouTube has been able to create a review process in which they can prove that the channel has a legitimate audience and stop content thieves and criminals from making money. Naturally, this new rule also makes it very difficult for new YouTubers to make money.
Are you finding it difficult to earn money on YouTube? Subscribe to the Filmora.io YouTube channel for more tips on channel monetization.
Richard Bennett
Richard Bennett is a writer and a lover of all things video.
Follow @Richard Bennett
Enliven YouTube Images: A Burst of Neon Flair
Your YouTube video, or any other clip published on any forum, gets a larger number of hits if it has an attractive thumbnail. And, the fact is, a thumbnail becomes 10x more attractive when the main character that the image has have a neon border around it.
With that said, in the following sections, you will learn a couple of methods on how to add a YouTube thumbnail border around the main characters and/or objects that are significant to the clip.
In this article
01 Add Glowing Neon Border to YouTube Thumbnail with Filmora
02 Add a Glowing Neon Border in YouTube Thumbnail with Canva
03 Outline a Person in a YouTube Thumbnail with Photoshop
Part 1: How to Add Neon Border to YouTube Thumbnail for Free with Filmora
Being one of the most versatile and intuitive post-production tools available in the market today, Wondershare Filmora X allows you to add a neon border to a YouTube thumbnail quite conveniently. You can learn how to get this done on Windows or Mac by following the steps given below.
For Win 7 or later (64-bit)
For macOS 10.12 or later
Step 1: Define Project Settings and Add Image to the Timeline
Launch Wondershare Filmora X on your PC (a MacBook Pro M1 is used here), ensure that the project aspect ratio is set to 16:9 (Widescreen) on the splash screen, and click New Project. On the main interface, click the Preview quality and display settings icon from the upper-right area of the Timeline, click Change Project Aspect Ratio, click to select 1280 x 720 (HD) from the Resolution menu of the Project Settings box, and click OK to save the custom project settings.

Then select My Media from the menu bar if not already selected, click Project Media from the navigation pane, and click Import from the Media box to select and import the image of the main character or object that you want to use in the thumbnail.

Now, drag the image from the Media box to the Timeline at the bottom.

Step 2: Clear Image Background, Add Border, and Add Custom Background
Go to Effects from the menu bar, click to select the Default tab and then AI Portrait from the navigation pane, and click and drag the Human Segmentation preset from the right box, and place it over the image track in the Timeline.

Double-click the image layer, scroll down the upper-left box to the Video Effects section, and use the Edge Thickness and Edge Feather sliders to adjust the character’s edges to make them as realistic as possible. Click OK when done.

Next, click and drag the Human Border preset over the image track in the Timeline, and follow the same procedure to customize the border. This will give the character a neon border effect.

Now, use the method explained earlier to import a custom image for the background, and drag and place it under the previous track in the Timeline.

If you are running the latest version of Filmora, you will find there are some neon light effects available under AI Portrait as well.

Step 3: Add Titles to Thumbnail
Go to Titles from the menu bar, click to select the Default tab and then Lower 3rds from the navigation pane, and click and drag your preferred lower-third preset from the right window to a separate layer in the Timeline. Double-click the lower-third layer, and use the available options in the upper-left window to change the text, its color, etc., and drag the textbox to place it to your preferred position on the image as well. Click OK to save the changes.
Next, click to select Titles from the navigation pane, and drag your preferred title from the right window to the upper-most track in the Timeline. Now use the method explained earlier to edit the text, its color, position, etc. to make it look professional.

For more tips and tricks for creating YouTube thumbnail, you can check this You Tube thumbnail creating guide.
Step 4: Get the Neon Border Thumbnail
Click the Snapshot (Camera) icon from the upper-right area of the Timeline, go to My Media from the menu bar, right-click the thumbnail of the screenshot you captured, and click Reveal in Finder (on Mac) or Reveal in Explorer (on Windows) to get to the folder the YouTube thumbnail border is saved in.

Part 2: How to Add a Glowing Neon Border in Your YouTube Thumbnail with Canva
Canva is another intuitive editing program that works on the web interface rather than having you download and install an app on your PC. You can add a neon border for YouTube thumbnails using Canva by following the instructions given below:
Step 1: Define Project Settings and Add a Background
After signing in to your Canva account, click Create a design from the top-right corner of the page, click Custom size from the bottom, define 1280 and 720 in the Width and Height fields on the box that appears respectively, and click Create new design.

Now, click to select Background from the navigation bar on the left (if the Background tool is not visible, click More and then choose Background from the expanded list), and click to select a background from the images available in the center pane.

Step 2: Upload an Image and Add Effects
Click Uploads from the navigation bar, click the More icon from the right of the Upload media button present at the top of the center pane, choose your preferred method to upload the image (with the transparent background) that you want to use, upload the image, and drag it from the center pane to the Canvas.
Note: You can use any of the tools available online to remove the background from your image for free.

To add a YouTube thumbnail border, make sure that the image that you added to the Canvas is selected, click the Duplicate icon from the upper-right area, and use the scaling handles of the copy of the image to increase its size a bit. Reposition the image back to its original location as well.
Then, click Edit image from the upper-left corner of the Canvas, click Duotone from the Edit image pane at the center, if need be, click See all, choose your preferred duotone effect to apply on the image, choose your preferred highlight and shadow colors from the box that appears next, and click Back from the top of the pane.

Next, click See all next to the Adjust section from the center pane, and drag the Blur slider to the right to increase the blur effect on the image.

Step 3: Position the Layers
While keeping the duplicate image selected, click the Position button from the upper-right area of the Canvas, and click Background to send the second image behind the first one to get the neon border effect for the photo.

Part 3: How to Outline a Person in a YouTube Thumbnail with Photoshop
Because YouTube thumbnails are nothing but static images, creating YouTube thumbnail border with Adobe Photoshop is comparatively easier. The process of doing this is given below:
Step 1: Define Document Preferences and Import an Image
Launch Adobe Photoshop on your PC, click Create new, and on the New Document customization box, define the width and height values to 1280 and 720 pixels respectively. Select Transparent from the Background Contents menu as well if not already selected. Click Create from the bottom to create a new Photoshop document with the specified document settings. Next, open the folder that contains the source image, drag the photo to Photoshop, and press Enter to place the photo.

Step 2: Remove Background from the Image
Make sure that the image layer is selected in the Layers panel on the right, go to Select from the menu bar at the top, and click Subject. From the bottom of the Layers panel, click the Add a mask icon to get rid of the background, leaving only the human on the Canvas.

Step 3: Add a Custom Background and an Outline Around the Subject
Use the method explained earlier to import a background image of your choice to Photoshop. Drag the background image layer to the bottom in the Layers panel. Double-click the masked layer, click to select Stroke from the left pane of the Layer Style box, and use the options available on the right to manage the size, color, position, etc. of the stroke that has been added around the human subject. Click OK when done, and then export the image normally to use it as a YouTube thumbnail border.

Summary
It is important to know that the default resolution of a YouTube thumbnail is 1280 x 720 pixels that is usually written and referred to as 720p. While adding a YouTube thumbnail border, it is also imperative to have a good sense of color combination and fonts. Furthermore, a decent tool like Wondershare Filmora X must be used to add an appealing neon border around the main subject in the thumbnail image easily and quickly.
02 Add a Glowing Neon Border in YouTube Thumbnail with Canva
03 Outline a Person in a YouTube Thumbnail with Photoshop
Part 1: How to Add Neon Border to YouTube Thumbnail for Free with Filmora
Being one of the most versatile and intuitive post-production tools available in the market today, Wondershare Filmora X allows you to add a neon border to a YouTube thumbnail quite conveniently. You can learn how to get this done on Windows or Mac by following the steps given below.
For Win 7 or later (64-bit)
For macOS 10.12 or later
Step 1: Define Project Settings and Add Image to the Timeline
Launch Wondershare Filmora X on your PC (a MacBook Pro M1 is used here), ensure that the project aspect ratio is set to 16:9 (Widescreen) on the splash screen, and click New Project. On the main interface, click the Preview quality and display settings icon from the upper-right area of the Timeline, click Change Project Aspect Ratio, click to select 1280 x 720 (HD) from the Resolution menu of the Project Settings box, and click OK to save the custom project settings.
Then select My Media from the menu bar if not already selected, click Project Media from the navigation pane, and click Import from the Media box to select and import the image of the main character or object that you want to use in the thumbnail.
Now, drag the image from the Media box to the Timeline at the bottom.
Step 2: Clear Image Background, Add Border, and Add Custom Background
Go to Effects from the menu bar, click to select the Default tab and then AI Portrait from the navigation pane, and click and drag the Human Segmentation preset from the right box, and place it over the image track in the Timeline.
Double-click the image layer, scroll down the upper-left box to the Video Effects section, and use the Edge Thickness and Edge Feather sliders to adjust the character’s edges to make them as realistic as possible. Click OK when done.
Next, click and drag the Human Border preset over the image track in the Timeline, and follow the same procedure to customize the border. This will give the character a neon border effect.
Now, use the method explained earlier to import a custom image for the background, and drag and place it under the previous track in the Timeline.
If you are running the latest version of Filmora, you will find there are some neon light effects available under AI Portrait as well.
Step 3: Add Titles to Thumbnail
Go to Titles from the menu bar, click to select the Default tab and then Lower 3rds from the navigation pane, and click and drag your preferred lower-third preset from the right window to a separate layer in the Timeline. Double-click the lower-third layer, and use the available options in the upper-left window to change the text, its color, etc., and drag the textbox to place it to your preferred position on the image as well. Click OK to save the changes.
Next, click to select Titles from the navigation pane, and drag your preferred title from the right window to the upper-most track in the Timeline. Now use the method explained earlier to edit the text, its color, position, etc. to make it look professional.
For more tips and tricks for creating YouTube thumbnail, you can check this You Tube thumbnail creating guide.
Step 4: Get the Neon Border Thumbnail
Click the Snapshot (Camera) icon from the upper-right area of the Timeline, go to My Media from the menu bar, right-click the thumbnail of the screenshot you captured, and click Reveal in Finder (on Mac) or Reveal in Explorer (on Windows) to get to the folder the YouTube thumbnail border is saved in.
Part 2: How to Add a Glowing Neon Border in Your YouTube Thumbnail with Canva
Canva is another intuitive editing program that works on the web interface rather than having you download and install an app on your PC. You can add a neon border for YouTube thumbnails using Canva by following the instructions given below:
Step 1: Define Project Settings and Add a Background
After signing in to your Canva account, click Create a design from the top-right corner of the page, click Custom size from the bottom, define 1280 and 720 in the Width and Height fields on the box that appears respectively, and click Create new design.
Now, click to select Background from the navigation bar on the left (if the Background tool is not visible, click More and then choose Background from the expanded list), and click to select a background from the images available in the center pane.
Step 2: Upload an Image and Add Effects
Click Uploads from the navigation bar, click the More icon from the right of the Upload media button present at the top of the center pane, choose your preferred method to upload the image (with the transparent background) that you want to use, upload the image, and drag it from the center pane to the Canvas.
Note: You can use any of the tools available online to remove the background from your image for free.
To add a YouTube thumbnail border, make sure that the image that you added to the Canvas is selected, click the Duplicate icon from the upper-right area, and use the scaling handles of the copy of the image to increase its size a bit. Reposition the image back to its original location as well.
Then, click Edit image from the upper-left corner of the Canvas, click Duotone from the Edit image pane at the center, if need be, click See all, choose your preferred duotone effect to apply on the image, choose your preferred highlight and shadow colors from the box that appears next, and click Back from the top of the pane.
Next, click See all next to the Adjust section from the center pane, and drag the Blur slider to the right to increase the blur effect on the image.
Step 3: Position the Layers
While keeping the duplicate image selected, click the Position button from the upper-right area of the Canvas, and click Background to send the second image behind the first one to get the neon border effect for the photo.
Part 3: How to Outline a Person in a YouTube Thumbnail with Photoshop
Because YouTube thumbnails are nothing but static images, creating YouTube thumbnail border with Adobe Photoshop is comparatively easier. The process of doing this is given below:
Step 1: Define Document Preferences and Import an Image
Launch Adobe Photoshop on your PC, click Create new, and on the New Document customization box, define the width and height values to 1280 and 720 pixels respectively. Select Transparent from the Background Contents menu as well if not already selected. Click Create from the bottom to create a new Photoshop document with the specified document settings. Next, open the folder that contains the source image, drag the photo to Photoshop, and press Enter to place the photo.
Step 2: Remove Background from the Image
Make sure that the image layer is selected in the Layers panel on the right, go to Select from the menu bar at the top, and click Subject. From the bottom of the Layers panel, click the Add a mask icon to get rid of the background, leaving only the human on the Canvas.
Step 3: Add a Custom Background and an Outline Around the Subject
Use the method explained earlier to import a background image of your choice to Photoshop. Drag the background image layer to the bottom in the Layers panel. Double-click the masked layer, click to select Stroke from the left pane of the Layer Style box, and use the options available on the right to manage the size, color, position, etc. of the stroke that has been added around the human subject. Click OK when done, and then export the image normally to use it as a YouTube thumbnail border.
Summary
It is important to know that the default resolution of a YouTube thumbnail is 1280 x 720 pixels that is usually written and referred to as 720p. While adding a YouTube thumbnail border, it is also imperative to have a good sense of color combination and fonts. Furthermore, a decent tool like Wondershare Filmora X must be used to add an appealing neon border around the main subject in the thumbnail image easily and quickly.
Also read:
- A Comprehensive Guide to Personalizing Video Images for 2024
- Conquering the Digital Landscape Leveraging Multi-Platform Streaming for 2024
- Enriching Videos with No-Cost Sounds Legally
- The Path to Ethical Expansion YouTube Traffic Enhancement
- [New] Dial Up Your Digital Presence Tips for Confident Video Creators
- 2024 Approved A Stepwise Approach to YouTube Caption Addition
- [Updated] Edible Imagery Stepwise Food Film Making
- [New] Boost Your Search Rankings Expert Reviews on 7 Cost-Effective Video Tags Extractors
- Engage and Inspire Viewers - Animated Subscribers in Filmora Explained for 2024
- Enhancing User Interaction with Well-Sized Thumbnails
- 2024 Approved Boosting Your Video Income on Youtube - Essentials
- [New] Enlightenment Echoes Best Ed Tutorials YT
- How to Rotate YouTube Videos by Any Angle [2023 Guide &Editors]
- Quick and Easy Channels Personalize Your YouTube URL Now
- 2024 Approved Crafting a Personalized YouTube Pathway to Viewers
- How-To's on Selecting Best iOS Video Editing Software
- Unified Media Playback on YouTube FLV Files Tutorial
- 2024 Approved Boosting Views Top 14 Gaming Video Ideas That Work
- Logo Luminosity Enhancing Gaming Channels with Designs
- Achieving YouTube Excellence with Gamers' Channel Graphics for 2024
- The Dark Side of Digital Content Profitability
- 2024 Approved [Filmora] Best Magic Tricks of YouTube Video Editors EVER
- Trippy Techniques Secrets to Excellent Tripod Use in Vlogging
- Profitability in Production Starting a Successful Vlog
- Boost Your Video's Popularity on YouTube for 2024
- UltraEdit Pro Music & Visual Craftsmanship for PCs
- Crafting Compelling Narratives with Strategic YouTube Banners for 2024
- [New] Avoiding Strikes YouTube Edition
- [Updated] Accelerate Channels YouTube's Top Collaborative Growth Tips
- [New] Boosting Channel Success Scaling for a Million Viewers
- Secrets Unveiled Perfect Your 360° YouTube Live Experience
- 2024 Approved Effective, Legal Strategies for Content Visibility
- 2024 Approved Essential Tips for Creating Compelling Free Ads on YouTube
- [Updated] Essential Knowledge for YouTube Short Creators
- 10 Power Players YouTube's Ladies in Gaming for 2024
- In 2024, Digital Dreams Unite Conference
- 2024 Approved Crafting Comfortable Cinematography Amidst the Chill
- Channel Name Wizardry Brainstorm & Create!
- YouTube's Evergreen Most-Watched Video Catalog
- [New] Captivating Startups Discovering the Best 15 Video Intros
- Profit From YouTube Monetize YouTube Shorts and Boost Your Income for 2024
- 2024 Approved Decoding YouTube's Algorithm Behind Prominent Comments
- The Ultimate Guide to Video Visibility (For YouTubers)
- [Updated] Epic Soundscape Trending Audio for Cutting-Edge YouTube Short Videos
- In 2024, Crafting Exceptional FreeFire Content on YouTube Platforms
- Add Visual Appeal with These Methods for YT Video Inclusion in PPT for 2024
- The Ultimate Guide for Aspiring Movie Makers, Beyond YouTube
- Will iSpoofer update On Honor X50i | Dr.fone
- New Selected Overdub Voice with AI Virbo At Its Finest
- How to Bypass FRP from Vivo Y100?
- How To Update or Downgrade iPhone 12 Pro Max Without Losing Data? | Dr.fone
- 7 Fixes for Unfortunately, Phone Has Stopped on Realme 12 Pro+ 5G | Dr.fone
- [New] In 2024, The Easy Steps for Altering Your Display Name in Discord
- [Updated] 100+ Best Examples & Tips to Craft Your Facebook Bios
- [New] Mastering the Loop A Comprehensive Guide for Instagram Videographers
- Updated Streamline Video Editing Fast and Easy Ways to Trim Large Files on Mac for 2024
- [Updated] Mastering the Art of Eye-Catching FB Ad Content for 2024
- Failed to play HEVC files on Samsung Galaxy S24
- Updated 2024 Approved Video Editing on Mac VN Editor and Other Top Picks
- Fast & Furious The Prime 5 Video Clipping Tools in Chromes
- In 2024, How to Mirror PC to Apple iPhone 12 mini? | Dr.fone
- How to Unlock Infinix Note 30i Pattern Lock if Forgotten? 6 Ways
- 2024 Approved Live TV on Your Desktop Windows PC Masterclass in Capturing Screens
- 2024 Approved Android/iOS Techniques Screening Google Meets
- Title: "2024 Approved Average Profit per Stream Watcher on YouTube"
- Author: Steven
- Created at : 2024-05-25 18:25:33
- Updated at : 2024-05-26 18:25:33
- Link: https://youtube-clips.techidaily.com/2024-approved-average-profit-per-stream-watcher-on-youtube/
- License: This work is licensed under CC BY-NC-SA 4.0.
