
"2024 Approved Audiovisual Excellence on YouTube Through Enhancements"
Audiovisual Excellence on YouTube Through Enhancements
How to Use YouTube Enhancements


Richard Bennett
Mar 27, 2024• Proven solutions
YouTube has integrated a free video editor to facilitate the work of YouTubers and allow them to process their videos prior to uploading. Although nobody can claim these features can live up to the sophisticated features of the professional video editors, YouTube enhancements are useful and cool which offer a simple way to improve the quality of the videos and do not require any technical knowledge on your behalf.
If you are looking for a more professional approach in video editing, you should try out Wondershare Filmora(for Windows and Mac) . This is an exceptionally versatile and powerful tool, which will allow you to gain full control over the videos you wish to edit. It is very easy to use, and it will open up a new world of potentials in video editing. There is a free trial that you can benefit from, so as to see if Filmora meets your criteria in full prior to your purchase.
 Download Mac Version ](https://tools.techidaily.com/wondershare/filmora/download/ )
- Part 1: How to Use YouTube Enhancements
- Part 2: How to Use Wondershare Filmora to Improve Video Qualtiy
How to Use YouTube Enhancements
First of all, you need to locate YouTube Enhancements. As soon as you have logged into your YouTube channel, you should go to the Video Manager. There you choose Edit and YouTube Enhancements, and you are ready to go. There are three distinctive categories that you can use, in order to edit your video. You can choose among Quick Fix, Filters, and Blurring Effects. As you can see, there are features that pretty much cover the basics in video editing under these categories.


Quick Fix promptly addresses issues that have to do with the contrast and saturation, as well as offers the ability to rotate or trim the video. There is nothing sophisticated there, but it is a really easy and practical solution for those who do not wish to waste time editing. It is cool that you can also stabilize your video or allow for Slow Motion or Timelapse effects. This is definitely an improvement for YouTube videos.

Filters feel a lot like those used on Instagram. They are neat and cool, of course, covering many of the demands for sophisticated editing. You can find filters like Lomo-ish, Old Fashioned, Heat Map, Cartoon, Cross Process, Festival and much more on YouTube Enhancements. You can also adjust the lighting and colors, so as to fine-tune your video.

Blurring Effects are perhaps the most advanced on YouTube Enhancements, and they provide the opportunity to maintain your privacy, by removing people’s distinctive details from the video and blurring them or putting mosaic on their face. With this tool, you can also blur objects on the video, which can increase your privacy even more. For instance, you can blur the plates of your car or your address. Last, there are some hilarious effects that you should check out.

Once you are done, there is an option to preview the video that you have edited. In this way, you will know if the editions that you have made are sufficient for you or not. Finally, you can choose either to save the video as a new file or revert to the original video. These options are welcome, as sometimes you just do not get what you have expected and you do not want to replace the video you have already uploaded.
How to Use Wondershare Filmora to improve YouTube videos
These are the steps that you need to follow, so as to proceed with high-quality video editing on Filmora:
- Open Wordershare Filmora
- Choose if you want 16:9 or 4:3 aspect ratio
- Tap Import so as to upload the files
- Drag and drop them, in order to place them in the right order

- Click Edit and adjust the settings (rotation, contrast, saturation, brightness, hue, auto de-noise and speed)
 Greeting Card Builder
- Click OK, and you are done with the improvement of Video Quality
If you wish to fine-tune the images of the videos and place special filters, you can go ahead as follows:
- Tap the Effect button
- Drag the effect you want to use on the timeline (you can choose from a wide variety of effects, including Bokeh and Light Leaks, Old Film, etc.)

After having finished with the video editing process, you can preview the video and see if it is of acceptable quality standards. You can do that by clicking on the Play button. Then you can click on the Create button and save the video where you want, in the format of your choosing. It is also possible for you to burn the video on a DVD or share it online using YouTube or Facebook.

Download Mac Version ](https://tools.techidaily.com/wondershare/filmora/download/ )
Richard Bennett
Richard Bennett is a writer and a lover of all things video.
Follow @Richard Bennett
Richard Bennett
Mar 27, 2024• Proven solutions
YouTube has integrated a free video editor to facilitate the work of YouTubers and allow them to process their videos prior to uploading. Although nobody can claim these features can live up to the sophisticated features of the professional video editors, YouTube enhancements are useful and cool which offer a simple way to improve the quality of the videos and do not require any technical knowledge on your behalf.
If you are looking for a more professional approach in video editing, you should try out Wondershare Filmora(for Windows and Mac) . This is an exceptionally versatile and powerful tool, which will allow you to gain full control over the videos you wish to edit. It is very easy to use, and it will open up a new world of potentials in video editing. There is a free trial that you can benefit from, so as to see if Filmora meets your criteria in full prior to your purchase.
Download Mac Version ](https://tools.techidaily.com/wondershare/filmora/download/ )
- Part 1: How to Use YouTube Enhancements
- Part 2: How to Use Wondershare Filmora to Improve Video Qualtiy
How to Use YouTube Enhancements
First of all, you need to locate YouTube Enhancements. As soon as you have logged into your YouTube channel, you should go to the Video Manager. There you choose Edit and YouTube Enhancements, and you are ready to go. There are three distinctive categories that you can use, in order to edit your video. You can choose among Quick Fix, Filters, and Blurring Effects. As you can see, there are features that pretty much cover the basics in video editing under these categories.
Quick Fix promptly addresses issues that have to do with the contrast and saturation, as well as offers the ability to rotate or trim the video. There is nothing sophisticated there, but it is a really easy and practical solution for those who do not wish to waste time editing. It is cool that you can also stabilize your video or allow for Slow Motion or Timelapse effects. This is definitely an improvement for YouTube videos.
Filters feel a lot like those used on Instagram. They are neat and cool, of course, covering many of the demands for sophisticated editing. You can find filters like Lomo-ish, Old Fashioned, Heat Map, Cartoon, Cross Process, Festival and much more on YouTube Enhancements. You can also adjust the lighting and colors, so as to fine-tune your video.
Blurring Effects are perhaps the most advanced on YouTube Enhancements, and they provide the opportunity to maintain your privacy, by removing people’s distinctive details from the video and blurring them or putting mosaic on their face. With this tool, you can also blur objects on the video, which can increase your privacy even more. For instance, you can blur the plates of your car or your address. Last, there are some hilarious effects that you should check out.
Once you are done, there is an option to preview the video that you have edited. In this way, you will know if the editions that you have made are sufficient for you or not. Finally, you can choose either to save the video as a new file or revert to the original video. These options are welcome, as sometimes you just do not get what you have expected and you do not want to replace the video you have already uploaded.
How to Use Wondershare Filmora to improve YouTube videos
These are the steps that you need to follow, so as to proceed with high-quality video editing on Filmora:
- Open Wordershare Filmora
- Choose if you want 16:9 or 4:3 aspect ratio
- Tap Import so as to upload the files
- Drag and drop them, in order to place them in the right order
- Click Edit and adjust the settings (rotation, contrast, saturation, brightness, hue, auto de-noise and speed)
- Click OK, and you are done with the improvement of Video Quality
If you wish to fine-tune the images of the videos and place special filters, you can go ahead as follows:
- Tap the Effect button
- Drag the effect you want to use on the timeline (you can choose from a wide variety of effects, including Bokeh and Light Leaks, Old Film, etc.)
After having finished with the video editing process, you can preview the video and see if it is of acceptable quality standards. You can do that by clicking on the Play button. Then you can click on the Create button and save the video where you want, in the format of your choosing. It is also possible for you to burn the video on a DVD or share it online using YouTube or Facebook.
Download Mac Version ](https://tools.techidaily.com/wondershare/filmora/download/ )
Richard Bennett
Richard Bennett is a writer and a lover of all things video.
Follow @Richard Bennett
Richard Bennett
Mar 27, 2024• Proven solutions
YouTube has integrated a free video editor to facilitate the work of YouTubers and allow them to process their videos prior to uploading. Although nobody can claim these features can live up to the sophisticated features of the professional video editors, YouTube enhancements are useful and cool which offer a simple way to improve the quality of the videos and do not require any technical knowledge on your behalf.
If you are looking for a more professional approach in video editing, you should try out Wondershare Filmora(for Windows and Mac) . This is an exceptionally versatile and powerful tool, which will allow you to gain full control over the videos you wish to edit. It is very easy to use, and it will open up a new world of potentials in video editing. There is a free trial that you can benefit from, so as to see if Filmora meets your criteria in full prior to your purchase.
 Glarysoft File Recovery Pro Annually - Helps to recover your lost file/data, even permanently deleted data.
Download Mac Version ](https://tools.techidaily.com/wondershare/filmora/download/ )
- Part 1: How to Use YouTube Enhancements
- Part 2: How to Use Wondershare Filmora to Improve Video Qualtiy
How to Use YouTube Enhancements
First of all, you need to locate YouTube Enhancements. As soon as you have logged into your YouTube channel, you should go to the Video Manager. There you choose Edit and YouTube Enhancements, and you are ready to go. There are three distinctive categories that you can use, in order to edit your video. You can choose among Quick Fix, Filters, and Blurring Effects. As you can see, there are features that pretty much cover the basics in video editing under these categories.
Quick Fix promptly addresses issues that have to do with the contrast and saturation, as well as offers the ability to rotate or trim the video. There is nothing sophisticated there, but it is a really easy and practical solution for those who do not wish to waste time editing. It is cool that you can also stabilize your video or allow for Slow Motion or Timelapse effects. This is definitely an improvement for YouTube videos.

Filters feel a lot like those used on Instagram. They are neat and cool, of course, covering many of the demands for sophisticated editing. You can find filters like Lomo-ish, Old Fashioned, Heat Map, Cartoon, Cross Process, Festival and much more on YouTube Enhancements. You can also adjust the lighting and colors, so as to fine-tune your video.
Blurring Effects are perhaps the most advanced on YouTube Enhancements, and they provide the opportunity to maintain your privacy, by removing people’s distinctive details from the video and blurring them or putting mosaic on their face. With this tool, you can also blur objects on the video, which can increase your privacy even more. For instance, you can blur the plates of your car or your address. Last, there are some hilarious effects that you should check out.
Once you are done, there is an option to preview the video that you have edited. In this way, you will know if the editions that you have made are sufficient for you or not. Finally, you can choose either to save the video as a new file or revert to the original video. These options are welcome, as sometimes you just do not get what you have expected and you do not want to replace the video you have already uploaded.
How to Use Wondershare Filmora to improve YouTube videos
These are the steps that you need to follow, so as to proceed with high-quality video editing on Filmora:
- Open Wordershare Filmora
- Choose if you want 16:9 or 4:3 aspect ratio
- Tap Import so as to upload the files
- Drag and drop them, in order to place them in the right order
- Click Edit and adjust the settings (rotation, contrast, saturation, brightness, hue, auto de-noise and speed)
- Click OK, and you are done with the improvement of Video Quality
If you wish to fine-tune the images of the videos and place special filters, you can go ahead as follows:
- Tap the Effect button
- Drag the effect you want to use on the timeline (you can choose from a wide variety of effects, including Bokeh and Light Leaks, Old Film, etc.)

After having finished with the video editing process, you can preview the video and see if it is of acceptable quality standards. You can do that by clicking on the Play button. Then you can click on the Create button and save the video where you want, in the format of your choosing. It is also possible for you to burn the video on a DVD or share it online using YouTube or Facebook.
Download Mac Version ](https://tools.techidaily.com/wondershare/filmora/download/ )
Richard Bennett
Richard Bennett is a writer and a lover of all things video.
Follow @Richard Bennett
Richard Bennett
Mar 27, 2024• Proven solutions
YouTube has integrated a free video editor to facilitate the work of YouTubers and allow them to process their videos prior to uploading. Although nobody can claim these features can live up to the sophisticated features of the professional video editors, YouTube enhancements are useful and cool which offer a simple way to improve the quality of the videos and do not require any technical knowledge on your behalf.
If you are looking for a more professional approach in video editing, you should try out Wondershare Filmora(for Windows and Mac) . This is an exceptionally versatile and powerful tool, which will allow you to gain full control over the videos you wish to edit. It is very easy to use, and it will open up a new world of potentials in video editing. There is a free trial that you can benefit from, so as to see if Filmora meets your criteria in full prior to your purchase.
Download Mac Version ](https://tools.techidaily.com/wondershare/filmora/download/ )
- Part 1: How to Use YouTube Enhancements
- Part 2: How to Use Wondershare Filmora to Improve Video Qualtiy
How to Use YouTube Enhancements
First of all, you need to locate YouTube Enhancements. As soon as you have logged into your YouTube channel, you should go to the Video Manager. There you choose Edit and YouTube Enhancements, and you are ready to go. There are three distinctive categories that you can use, in order to edit your video. You can choose among Quick Fix, Filters, and Blurring Effects. As you can see, there are features that pretty much cover the basics in video editing under these categories.
Quick Fix promptly addresses issues that have to do with the contrast and saturation, as well as offers the ability to rotate or trim the video. There is nothing sophisticated there, but it is a really easy and practical solution for those who do not wish to waste time editing. It is cool that you can also stabilize your video or allow for Slow Motion or Timelapse effects. This is definitely an improvement for YouTube videos.
 The Tube Sites Submitter is a fast and efficient tool for anyone who needs to upload videos quickly, easily and automatically to hundreds of tube sites in mere minutes .
Filters feel a lot like those used on Instagram. They are neat and cool, of course, covering many of the demands for sophisticated editing. You can find filters like Lomo-ish, Old Fashioned, Heat Map, Cartoon, Cross Process, Festival and much more on YouTube Enhancements. You can also adjust the lighting and colors, so as to fine-tune your video.
Blurring Effects are perhaps the most advanced on YouTube Enhancements, and they provide the opportunity to maintain your privacy, by removing people’s distinctive details from the video and blurring them or putting mosaic on their face. With this tool, you can also blur objects on the video, which can increase your privacy even more. For instance, you can blur the plates of your car or your address. Last, there are some hilarious effects that you should check out.
Once you are done, there is an option to preview the video that you have edited. In this way, you will know if the editions that you have made are sufficient for you or not. Finally, you can choose either to save the video as a new file or revert to the original video. These options are welcome, as sometimes you just do not get what you have expected and you do not want to replace the video you have already uploaded.

How to Use Wondershare Filmora to improve YouTube videos
These are the steps that you need to follow, so as to proceed with high-quality video editing on Filmora:
- Open Wordershare Filmora
- Choose if you want 16:9 or 4:3 aspect ratio
- Tap Import so as to upload the files
- Drag and drop them, in order to place them in the right order
- Click Edit and adjust the settings (rotation, contrast, saturation, brightness, hue, auto de-noise and speed)
- Click OK, and you are done with the improvement of Video Quality
If you wish to fine-tune the images of the videos and place special filters, you can go ahead as follows:
- Tap the Effect button
- Drag the effect you want to use on the timeline (you can choose from a wide variety of effects, including Bokeh and Light Leaks, Old Film, etc.)
After having finished with the video editing process, you can preview the video and see if it is of acceptable quality standards. You can do that by clicking on the Play button. Then you can click on the Create button and save the video where you want, in the format of your choosing. It is also possible for you to burn the video on a DVD or share it online using YouTube or Facebook.
Download Mac Version ](https://tools.techidaily.com/wondershare/filmora/download/ )
Richard Bennett
Richard Bennett is a writer and a lover of all things video.
Follow @Richard Bennett
No More Black Fringe in YouTube Videos
How to Remove Black Bars from YouTube Videos

Richard Bennett
Mar 27, 2024• Proven solutions
The black bars appear because the video uploaded by the users may include horizontal black bars at the bottom and top of the video player to fit an aspect ratio of 4:3. The YouTube video player has an aspect ratio of 16:9, so it adds vertical black bars to fit according to the dimension. And in this guide, we will help you get rid of this trouble and remove annoying black bars from YouTube videos.
- Part 1: Removing the black bars before uploading
- Part 2: Removing the black bars from uploaded YouTube videos
Remove the black bars before uploading
You can make use of the following software to remove the black bars from your videos.
1. Wondershare Filmora
Filmora supports a large format of videos hence one of the widely used. Follow these steps to remove the black bars:
- Import the video or drag and drop it in Wondershare Flimora.
- Select the video with black bars and right click on it.
- Click on “crop and zoom” which will open the crop window.
- Set your desired frameset (16:9, 4:3 or customized aspect ratio) and see your video in the preview pane.
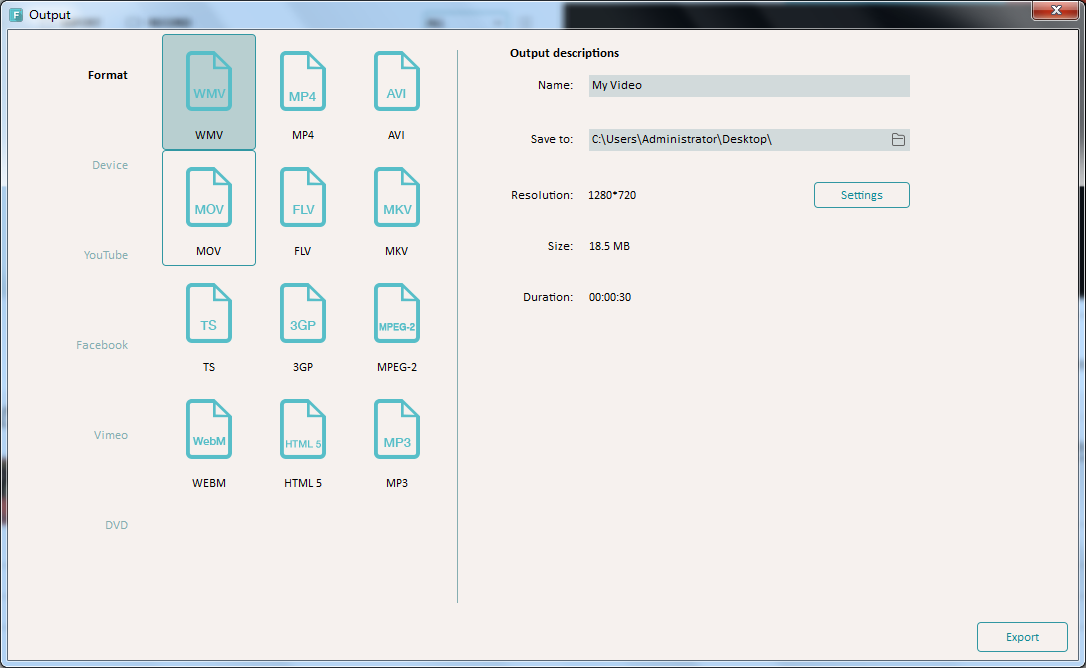
- Save the new video without the black bars by clicking on “Export”.
Download Mac Version ](https://tools.techidaily.com/wondershare/filmora/download/ )
2. Sony Vegas Pro
One of the most popular and sought after video editing tool, Sony Vegas Pro can help removing the black bars very simply:
- Open the video.
- You will see the video in preview and a timeline beneath, right click on the video clip on the timeline.
- Click on properties, a new window will pop-up, click on disable resample and make sure that “maintain aspect ratio” is unchecked.
- Your video will be without the black bars. Save the video.
3. Windows Live Movie Maker
This inbuilt tool in Windows for video editing can be used to remove the black bars from your YouTube videos.
- Drop and drag the video to windows live movie maker.
- Select the video and you will see a couple of options to set aspect ratio.
- Click on the desired one and the black bars will be removed.
- You can save the video in different formats.
4. Final Cut Pro
Final Cut pro offers you a whole lot of video editing options that includes removal of black bars. Right aspect ratio ensures there are no unpleasant black bars on either side of the video. To get them removed with the help of Final Cut Pro:
- Import the video with black bars.
- Select the video and change its aspect ratio. (Either stretch it or crop it).
- Save the video after it has been corrected.
Removing the black bars from uploaded YouTube videos
It is very simple to remove black bars from existing YouTube videos or while uploading a video. Click on the Edit button next to the video, and add the most suited instruction in the Tag bar below:

yt:crop=16:9
This tag zooms in on the video because of which the contents at the borders (black bars in this case) do not appear anymore.
yt:stretch=16:9
This tag stretches the video in the aspect ratio of 16:9. It is used to view the video in wide-screen format.
yt:stretch=4:3
if your video is appearing in wide-screen format, but you want it to display in 720 x 480 pixels, apply this tag. It scales down the video 4:3 aspect.
Try any of the above software to remove black bars from existing YouTube videos or the new videos and make it pleasant to viewers.
Richard Bennett
Richard Bennett is a writer and a lover of all things video.
Follow @Richard Bennett
Richard Bennett
Mar 27, 2024• Proven solutions
The black bars appear because the video uploaded by the users may include horizontal black bars at the bottom and top of the video player to fit an aspect ratio of 4:3. The YouTube video player has an aspect ratio of 16:9, so it adds vertical black bars to fit according to the dimension. And in this guide, we will help you get rid of this trouble and remove annoying black bars from YouTube videos.
- Part 1: Removing the black bars before uploading
- Part 2: Removing the black bars from uploaded YouTube videos
Remove the black bars before uploading
You can make use of the following software to remove the black bars from your videos.
1. Wondershare Filmora
Filmora supports a large format of videos hence one of the widely used. Follow these steps to remove the black bars:
- Import the video or drag and drop it in Wondershare Flimora.
- Select the video with black bars and right click on it.
- Click on “crop and zoom” which will open the crop window.
- Set your desired frameset (16:9, 4:3 or customized aspect ratio) and see your video in the preview pane.
- Save the new video without the black bars by clicking on “Export”.

WPS Office Premium ( File Recovery, Photo Scanning, Convert PDF)–Yearly
Download Mac Version ](https://tools.techidaily.com/wondershare/filmora/download/ )
2. Sony Vegas Pro
One of the most popular and sought after video editing tool, Sony Vegas Pro can help removing the black bars very simply:
- Open the video.
- You will see the video in preview and a timeline beneath, right click on the video clip on the timeline.
- Click on properties, a new window will pop-up, click on disable resample and make sure that “maintain aspect ratio” is unchecked.
- Your video will be without the black bars. Save the video.
3. Windows Live Movie Maker
This inbuilt tool in Windows for video editing can be used to remove the black bars from your YouTube videos.
- Drop and drag the video to windows live movie maker.
- Select the video and you will see a couple of options to set aspect ratio.
- Click on the desired one and the black bars will be removed.
- You can save the video in different formats.
4. Final Cut Pro
Final Cut pro offers you a whole lot of video editing options that includes removal of black bars. Right aspect ratio ensures there are no unpleasant black bars on either side of the video. To get them removed with the help of Final Cut Pro:
- Import the video with black bars.
- Select the video and change its aspect ratio. (Either stretch it or crop it).
- Save the video after it has been corrected.
Removing the black bars from uploaded YouTube videos
It is very simple to remove black bars from existing YouTube videos or while uploading a video. Click on the Edit button next to the video, and add the most suited instruction in the Tag bar below:

yt:crop=16:9
This tag zooms in on the video because of which the contents at the borders (black bars in this case) do not appear anymore.
yt:stretch=16:9
This tag stretches the video in the aspect ratio of 16:9. It is used to view the video in wide-screen format.
yt:stretch=4:3
if your video is appearing in wide-screen format, but you want it to display in 720 x 480 pixels, apply this tag. It scales down the video 4:3 aspect.
Try any of the above software to remove black bars from existing YouTube videos or the new videos and make it pleasant to viewers.
 PaperScan Professional: PaperScan Scanner Software is a powerful TWAIN & WIA scanning application centered on one idea: making document acquisition an unparalleled easy task for anyone.
Richard Bennett
Richard Bennett is a writer and a lover of all things video.
Follow @Richard Bennett
Richard Bennett
Mar 27, 2024• Proven solutions
The black bars appear because the video uploaded by the users may include horizontal black bars at the bottom and top of the video player to fit an aspect ratio of 4:3. The YouTube video player has an aspect ratio of 16:9, so it adds vertical black bars to fit according to the dimension. And in this guide, we will help you get rid of this trouble and remove annoying black bars from YouTube videos.
- Part 1: Removing the black bars before uploading
- Part 2: Removing the black bars from uploaded YouTube videos
Remove the black bars before uploading
You can make use of the following software to remove the black bars from your videos.
1. Wondershare Filmora
Filmora supports a large format of videos hence one of the widely used. Follow these steps to remove the black bars:
- Import the video or drag and drop it in Wondershare Flimora.
- Select the video with black bars and right click on it.
- Click on “crop and zoom” which will open the crop window.
- Set your desired frameset (16:9, 4:3 or customized aspect ratio) and see your video in the preview pane.
- Save the new video without the black bars by clicking on “Export”.
 vMix HD - Software based live production. vMix HD includes everything in vMix Basic HD plus 1000 inputs, Video List, 4 Overlay Channels, and 1 vMix Call
Download Mac Version ](https://tools.techidaily.com/wondershare/filmora/download/ )
2. Sony Vegas Pro
One of the most popular and sought after video editing tool, Sony Vegas Pro can help removing the black bars very simply:
- Open the video.
- You will see the video in preview and a timeline beneath, right click on the video clip on the timeline.
- Click on properties, a new window will pop-up, click on disable resample and make sure that “maintain aspect ratio” is unchecked.
- Your video will be without the black bars. Save the video.
3. Windows Live Movie Maker
This inbuilt tool in Windows for video editing can be used to remove the black bars from your YouTube videos.
- Drop and drag the video to windows live movie maker.
- Select the video and you will see a couple of options to set aspect ratio.
- Click on the desired one and the black bars will be removed.
- You can save the video in different formats.
4. Final Cut Pro
Final Cut pro offers you a whole lot of video editing options that includes removal of black bars. Right aspect ratio ensures there are no unpleasant black bars on either side of the video. To get them removed with the help of Final Cut Pro:
- Import the video with black bars.
- Select the video and change its aspect ratio. (Either stretch it or crop it).
- Save the video after it has been corrected.
Removing the black bars from uploaded YouTube videos
It is very simple to remove black bars from existing YouTube videos or while uploading a video. Click on the Edit button next to the video, and add the most suited instruction in the Tag bar below:
yt:crop=16:9
This tag zooms in on the video because of which the contents at the borders (black bars in this case) do not appear anymore.
yt:stretch=16:9
This tag stretches the video in the aspect ratio of 16:9. It is used to view the video in wide-screen format.
yt:stretch=4:3
if your video is appearing in wide-screen format, but you want it to display in 720 x 480 pixels, apply this tag. It scales down the video 4:3 aspect.
Try any of the above software to remove black bars from existing YouTube videos or the new videos and make it pleasant to viewers.
Richard Bennett
Richard Bennett is a writer and a lover of all things video.
Follow @Richard Bennett
Richard Bennett
Mar 27, 2024• Proven solutions
The black bars appear because the video uploaded by the users may include horizontal black bars at the bottom and top of the video player to fit an aspect ratio of 4:3. The YouTube video player has an aspect ratio of 16:9, so it adds vertical black bars to fit according to the dimension. And in this guide, we will help you get rid of this trouble and remove annoying black bars from YouTube videos.
- Part 1: Removing the black bars before uploading
- Part 2: Removing the black bars from uploaded YouTube videos
You can make use of the following software to remove the black bars from your videos.
1. Wondershare Filmora
Filmora supports a large format of videos hence one of the widely used. Follow these steps to remove the black bars:
- Import the video or drag and drop it in Wondershare Flimora.
- Select the video with black bars and right click on it.
- Click on “crop and zoom” which will open the crop window.
- Set your desired frameset (16:9, 4:3 or customized aspect ratio) and see your video in the preview pane.
- Save the new video without the black bars by clicking on “Export”.
Download Mac Version ](https://tools.techidaily.com/wondershare/filmora/download/ )
2. Sony Vegas Pro
One of the most popular and sought after video editing tool, Sony Vegas Pro can help removing the black bars very simply:
- Open the video.
- You will see the video in preview and a timeline beneath, right click on the video clip on the timeline.
- Click on properties, a new window will pop-up, click on disable resample and make sure that “maintain aspect ratio” is unchecked.
- Your video will be without the black bars. Save the video.
3. Windows Live Movie Maker
This inbuilt tool in Windows for video editing can be used to remove the black bars from your YouTube videos.
- Drop and drag the video to windows live movie maker.
- Select the video and you will see a couple of options to set aspect ratio.
- Click on the desired one and the black bars will be removed.
- You can save the video in different formats.
4. Final Cut Pro
Final Cut pro offers you a whole lot of video editing options that includes removal of black bars. Right aspect ratio ensures there are no unpleasant black bars on either side of the video. To get them removed with the help of Final Cut Pro:
- Import the video with black bars.
- Select the video and change its aspect ratio. (Either stretch it or crop it).
- Save the video after it has been corrected.
Removing the black bars from uploaded YouTube videos
It is very simple to remove black bars from existing YouTube videos or while uploading a video. Click on the Edit button next to the video, and add the most suited instruction in the Tag bar below:
yt:crop=16:9
This tag zooms in on the video because of which the contents at the borders (black bars in this case) do not appear anymore.
yt:stretch=16:9
This tag stretches the video in the aspect ratio of 16:9. It is used to view the video in wide-screen format.
yt:stretch=4:3
if your video is appearing in wide-screen format, but you want it to display in 720 x 480 pixels, apply this tag. It scales down the video 4:3 aspect.
Try any of the above software to remove black bars from existing YouTube videos or the new videos and make it pleasant to viewers.
Richard Bennett
Richard Bennett is a writer and a lover of all things video.
Follow @Richard Bennett
- Title: 2024 Approved Audiovisual Excellence on YouTube Through Enhancements
- Author: Steven
- Created at : 2024-08-03 03:11:34
- Updated at : 2024-08-04 03:11:34
- Link: https://youtube-clips.techidaily.com/2024-approved-audiovisual-excellence-on-youtube-through-enhancements/
- License: This work is licensed under CC BY-NC-SA 4.0.