
:max_bytes(150000):strip_icc()/pathra-e4d704c32b464fae85640612f626dd22.jpg)
"2024 Approved Animated Text That Jumps Master Class with Easy Steps"
Animated Text That Jumps: Master Class with Easy Steps
How to Create Animated Bouncing Text

Liza Brown
Mar 27, 2024• Proven solutions
Earlier, you learned how to have a bounce text effect in Adobe After Effects . However, because AE is a complex application and has a steep learning curve, this section explains the two alternative ways to get the same effect on your existing video footage.
Method 1: How to Create Bouncing Text in Filmora Video Editor?
When talking about Wondershare Filmora , the application is populated with several presets for texts and titles, animations, effects, filters, and much more.
These pre-built templates not only make your task easier, they also save your decent amount of time that you would spend while working with After Effects or any other similar app that requires you to build things from scratch.
You can follow the instructions given below to add animated bounce text to any of your video footages with Filmora:
Step 1: Add a Footage to Timeline
Launch Wondershare Filmora on your Windows or Mac PC. By default, the aspect ratio of the project is set to 16:9. Click anywhere inside the Media window at the upper-left section, and select and import footage you want to add bounce text to.
Step 2: Insert Text and Add Bounce Effect
Click Titles from the standard toolbar at the top, and click and drag your preferred title template from the Library to the timeline. In case you don’t want any specific animation or style on the title, you can use the default title.
In the timeline, double-click the title you just added, use the upper-left section to edit the text, go to the Animation tab from the left pane, scroll down the list, and double-click the Up Down 1 or Up Down 2 preset to apply the bounce effect to the credits. Click OK to save the changes and to get back to the main window.

Step 3: Add Shake Filters
Go to Effects from the standard toolbar, expand the Filters category from the left pane, and click Shake. From the Library window, click and drag your preferred shake filter to the timeline. Here, I will choose Mild.

You can customize the default effect by double-clicking the shake filter in the timeline, using the sliders in the upper-left area of the interface to make necessary adjustments, and then clicking OK to save the changes and to get back to the previous interface.

Step 4: Export the Final Output
Click EXPORT from the top of the interface, go to the Local tab in the Export box, choose your preferred output format from the list in the left, make required customizations from the right pane, and click EXPORT from the bottom-right corner to export the video.

Now, you can add the bouncing text video and the background video to the timeline, and then place the bouncing text video above the background video track.
Double click the text track, go to the Chroma Key effect, select the Color Picker tool, and click anywhere in the Preview window to get things right. Finally, export the entire project to your preferred output format as explained in Step 4.
As explained before, Wondeshare Filmora makes the entire process of creating and adding bounce text effect pretty simple. With all the pre-build templates, and the versatility of the options that can be used to customize those presets, you can come up with the effects that are usually obtained when you start generating them from the scratch.


Method 2: Generate Animated Bouncing Texts Online
If you don’t want any heavy and resource-intensive app on your PC merely for some special text effects, you can try any of the online solutions instead. The benefit of using any such web app is that all the processing is done on site’s server, and it is only a web browser and an Internet connection that you need to have at your side.
Some most trusted websites to generate bounce text are listed below:
1. ENGFTO
Website: https://engfto.com/index/create%5Fanimated%5Fbouncing%5Ftext/0-26

You can follow the instructions given below to use Engfto to generate bouncing text for your footages:
Step 1: Get to the Animated Bouncing Text Page
Launch your favorite web browser, and go to the link given above to get to the Engfto’s animated bouncing text page.
Step 2: Customize Text and Preferences
Modify the values in the fields under the SIZE AREA and TEXT sections to customize the text area, the text itself, its size, and font. Next, adjust the values in the fields under the EFFECT PARAMETERS section to get the required bounce effect. Also, use the fields under the BACKGROUND section to either change the background color, or pick a background image from your PC.
Step 3: Obtain the Animated Text
Click the SAVE GIF ANIMATION button from the lower section of the page to download the animated text to your PC.
2. Loading.io
The instructions given below explain how to use Loading.io to get animated bounce text effect for your footages:
Step 1: Get to the Loading.io Webpage
Launch your favorite web browser and go to https://loading.io/animation/text/ .
Step 2: Customize the Text and Choose Animation Effect

Use the options available on the webpage to type your text, and change its font, color, background, transparency level etc. Select Bounce (or any of its variants) from the Animation drop-down list, and adjust the speed using the Speed slider.
Step 3: Obtain the Text
Click your preferred option from next to the Download As section to download the animated text to your PC.
Note: Regardless of the web solution you choose to generate and obtain animated bounce text, you will still need a post-production tool to add the downloaded text to your footage.
Conclusion
Generating bounce text effect is much simpler when you use Wondershare Filmora or any of the online solutions as explained in Method 2. While the former gives you more flexibility when it comes to customizations, the latter doesn’t require any app to be installed on your PC. In addition, many times the web apps offer their services for free, and therefore they are preferred by the novice users who are not much into post-production processes.
Liza Brown
Liza Brown is a writer and a lover of all things video.
Follow @Liza Brown
Liza Brown
Mar 27, 2024• Proven solutions
Earlier, you learned how to have a bounce text effect in Adobe After Effects . However, because AE is a complex application and has a steep learning curve, this section explains the two alternative ways to get the same effect on your existing video footage.
Method 1: How to Create Bouncing Text in Filmora Video Editor?
When talking about Wondershare Filmora , the application is populated with several presets for texts and titles, animations, effects, filters, and much more.
These pre-built templates not only make your task easier, they also save your decent amount of time that you would spend while working with After Effects or any other similar app that requires you to build things from scratch.
You can follow the instructions given below to add animated bounce text to any of your video footages with Filmora:
Step 1: Add a Footage to Timeline
Launch Wondershare Filmora on your Windows or Mac PC. By default, the aspect ratio of the project is set to 16:9. Click anywhere inside the Media window at the upper-left section, and select and import footage you want to add bounce text to.
Step 2: Insert Text and Add Bounce Effect
Click Titles from the standard toolbar at the top, and click and drag your preferred title template from the Library to the timeline. In case you don’t want any specific animation or style on the title, you can use the default title.
In the timeline, double-click the title you just added, use the upper-left section to edit the text, go to the Animation tab from the left pane, scroll down the list, and double-click the Up Down 1 or Up Down 2 preset to apply the bounce effect to the credits. Click OK to save the changes and to get back to the main window.
Step 3: Add Shake Filters
Go to Effects from the standard toolbar, expand the Filters category from the left pane, and click Shake. From the Library window, click and drag your preferred shake filter to the timeline. Here, I will choose Mild.
You can customize the default effect by double-clicking the shake filter in the timeline, using the sliders in the upper-left area of the interface to make necessary adjustments, and then clicking OK to save the changes and to get back to the previous interface.
Step 4: Export the Final Output
Click EXPORT from the top of the interface, go to the Local tab in the Export box, choose your preferred output format from the list in the left, make required customizations from the right pane, and click EXPORT from the bottom-right corner to export the video.
Now, you can add the bouncing text video and the background video to the timeline, and then place the bouncing text video above the background video track.
Double click the text track, go to the Chroma Key effect, select the Color Picker tool, and click anywhere in the Preview window to get things right. Finally, export the entire project to your preferred output format as explained in Step 4.
As explained before, Wondeshare Filmora makes the entire process of creating and adding bounce text effect pretty simple. With all the pre-build templates, and the versatility of the options that can be used to customize those presets, you can come up with the effects that are usually obtained when you start generating them from the scratch.
Method 2: Generate Animated Bouncing Texts Online
If you don’t want any heavy and resource-intensive app on your PC merely for some special text effects, you can try any of the online solutions instead. The benefit of using any such web app is that all the processing is done on site’s server, and it is only a web browser and an Internet connection that you need to have at your side.
Some most trusted websites to generate bounce text are listed below:
1. ENGFTO
Website: https://engfto.com/index/create%5Fanimated%5Fbouncing%5Ftext/0-26
You can follow the instructions given below to use Engfto to generate bouncing text for your footages:
Step 1: Get to the Animated Bouncing Text Page
Launch your favorite web browser, and go to the link given above to get to the Engfto’s animated bouncing text page.
Step 2: Customize Text and Preferences
Modify the values in the fields under the SIZE AREA and TEXT sections to customize the text area, the text itself, its size, and font. Next, adjust the values in the fields under the EFFECT PARAMETERS section to get the required bounce effect. Also, use the fields under the BACKGROUND section to either change the background color, or pick a background image from your PC.
Step 3: Obtain the Animated Text
Click the SAVE GIF ANIMATION button from the lower section of the page to download the animated text to your PC.
2. Loading.io
The instructions given below explain how to use Loading.io to get animated bounce text effect for your footages:
Step 1: Get to the Loading.io Webpage
Launch your favorite web browser and go to https://loading.io/animation/text/ .
Step 2: Customize the Text and Choose Animation Effect
Use the options available on the webpage to type your text, and change its font, color, background, transparency level etc. Select Bounce (or any of its variants) from the Animation drop-down list, and adjust the speed using the Speed slider.
Step 3: Obtain the Text
Click your preferred option from next to the Download As section to download the animated text to your PC.
Note: Regardless of the web solution you choose to generate and obtain animated bounce text, you will still need a post-production tool to add the downloaded text to your footage.
Conclusion
Generating bounce text effect is much simpler when you use Wondershare Filmora or any of the online solutions as explained in Method 2. While the former gives you more flexibility when it comes to customizations, the latter doesn’t require any app to be installed on your PC. In addition, many times the web apps offer their services for free, and therefore they are preferred by the novice users who are not much into post-production processes.
Liza Brown
Liza Brown is a writer and a lover of all things video.
Follow @Liza Brown
Achieving Video Popularity: Mastering YouTube Thumbnail Selection
Best 8 YouTube Thumbnail Grabbers You Should Know

Richard Bennett
Oct 26, 2023• Proven solutions
A YouTube thumbnail must be made very engaging and attractive to tell the potential viewers what the video is about and make them watch it. Since YouTube is a visual media platform, viewers set their eyes on the thumbnails first before they read the title of the video. If you’ve made a collage of YouTube thumbnails or designed YouTube channel art containing various freeze-frame images from different YouTube videos, you are no stranger to needing a fast way to collect YouTube thumbnail images. Online, there are several tools dedicated to solving this exact problem. These are the top five YouTube Thumbnail grabbers:
These thumbnails can be then be used in videos, blogs, articles, web pages, etc. Let’s have a look at 8 best thumbnail grabbers in the market:
- YouTube Thumbnail Grabber
- BoingBoing
- Thumbnailsave.com
- Get YouTube Thumbnail
- Fbutube.com
- YT Thumbnail Downloader
- Youtubethumbnailimage.com
- Youthumbnail.com
#1: YouTube Thumbnail Grabber
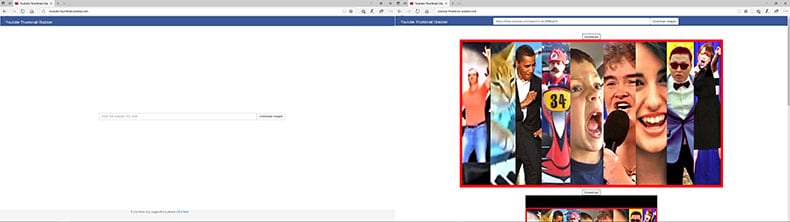
https://youtube-thumbnail-grabber.com
YouTube Thumbnail Grabber is at the top of our list. The website is very simple and clean with no ads. All you need to do is enter the YouTube video URL and click on the “Download Images” button. The site will then present you with your downloadable images in different sizes. It’s free and fast!
#2: BoingBoing
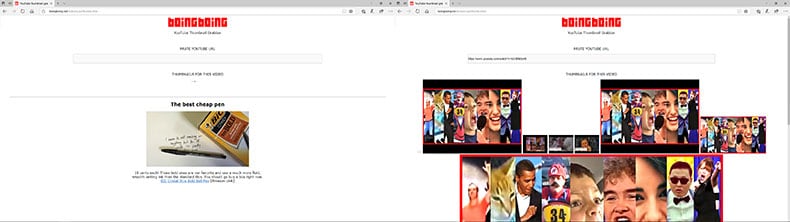
https://boingboing.net/features/getthumbs.html
BoingBoing is faster than YouTube Thumbnail grabber because it skips the “Download Images” step. As soon as you enter in your YouTube video URL, BoingBoing will automatically present you with your downloadable images. Although it is one step faster than YouTube Thumbnail Grabber, you will have to deal with having to view one small ad at the bottom of the page. In case you also want to download freeze frames that occur midway through the video, BoingBoing also gives you the option to download those images as well.
#3: Thumbnailsave.com
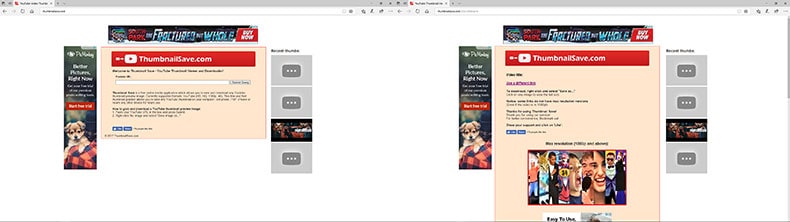
Another free, straightforward website for grabbing your YouTube thumbnails is Thumbnailsave.com. Again, all you need to do is enter the YouTube video URL and click the “Submit” button. Unlike our first two options, this site has a lot more ads. You’ll see a banner ad at the top as well as an ad to the side of the page. One interesting thing about this website is that it displays a column of thumbnails recently grabbed by users all over the world (displayed on the right side of the page). You might find this entertaining. If you are captivated by one of the thumbnail images, you can download it onto your computer and then do a reverse image search on Google to find the video.
#4: Get YouTube Thumbnail
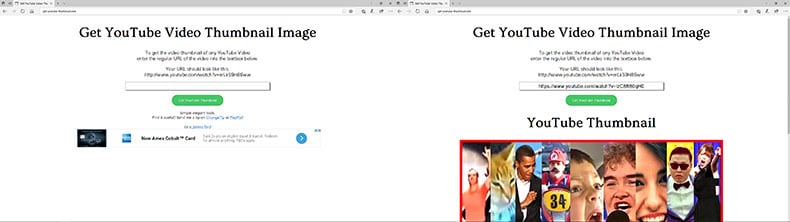
http://www.get-youtube-thumbnail.com
Get YouTube Thumbnail is another free, straightforward tool for grabbing YouTube thumbnail images. All you need to do is paste the URL of the YouTube video and click on the “Get YouTube Thumbnail” button to retrieve your thumbnail. Yes, that’s right. One thumbnail image. What’s different about this website is that it provides you with a unique image URL. This might be useful for anyone not wanting to deal with files. While this website is free to use, it does have ads.
#5: Fbutube.com
Fbtube.com is a tool that is used to download YouTube thumbnails by bloggers, YouTubers, graphic designers, etc. This tool helps to grab all the thumbnails available for a YouTube video. All you need to do is copy and paste the link of the YouTube video you like in the search bar and tap on the Generate tab.
A number of thumbnail images will be displayed of different sizes and resolutions (720p, 360p, 180p, and 90p) will be displayed for you to choose from. You can download the thumbnail you like by hitting the Download tab. This tool also offers an option to create a custom YouTube thumbnail for sharing on Facebook.
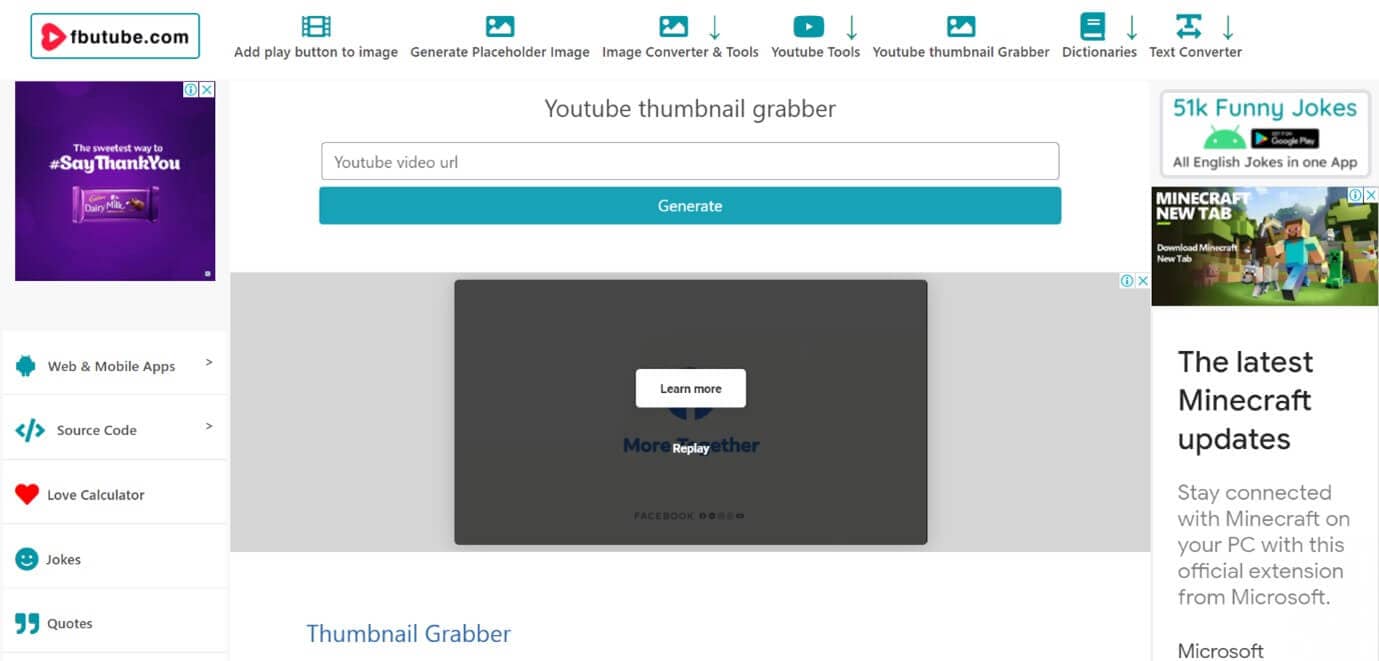
https://fbutube.com/youtube-thumbnail-grabber
#6: YT Thumbnail Downloader
YT Thumbnail Downloader is a free online tool that you can use to download the thumbnail of any YouTube video you wish. This tool is very easy to use, contains no ads, and offers thumbnails in 1080p, 720p, 480p, and 360p format.
To download the thumbnail simply paste the link of the YouTube video you like and hit the Download button. A list of thumbnails of different qualities will be displayed. Choose your desired quality and hit Download again. Another plus point of YTThumbnail Downloader is that it allows extracting thumbnails of live streaming videos.
https://yt-thumbnail-downloader.com/
#7: Youtubethumbnailimage.com
Youtubethumbnailimage.com is another free site that allows you to download YouTube thumbnails. This site allows to download thumbnails in 4 different dimensions, HD 1920x1080, SD 640x480, HQ 480x360, and MQ 320x180.
To download the thumbnail you just have to copy and paste the URL of your desired YouTube video in the search bar and hit Search. Once the results are displayed, choose a dimension and hit Download.
https://youtubethumbnailimage.com/
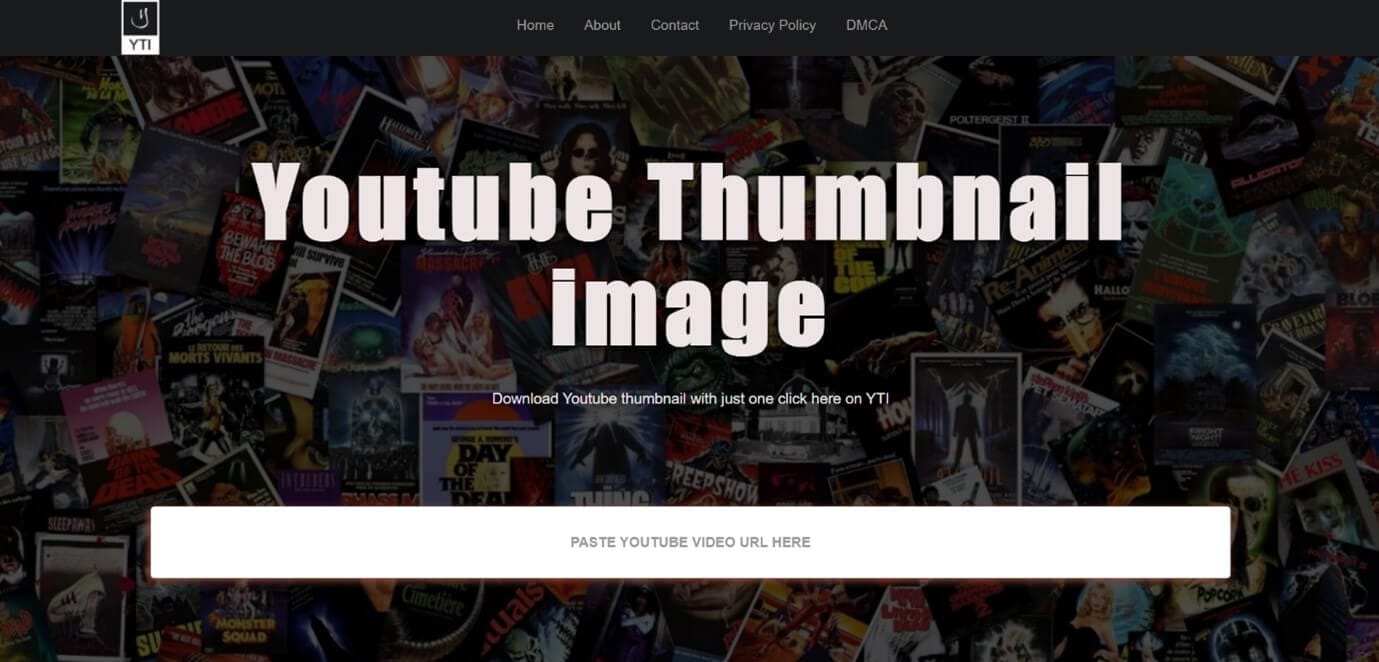
#8: Youthumbnail.com
Youthumbnail.com is the final tool we will be talking about that can help you save the YouTube thumbnail of a YouTube video. This free tool contains some annoying ads but can download YouTube thumbnail fast and easily in 3 different qualities.
To download the YouTube thumbnail, paste the link of the YouTube video you like in the search box and press Enter. Select the image of your choice from the three images displayed and the thumbnail will be downloaded for your later use.
So that’s our list of top online tools to grab your YouTube thumbnails with our favorite one being YouTube Thumbnail Grabber.
Want to know more about what makes a great YouTube thumbnail? Read all about it in our Ultimate Guide to YouTube Thumbnails.
Custom Videos with Versatile Video Editor
Filmora is a stunning video editing software that is suggested both by beginners and professionals alike for creating and editing all sorts of videos, from Gifs and one-minute videos to high-quality movies and YouTube videos. It packs in a wide variety of features like 4K editing, noise removal, color tuning, audio mixer, scene detection, video stabilization, advanced text editor, GIF support, audio equalizer, etc. that can be used to create an outstanding YouTube video of your own.
Some other features offered by Filmora that can be used to make your YouTube video more attractive are 800+ video effects, motion tracking, green screen editing, screen recording, 3D Lut, and the option to export videos to YouTube directly
Conclusion
The thumbnail is one of the most important metadata of a YouTube video and hence all the YouTubers try to design it in the best way possible. As a result, most of the thumbnails are very attractive, creative and speak a lot about the content. Hence many people including bloggers, YouTubers, content creators, etc. want to download and save these thumbnails for their videos, blogs, articles wallpapers, and much more.
The YouTube thumbnail grabbers we have listed above are free and can be used by anyone to download their desired YouTube video thumbnail in good quality. Along with that anyone who wishes to create an attractive YouTube video that stands out can use Wondershare Filmora and its extensive video editing features. Hope our suggestions help you in the future. Thank you.
Richard Bennett
Richard Bennett is a writer and a lover of all things video.
Follow @Richard Bennett
Richard Bennett
Oct 26, 2023• Proven solutions
A YouTube thumbnail must be made very engaging and attractive to tell the potential viewers what the video is about and make them watch it. Since YouTube is a visual media platform, viewers set their eyes on the thumbnails first before they read the title of the video. If you’ve made a collage of YouTube thumbnails or designed YouTube channel art containing various freeze-frame images from different YouTube videos, you are no stranger to needing a fast way to collect YouTube thumbnail images. Online, there are several tools dedicated to solving this exact problem. These are the top five YouTube Thumbnail grabbers:
These thumbnails can be then be used in videos, blogs, articles, web pages, etc. Let’s have a look at 8 best thumbnail grabbers in the market:
- YouTube Thumbnail Grabber
- BoingBoing
- Thumbnailsave.com
- Get YouTube Thumbnail
- Fbutube.com
- YT Thumbnail Downloader
- Youtubethumbnailimage.com
- Youthumbnail.com
#1: YouTube Thumbnail Grabber
https://youtube-thumbnail-grabber.com
YouTube Thumbnail Grabber is at the top of our list. The website is very simple and clean with no ads. All you need to do is enter the YouTube video URL and click on the “Download Images” button. The site will then present you with your downloadable images in different sizes. It’s free and fast!
#2: BoingBoing
https://boingboing.net/features/getthumbs.html
BoingBoing is faster than YouTube Thumbnail grabber because it skips the “Download Images” step. As soon as you enter in your YouTube video URL, BoingBoing will automatically present you with your downloadable images. Although it is one step faster than YouTube Thumbnail Grabber, you will have to deal with having to view one small ad at the bottom of the page. In case you also want to download freeze frames that occur midway through the video, BoingBoing also gives you the option to download those images as well.
#3: Thumbnailsave.com
Another free, straightforward website for grabbing your YouTube thumbnails is Thumbnailsave.com. Again, all you need to do is enter the YouTube video URL and click the “Submit” button. Unlike our first two options, this site has a lot more ads. You’ll see a banner ad at the top as well as an ad to the side of the page. One interesting thing about this website is that it displays a column of thumbnails recently grabbed by users all over the world (displayed on the right side of the page). You might find this entertaining. If you are captivated by one of the thumbnail images, you can download it onto your computer and then do a reverse image search on Google to find the video.
#4: Get YouTube Thumbnail
http://www.get-youtube-thumbnail.com
Get YouTube Thumbnail is another free, straightforward tool for grabbing YouTube thumbnail images. All you need to do is paste the URL of the YouTube video and click on the “Get YouTube Thumbnail” button to retrieve your thumbnail. Yes, that’s right. One thumbnail image. What’s different about this website is that it provides you with a unique image URL. This might be useful for anyone not wanting to deal with files. While this website is free to use, it does have ads.
#5: Fbutube.com
Fbtube.com is a tool that is used to download YouTube thumbnails by bloggers, YouTubers, graphic designers, etc. This tool helps to grab all the thumbnails available for a YouTube video. All you need to do is copy and paste the link of the YouTube video you like in the search bar and tap on the Generate tab.
A number of thumbnail images will be displayed of different sizes and resolutions (720p, 360p, 180p, and 90p) will be displayed for you to choose from. You can download the thumbnail you like by hitting the Download tab. This tool also offers an option to create a custom YouTube thumbnail for sharing on Facebook.
https://fbutube.com/youtube-thumbnail-grabber
#6: YT Thumbnail Downloader
YT Thumbnail Downloader is a free online tool that you can use to download the thumbnail of any YouTube video you wish. This tool is very easy to use, contains no ads, and offers thumbnails in 1080p, 720p, 480p, and 360p format.
To download the thumbnail simply paste the link of the YouTube video you like and hit the Download button. A list of thumbnails of different qualities will be displayed. Choose your desired quality and hit Download again. Another plus point of YTThumbnail Downloader is that it allows extracting thumbnails of live streaming videos.
https://yt-thumbnail-downloader.com/
#7: Youtubethumbnailimage.com
Youtubethumbnailimage.com is another free site that allows you to download YouTube thumbnails. This site allows to download thumbnails in 4 different dimensions, HD 1920x1080, SD 640x480, HQ 480x360, and MQ 320x180.
To download the thumbnail you just have to copy and paste the URL of your desired YouTube video in the search bar and hit Search. Once the results are displayed, choose a dimension and hit Download.
https://youtubethumbnailimage.com/
#8: Youthumbnail.com
Youthumbnail.com is the final tool we will be talking about that can help you save the YouTube thumbnail of a YouTube video. This free tool contains some annoying ads but can download YouTube thumbnail fast and easily in 3 different qualities.
To download the YouTube thumbnail, paste the link of the YouTube video you like in the search box and press Enter. Select the image of your choice from the three images displayed and the thumbnail will be downloaded for your later use.
So that’s our list of top online tools to grab your YouTube thumbnails with our favorite one being YouTube Thumbnail Grabber.
Want to know more about what makes a great YouTube thumbnail? Read all about it in our Ultimate Guide to YouTube Thumbnails.
Custom Videos with Versatile Video Editor
Filmora is a stunning video editing software that is suggested both by beginners and professionals alike for creating and editing all sorts of videos, from Gifs and one-minute videos to high-quality movies and YouTube videos. It packs in a wide variety of features like 4K editing, noise removal, color tuning, audio mixer, scene detection, video stabilization, advanced text editor, GIF support, audio equalizer, etc. that can be used to create an outstanding YouTube video of your own.
Some other features offered by Filmora that can be used to make your YouTube video more attractive are 800+ video effects, motion tracking, green screen editing, screen recording, 3D Lut, and the option to export videos to YouTube directly
Conclusion
The thumbnail is one of the most important metadata of a YouTube video and hence all the YouTubers try to design it in the best way possible. As a result, most of the thumbnails are very attractive, creative and speak a lot about the content. Hence many people including bloggers, YouTubers, content creators, etc. want to download and save these thumbnails for their videos, blogs, articles wallpapers, and much more.
The YouTube thumbnail grabbers we have listed above are free and can be used by anyone to download their desired YouTube video thumbnail in good quality. Along with that anyone who wishes to create an attractive YouTube video that stands out can use Wondershare Filmora and its extensive video editing features. Hope our suggestions help you in the future. Thank you.
Richard Bennett
Richard Bennett is a writer and a lover of all things video.
Follow @Richard Bennett
Also read:
- Making Yields with Content The Creator's Money Map
- [Updated] Dispelling Darkness, Enhancing Youtube Views
- 2024 Approved Crafting an Easy-to-Use YouTube Subscription Tagline
- Channel Image Makeovers on the House for 2024
- Essential Free Editing Software Rankings
- Essential Steps for Organizing YouTube Content
- Earning Edge Reached for Subscribers Above 500 for 2024
- Comprehensive Guide to YouTube Video Captioning for 2024
- Effortless YouTube Video to Text Conversion at No Cost
- Download YouTube Gallery Files Instantly for 2024
- Crafting Chic Looks The Ultimate Cosmetic Compendium for 2024
- Jake Paul's YouTube Odyssey A Tale of Growth
- How-To Guide for Effortless YouTube Playlist Downloads
- Elevate Presentations - Add YouTube in Google Slides
- The Pathway to Recognition YouTubers' Guide to Personal Brands
- [New] Boosting Your Content Visibility with YouTube's Spotlight Channels
- Channel-Specific Audio Excellence Top 156 Character Titles For YT Sound Solutions
- Decoding YouTube's User-Comment Selection Criteria
- 2024 Approved Bridging the Gap YouTube Editing Mastered in iMovie Workflows
- [Updated] 9 Powerful Methods to Make Money on Your YouTube Shorts
- 17 Best Lights and Lighting Equipment for YouTube for 2024
- Navigating the Intersection of YouTube and FB Video Posts
- Boost Your Views Optimal Hashtags for Video Success
- In 2024, Boost Your Channels with These 10 Artisan Banner Creators
- Maximizing Media IPhone/iPad - Download Youtube Videos Step-by-Step
- Choosing a Font for Impactful YouTube Credits
- In 2024, Easy OBS YouTube Live Streaming Guide
- Create Memorable Thumbnails - Discover These 8 YouTube Aids
- [New] Creating Custom Subscribe URLs for Online Content
- Harnessing Online Platforms Beyond YouTube to 30+ Communities
- 2024 Approved Disrupted Beats Best Mobile Music Distortors
- Audio Overhaul Methods for Content Creators Online
- [Updated] Captivating Audiences with Thrilling Unboxing Vids
- Proven Pathways to Profit with YouTube Short Videos
- Distinctive Digital Monikers for Video Creators
- [Updated] Elevate Your Media Content via YouTube Studio Editing Skills
- In 2024, Elevate Your Video Presence Mastery of Channel Art and Banner Sizes
- [New] Ever-Fading Memories Revived YouTube's Lost Content Hunt
- Enhancing Your Visual Mark Implementing Neon-Edged YouTubes for 2024
- 2024 Approved Elite Women Gaming Leaders Top 10 On YT
- Live Audience Score Keeper Apps
- [New] Elevate Engagement, Amplify Audience (YouTube Marketing)
- A Guide to Free You From YouTube's Extra Bar Width
- Amass Higher Views with #Powerful YouTube Tags
- In 2024, Boosting Views with Captivating Intros Filmed in iMovie
- Video Narrative Enhancer
- Entry-Level Mic Tips for YouTube Voice Talents for 2024
- 2024 Approved Comedy Classics A Curated 15-Channel Collection for Humor
- In 2024, Discover Essential List of 7 High-Performance Mobile Video Streaming Tools (iPhone/Android)
- [New] Discover the Leading Online Video Cutter for YouTube
- In 2024, 8 Ways to Transfer Photos from Nokia C22 to iPhone Easily | Dr.fone
- 2024 Approved How Can I Post Twitter Video on Instagram?
- In 2024, Premier Open-Source Switch Clones
- Pure Visuals Guide How to Eliminate Sound From MP4, MKV, AVI, MOV, WMV Videos
- How to use Device Manager to update hardware drivers in Windows 10
- Innovative Podcast Designers to Watch (Updated)
- [Updated] Prime 6 MP3 Generators From TikTok Videos for No Cost for 2024
- [New] Real-World Application Perfecting Your Instagram Livestream with OBS
- Recover your contacts after Oppo Find X7 has been deleted.
- [Updated] In 2024, 5 Secrets to Preventing Blank Scenes with OBS Recording
- Title: "2024 Approved Animated Text That Jumps Master Class with Easy Steps"
- Author: Steven
- Created at : 2024-05-25 21:07:09
- Updated at : 2024-05-26 21:07:09
- Link: https://youtube-clips.techidaily.com/2024-approved-animated-text-that-jumps-master-class-with-easy-steps/
- License: This work is licensed under CC BY-NC-SA 4.0.
