
:max_bytes(150000):strip_icc()/KhangVuong-d90c802b819741a297291d835e7762e4.jpeg)
"2024 Approved Accelerate Video Processing for YouTube Uploads"
Accelerate Video Processing for YouTube Uploads
How to Render and Upload YouTube Videos Faster?

Richard Bennett
Oct 26, 2023• Proven solutions
You’ve shot a video you’re proud of and you can’t wait to post it! But, slow down, you have to edit all your clips together first. And then you have to export your video from the editing program, which can take a while. Then you have to wait for it to upload to YouTube, and once it’s up you have to write your description, add cards, and do a handful of other things.
The period between finishing a video and actually posting it for your subscribers to see can be long and tiresome. A lot of videos have probably died in these stages because their creators ran out of energy and patience.
Don’t let this happen to your videos! Here are 4 ways you can save time and avoid headaches during post-production:
3. Use default descriptions and tags
4. TubeBuddy’s bulk features and tagging tools
1. Create mini-projects
When you have alarge editing project with lots of different titles, animations, clip sequences, and PIP tracks it can get hard to keep track of everything. That’s especially true if you need to go back and make changes. A change to one part of your video could affect other parts of it.
Also, the more complex your video is the longer it will take to render/export.
There is a way you can keep your project more organized, save time making minor adjustments, and speed up rendering: create sub-projects of different segments of your video and import them into your main project as their own clips.
This helps you in 3 ways:
1. If there are a lot of effects it’ll be faster to render a shorter video.
2. If you import your sequence as its own clip you won’t have to worry about adjusting little parts of it whenever you change earlier sections of your video.
3. If you do want to make adjustments to your sequence you can open up your mini-project and change it without affecting anything in your main project.
2. Optimize your upload speed
At home, your videos will upload fastest if all of your internet resources are devoted to the upload. That means you should not have any other windows open on your computer while you are uploading. You should also make sure there aren’t other devices competing for wifi like smart tvs, cell phones, or really fancy coffee makers.
If you have neighbors on the same wifi signal as you and they are online at the same time, this will slow you down too.
Because there is so much that can interfere with wifi, you might want to consider a wired Ethernet cable. Ethernet connections are faster in general, and you won’t have any problems with other devices competing for resources like you get with wifi.
If you’re doing everything you can to optimize your upload speed at home and still find that it takes an unreasonable amount of time to upload videos to YouTube, go somewhere with a better connection. Save your video to a USB drive and take it to a library or college to upload. Connections in these kinds of places tend to be very strong.
3. Use default descriptions and tags
In your Creator Studio, go to Channel > Upload defaults. Here you can write in titles, descriptions, and tags which will automatically be applied to every video you upload.

Note: in the latest YouTube Studio, the upload interface is changed but the main process is similar.

You probably have tags you use for almost every video you post. For example, if your channel is about vegan cooking then every one of your videos is probably tagged ‘vegan’, ‘food’, and ‘cooking’. If you type those tags in here then you don’t have to keep adding them to every new video, and you can still add or remove tags from individual uploads so you aren’t stuck using the exact same set of tags every time.
Similarly, you probably have some default text that goes in the description of every one of your videos (i.e. a link to your personal website or a brief introduction of yourself). If you type in a default description then that text will appear automatically in every new video description and you can just add to it when you need to for individual videos.
Using defaults might only save you a couple of minutes per video, but those minutes add up.
4. TubeBuddy’s bulk features and tagging tools
TubeBuddy is a channel management tool for YouTube. Most of its features are more geared towards very large channels or companies with a YouTube presence, but there are also features that can help small or mid-sized YouTubers save time and stay organized.
Some of these tools include templates for things like cards and end screens and bulk processing tools for when you want to change a lot of things at once. For example, if you wanted to update the links in every card in every one of your videos at once then TubeBuddy could help with that.
Some of TubeBuddy’s best features for growing channels are the tagging features. TubeBuddy will help you discover tags, suggest new tags, and even copy whole lists of tags from rival videos.
There are different levels of pricing for TubeBuddy (including a free version, although it’s very limited) and you get a discount on the Pro version if you have less than 50,000 lifetime views on your channel. It ends up being $4.50USD a month (or $3.60 USD a month if you pay for a year in advance). It’s a good investment for someone who’s starting to see some growth on YouTube, but probably not if you’re still trying to reach milestones like 500 subs or 10,000 views.
You have to work hard to get anywhere on YouTube, but that doesn’t mean you should be toiling away at tedious stuff like typing in the same tags over and over. If you have any time-saving tips then make sure to share them with everyone in the comments!
Remember that your time is valuable =)

If you are using Filmora to edit YouTube videos, you can upload the video to YouTube directly from Filmora without download it again first, which can save you time. Besides, if you don’t want the video to be public, you can change Privacy to unlisted or private in Filmora.


Richard Bennett
Richard Bennett is a writer and a lover of all things video.
Follow @Richard Bennett
Richard Bennett
Oct 26, 2023• Proven solutions
You’ve shot a video you’re proud of and you can’t wait to post it! But, slow down, you have to edit all your clips together first. And then you have to export your video from the editing program, which can take a while. Then you have to wait for it to upload to YouTube, and once it’s up you have to write your description, add cards, and do a handful of other things.
The period between finishing a video and actually posting it for your subscribers to see can be long and tiresome. A lot of videos have probably died in these stages because their creators ran out of energy and patience.
Don’t let this happen to your videos! Here are 4 ways you can save time and avoid headaches during post-production:
3. Use default descriptions and tags
4. TubeBuddy’s bulk features and tagging tools
1. Create mini-projects
When you have alarge editing project with lots of different titles, animations, clip sequences, and PIP tracks it can get hard to keep track of everything. That’s especially true if you need to go back and make changes. A change to one part of your video could affect other parts of it.
Also, the more complex your video is the longer it will take to render/export.
There is a way you can keep your project more organized, save time making minor adjustments, and speed up rendering: create sub-projects of different segments of your video and import them into your main project as their own clips.
This helps you in 3 ways:
1. If there are a lot of effects it’ll be faster to render a shorter video.
2. If you import your sequence as its own clip you won’t have to worry about adjusting little parts of it whenever you change earlier sections of your video.
3. If you do want to make adjustments to your sequence you can open up your mini-project and change it without affecting anything in your main project.
2. Optimize your upload speed
At home, your videos will upload fastest if all of your internet resources are devoted to the upload. That means you should not have any other windows open on your computer while you are uploading. You should also make sure there aren’t other devices competing for wifi like smart tvs, cell phones, or really fancy coffee makers.
If you have neighbors on the same wifi signal as you and they are online at the same time, this will slow you down too.
Because there is so much that can interfere with wifi, you might want to consider a wired Ethernet cable. Ethernet connections are faster in general, and you won’t have any problems with other devices competing for resources like you get with wifi.
If you’re doing everything you can to optimize your upload speed at home and still find that it takes an unreasonable amount of time to upload videos to YouTube, go somewhere with a better connection. Save your video to a USB drive and take it to a library or college to upload. Connections in these kinds of places tend to be very strong.
3. Use default descriptions and tags
In your Creator Studio, go to Channel > Upload defaults. Here you can write in titles, descriptions, and tags which will automatically be applied to every video you upload.
Note: in the latest YouTube Studio, the upload interface is changed but the main process is similar.
You probably have tags you use for almost every video you post. For example, if your channel is about vegan cooking then every one of your videos is probably tagged ‘vegan’, ‘food’, and ‘cooking’. If you type those tags in here then you don’t have to keep adding them to every new video, and you can still add or remove tags from individual uploads so you aren’t stuck using the exact same set of tags every time.
Similarly, you probably have some default text that goes in the description of every one of your videos (i.e. a link to your personal website or a brief introduction of yourself). If you type in a default description then that text will appear automatically in every new video description and you can just add to it when you need to for individual videos.
Using defaults might only save you a couple of minutes per video, but those minutes add up.
4. TubeBuddy’s bulk features and tagging tools
TubeBuddy is a channel management tool for YouTube. Most of its features are more geared towards very large channels or companies with a YouTube presence, but there are also features that can help small or mid-sized YouTubers save time and stay organized.
Some of these tools include templates for things like cards and end screens and bulk processing tools for when you want to change a lot of things at once. For example, if you wanted to update the links in every card in every one of your videos at once then TubeBuddy could help with that.
Some of TubeBuddy’s best features for growing channels are the tagging features. TubeBuddy will help you discover tags, suggest new tags, and even copy whole lists of tags from rival videos.
There are different levels of pricing for TubeBuddy (including a free version, although it’s very limited) and you get a discount on the Pro version if you have less than 50,000 lifetime views on your channel. It ends up being $4.50USD a month (or $3.60 USD a month if you pay for a year in advance). It’s a good investment for someone who’s starting to see some growth on YouTube, but probably not if you’re still trying to reach milestones like 500 subs or 10,000 views.
You have to work hard to get anywhere on YouTube, but that doesn’t mean you should be toiling away at tedious stuff like typing in the same tags over and over. If you have any time-saving tips then make sure to share them with everyone in the comments!
Remember that your time is valuable =)
If you are using Filmora to edit YouTube videos, you can upload the video to YouTube directly from Filmora without download it again first, which can save you time. Besides, if you don’t want the video to be public, you can change Privacy to unlisted or private in Filmora.
Richard Bennett
Richard Bennett is a writer and a lover of all things video.
Follow @Richard Bennett
Create Memorable Thumbnails - Discover These 8 YouTube Aids
Top 12 Free YouTube Thumbnail Makers - Filmora
Richard Bennett
Mar 27, 2024• Proven solutions
Video thumbnails are vital to get your videos more views. Many successful YouTubers make nice thumbnails which help them get lots of views and thus tons of subscribers.
If you are searching for software tools that can assist in the creation of YouTube video thumbnails, then you are on the right page because the details available below will provide you with complete information about the top 10+ highly rated YouTube Thumbnail Makers on both desktop and mobile devices. Some of them are free to create YouTube thumbnails; others may need to pay to get more advanced features. Besides, I’ll also show you how to create a thumbnail in the Filmora video editor in detail.
- Part 1: Best Free YouTube Thumbnail Makers for Online Users
- Part 2: How to Make Video Thumbnail with Wondershare Filmora [Creative Ways]
- Part 3: FAQs About YouTube Thumbnail
Before we get started, it is highly recommended to watch this video, teaching you how to make a YouTube Thumbnail in 30 seconds with Filmora.
You might be interested in
- How to Make Fortnite Thumbnail Super Easy and Free >>
- Best Size, Best Practices of Making YouTube Thumbnail >>
Part 1:10+ Free YouTube Thumbnail Makers for Windows/Mac/Online/Android/iPhone/iPad
In this part, we will share with you some Free YouTube Thumbnail Makers that you can use. Some of them are online solutions, so there is no need to download them, some of them can be downloaded on Windows or Mac computers.
If you prefer to edit videos on mobile devices, then it is good to have an app that allows you to create video thumbnails for YouTube videos. So in this part, we have included some video thumbnail maker apps that you can use on iPhone and Android phones.
1. Canva
It is a free thumbnail maker that can be accessed from its official website at Canva.com. This Video Thumbnail Maker is useful for graphic designers as it offers incredible features. The simple to use drag and drop type functions are wonderful, and the effects available for your Thumbnail Creation include free stock-type photos, Illustrations, Lines, Shapes, Frames, Grids, Backgrounds, Text, etc. The quick customer support facility is appreciable. Note: You need to sign up to use the thumbnail templates.
Main Features of this free YouTube Thumbnail Maker:
- It offers a customized YouTube thumbnail design
- You can change images, colors and fonts easily
- You can get more styles and templates if you pay
- Registration needed
2. Wondershare PixStudio
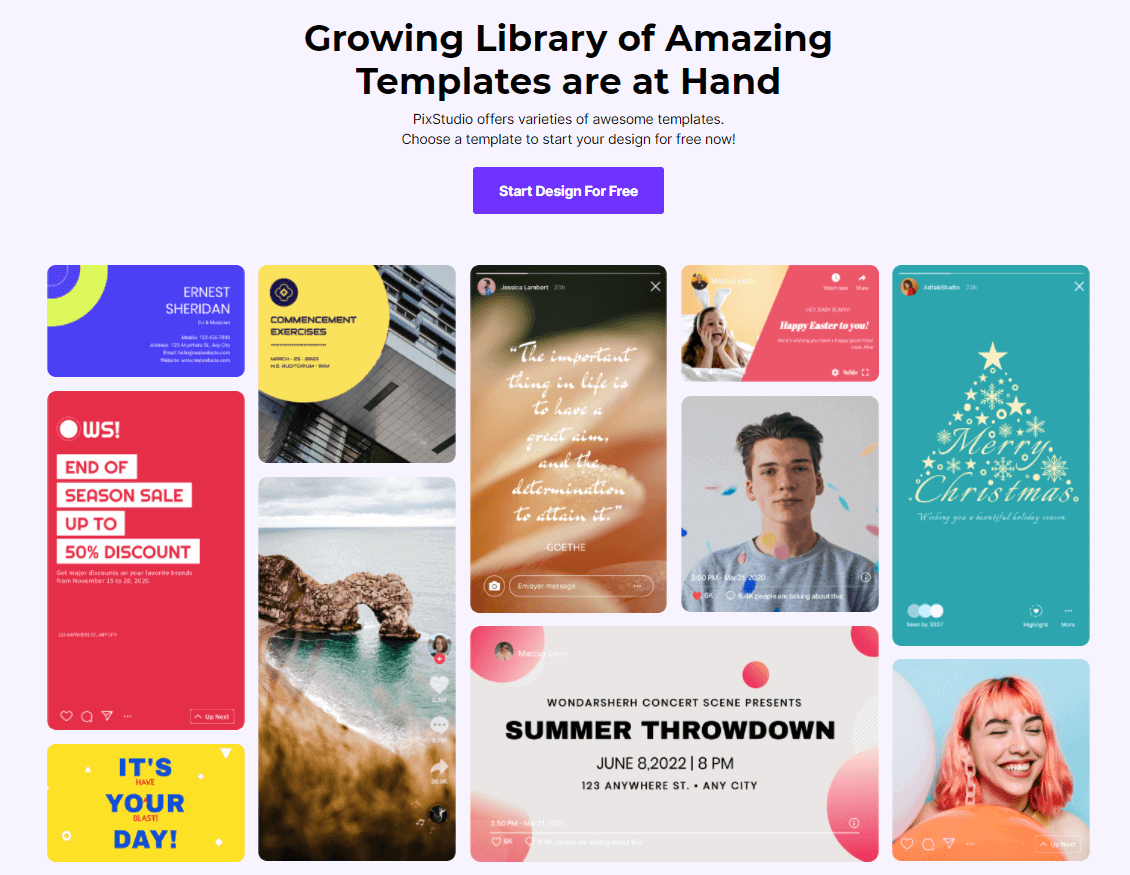
Wondershare PixStudio is an all-in-one and powerful online graphic design maker for everyone. It has various types of templates for YouTube Thumbnails, Logos, Posters, etc. You can create a beautiful design by simply dragging and dropping the elements and photos. The online platform is free to use all templates, just One-Click to download your creations and share to your Facebook, Instagram Story, YouTube Thumbnails, etc. immediately.
Features :
- Various types of templates
- Simple and Fast Design
- Background remover
Available:
Online
iPhone/iPad
Android
3. PicMonkey

This online thumbnail maker provides numerous filters, exclusive overlays, fonts, frames, and extra beautifying touch-up type tools to users with a single registration to Picmonkey’s premium membership. The exclusive effects like Ombre, zombify, premium fonts and Mirror are a really good collection of this tool. Now you can easily design beautiful collages, edit your memories, and create professional thumbnails with Picmonkey.com. Because of its wide range of options, it is probably the second most popular option for YouTubers who want to make professional thumbnails, right after Canva. One major difference between Picmonkey and Canva is that Picmonkey is no longer free. It costs $4 per month.
Features:
- As a youtube thumbnail maker, you also can touch up facial beautification
- Design tools make creative logos
- Provides 100+ designer-crafted thumbnail templates
Available :
Online
iPhone/iPad
Android
4. Fotor
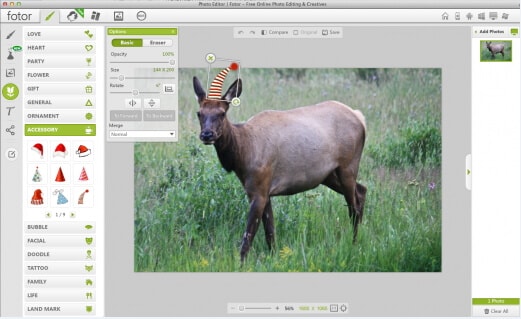
It is possible to get something outstanding even out of your simple content without making much effort because Fotor serves you with all advanced features, and it covers attractive themes from all over the world. Fotor allows you to re-discover your art and skills without any limitation as it offers all quick editing services online. It is very interactive and simple to use with all rich features, so even beginners who haven’t made any thumbnail before can make a video thumbnail with it easily.
Features:
- Your thumbnail will be saved on the cloud
- Fast processing speed while exporting your work
- Provides YouTube thumbnail templates for different scenarios
Available :
Online
iPhone/iPad
Android
5. Fotojet
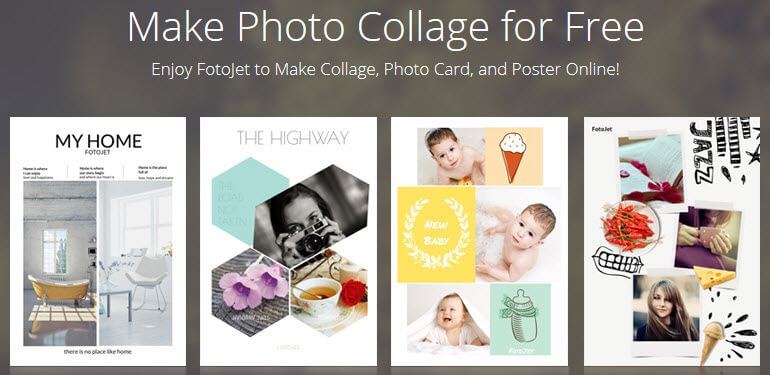
The fotojet.com online tool provides numerous facilities, whereas it is preferably used for collage making, graphic designing, and as a photo editor. With this advanced thumbnail creator tool, now you can easily rotate, crop, resize or filter your images while creating direct posts for social media pages such as Instagram, Facebook, etc. Fotojet.com possesses more than 600 stunning collage making templates that are suitable for your special events.
Features:
- It owns many templates for you to use
- Easy to have a high-quality thumbnail with only a few clicks
- 3 Steps to make a YouTube thumbnail
Available :
Online
Windows
Mac
6. Backgrounder
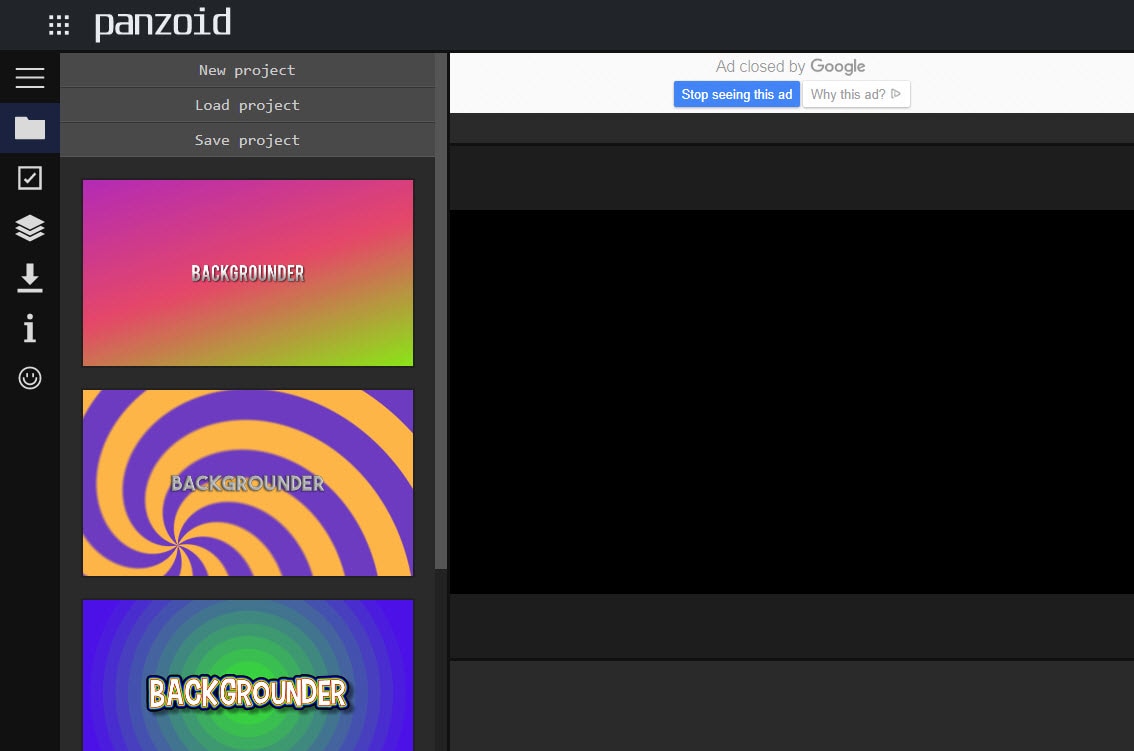
It allows you to design masterpieces of customized professional art, avatars, and thumbnails for videos on YouTube, Facebook, Twitter, etc. It is simple to use and contains an interactive user interface that is suitable for professionals as well as beginners.
Features:
- It owns a community that you can share works with other people
- The interface is extremely straightforward
Available :
Online
7. Pixlr:
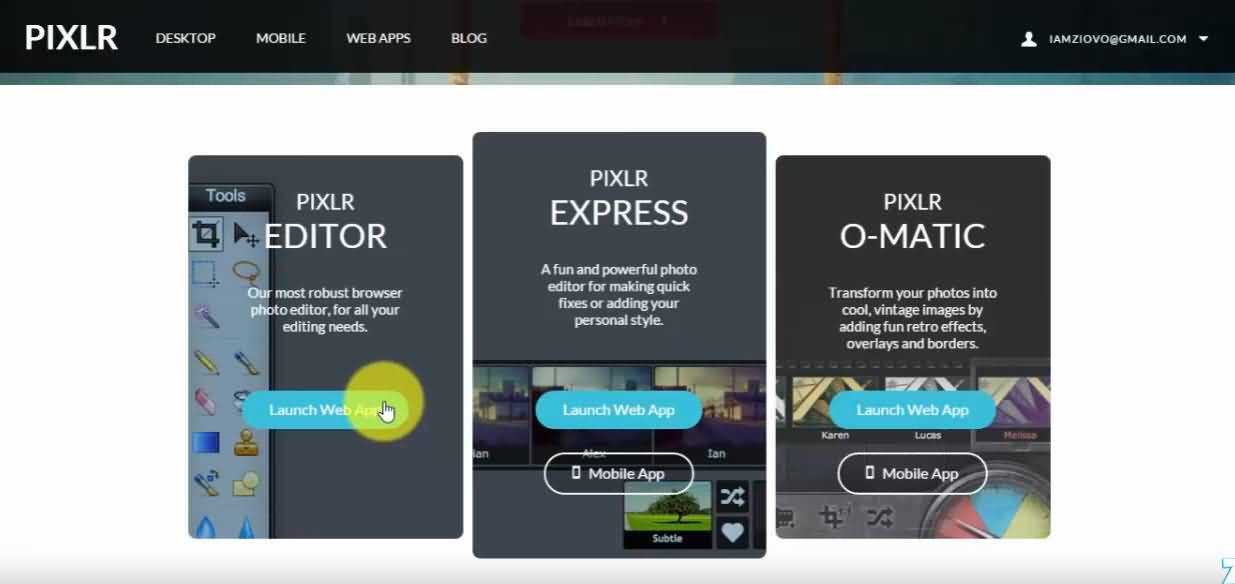
It is a specially designs app version of well known Pixlr website where you can feel free to add overlays to your thumbnails. The choice of filters is also good for her with a high-end resolution as compared to available online solutions.
Features:
- Its free effects are a great source to come up with a new YouTube thumbnail
- Comprehensive editing tools are handy to use every day
Available :
Online
iPhone/iPad
Android
8. Photo Editor:
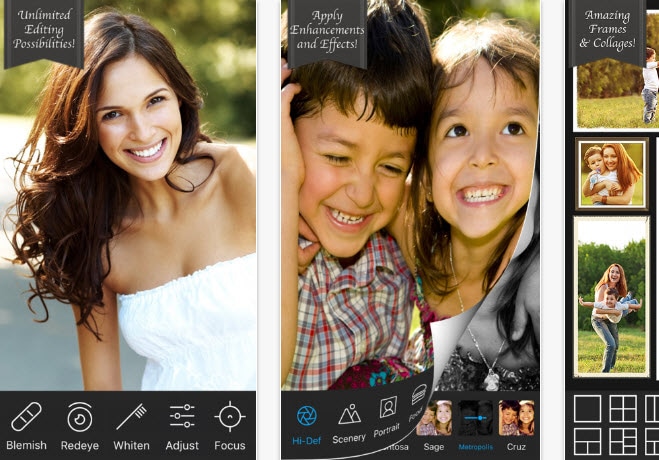
Photo Editor is one of the most popular applications that assist users in the easy addition of stickers, frames, etc while it makes adjustment of redeye, brightness, and sharpness much easier. Most people love this application more due to its ability to create memes with available images and text for those images can be adjusted easily. The photo editor also makes it much easier to share edited stuff on Instagram and the quality of edited images use to be very high in this case.
Features:
- Color splash is a great tool to brighten up your thumbnail
- You can easily crop, rotate and flip
Available :
iPhone/iPad
9. Insta Collage:
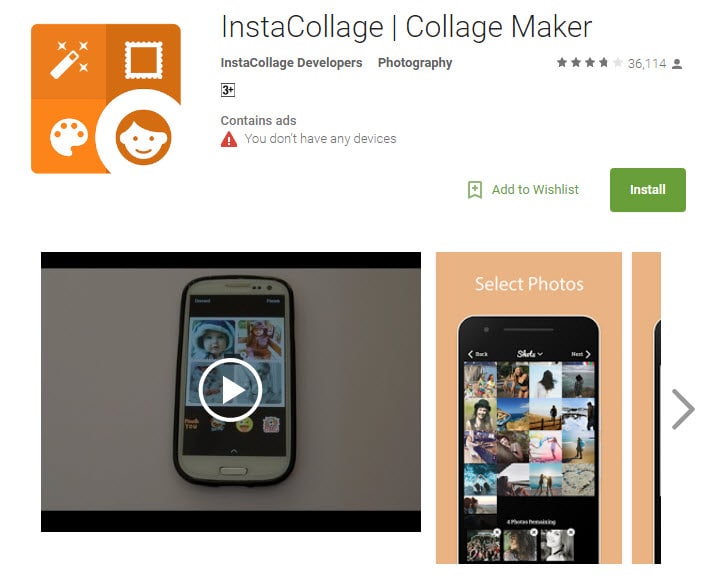
The name of this application describes its most special feature that is it allows users to create wonderful collages within very little time. This tool comes with easy editing and sharing features so that users can have an easy interface on other platforms too. There are lots of effects that can be added to images while designing thumbnails and it is rated to have an outstanding quality of results.
Features:
- The personalized layout will give you a catchy thumbnail
- It owns 30 patterns and 18 frames to select
Available :
Android
10. Cropic:
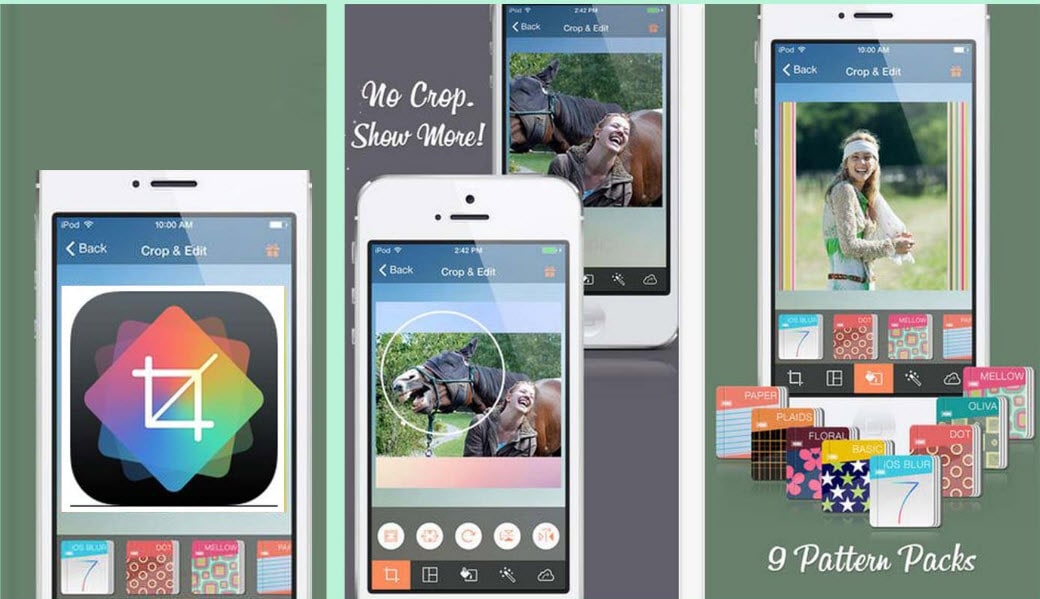
Here is one more application for you that you will need for easy customization as well as fast sharing to YouTube as well as Instagram. Users can bring all size types to this platform, and it is also possible to add text at the time of editing. This tool is suggested for beginners as well as professionals due to its great results.
Features:
- You can scale the image by hand and cut it
- Pro version is more powerful for supporting 1224x1224 pixels
Available :
iPhone/iPad
With all these available software tools, it becomes much easier to create video Thumbnails for YouTube. The easy-to-follow steps are well described in different articles on the internet, but first of all, you need to make a selection between whether you need to use the online tool or wish to download the app on your device.
For the second case, you need to spare some memory in your device, whereas for the first one it demands a fast internet connection for easy services. Besides those specially designed YouTube Thumbnail makers, you can also create a thumbnail in Filmora if you’ve already installed it.
11. Snappa:
If you’re looking for a tool that can be upgraded later, then Snappa could be for you. Offering users both free and paid functions, Snappa will allow users to generate some truly alluring thumbnails, while still being able to use the tools for work on other social media platforms.
Features:
- Pre-Made Templates Available
- Easily Customize Backgrounds
- Place Custom Text Anywhere You Want
- Create a Truly Bespoke YouTube Thumbnail
Available :
Online
iPhone/iPad
Android
12. Adobe Spark:
Not only is Adobe recognized for creating images in many different contexts, but it is also able to offer YouTubers a free tool to ensure that their video thumbnails are catching the eye of social network visitors.
Features:
- A Basic and Easy-To-Use Platform
- Ideal for Beginners
- Customize Colors, Backgrounds, and Text with Ease
- Add Additional Images if Needed
Available :
Windows 7 or newer
Mac OS X
Chromebook
Part 2: How to Make YouTube Thumbnails in Wondershare Filmora?
Filmora is easy to use and powerful video editing software for your YouTube videos, which allows you not only to cut, rotate, crop, reverse, or speed up your videos, but also to apply some advanced editing effects like green screen, PIP, audio editing, etc. within clicks.
Here are several creative ways of making thumbnails in Filmora. You can easily create a thumbnail in 30 seconds with Filmora’s new feature, AI portrait.
You can add your image or background image to Filmora and then add some filters, texts, overlay, or elements to the photo, and then take a snapshot, since Filmora features the snapshot tool which allows you to pick up the most attractive images from the video and use it as a video thumbnail.
Thumbnail created from a photo in Filmora
Or, you can extract frames from the video and use it as a thumbnail and upload it to YouTube later.
Thumbnail extracted from video footage in Filmora
One more creative way is to compositevideo footage with the green screen feature .
Use Green Screen to Create Video Thumbnail in Filmora
Where to find the thumbnail photo in Wondershare Filmora?
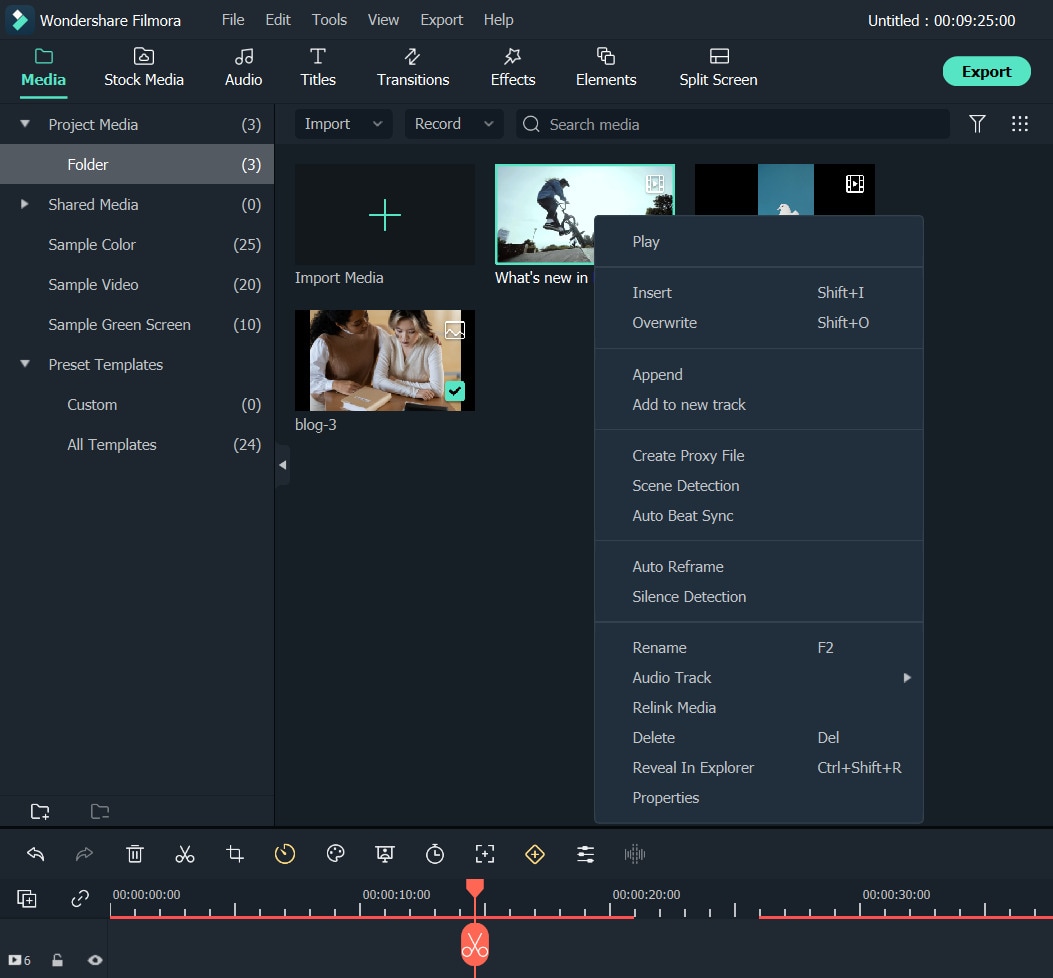
After clicking the Camera icon in Filmora to take a screenshot, you can find the photos by right-clicking the image in the Media library and then selecting Reveal in Explorer to check it.
Download Mac Version ](https://tools.techidaily.com/wondershare/filmora/download/ )
Part 3: FAQs About YouTube Thumbnail
1. What Does Thumbnail Mean on YouTube?
Thumbnails are reduced-size versions of images or videos. The name is an allusion to images being reduced to roughly the size of a human thumbnail. Thumbnails have special significance in YouTube SEO. They are used for drawing the viewers’ attention. A well-made thumbnail can bring millions of views for a YouTuber .
2. Which Is the Best Thumbnail Maker for YouTube?
Besides the thumbnail maker introduced above, the Filmora video editor and be used as an excellent thumbnail maker as well. Instead of going through the hassle of installing or subscribing to a separate program or website, it is better to use the extensive features of Filmora. It can take free snapshots for you, which you can modify within Filmora. There are stunning title templates, effects, overlays, transitions, and a large library of stock content at your service. From Part 2 in this article, you can see that making a YouTube thumbnail in Filmora is easy and efficient.
Richard Bennett
Richard Bennett is a writer and a lover of all things video.
Follow @Richard Bennett
Richard Bennett
Mar 27, 2024• Proven solutions
Video thumbnails are vital to get your videos more views. Many successful YouTubers make nice thumbnails which help them get lots of views and thus tons of subscribers.
If you are searching for software tools that can assist in the creation of YouTube video thumbnails, then you are on the right page because the details available below will provide you with complete information about the top 10+ highly rated YouTube Thumbnail Makers on both desktop and mobile devices. Some of them are free to create YouTube thumbnails; others may need to pay to get more advanced features. Besides, I’ll also show you how to create a thumbnail in the Filmora video editor in detail.
- Part 1: Best Free YouTube Thumbnail Makers for Online Users
- Part 2: How to Make Video Thumbnail with Wondershare Filmora [Creative Ways]
- Part 3: FAQs About YouTube Thumbnail
Before we get started, it is highly recommended to watch this video, teaching you how to make a YouTube Thumbnail in 30 seconds with Filmora.
You might be interested in
- How to Make Fortnite Thumbnail Super Easy and Free >>
- Best Size, Best Practices of Making YouTube Thumbnail >>
Part 1:10+ Free YouTube Thumbnail Makers for Windows/Mac/Online/Android/iPhone/iPad
In this part, we will share with you some Free YouTube Thumbnail Makers that you can use. Some of them are online solutions, so there is no need to download them, some of them can be downloaded on Windows or Mac computers.
If you prefer to edit videos on mobile devices, then it is good to have an app that allows you to create video thumbnails for YouTube videos. So in this part, we have included some video thumbnail maker apps that you can use on iPhone and Android phones.
1. Canva
It is a free thumbnail maker that can be accessed from its official website at Canva.com. This Video Thumbnail Maker is useful for graphic designers as it offers incredible features. The simple to use drag and drop type functions are wonderful, and the effects available for your Thumbnail Creation include free stock-type photos, Illustrations, Lines, Shapes, Frames, Grids, Backgrounds, Text, etc. The quick customer support facility is appreciable. Note: You need to sign up to use the thumbnail templates.
Main Features of this free YouTube Thumbnail Maker:
- It offers a customized YouTube thumbnail design
- You can change images, colors and fonts easily
- You can get more styles and templates if you pay
- Registration needed
2. Wondershare PixStudio
Wondershare PixStudio is an all-in-one and powerful online graphic design maker for everyone. It has various types of templates for YouTube Thumbnails, Logos, Posters, etc. You can create a beautiful design by simply dragging and dropping the elements and photos. The online platform is free to use all templates, just One-Click to download your creations and share to your Facebook, Instagram Story, YouTube Thumbnails, etc. immediately.
Features :
- Various types of templates
- Simple and Fast Design
- Background remover
Available:
Online
iPhone/iPad
Android
3. PicMonkey
This online thumbnail maker provides numerous filters, exclusive overlays, fonts, frames, and extra beautifying touch-up type tools to users with a single registration to Picmonkey’s premium membership. The exclusive effects like Ombre, zombify, premium fonts and Mirror are a really good collection of this tool. Now you can easily design beautiful collages, edit your memories, and create professional thumbnails with Picmonkey.com. Because of its wide range of options, it is probably the second most popular option for YouTubers who want to make professional thumbnails, right after Canva. One major difference between Picmonkey and Canva is that Picmonkey is no longer free. It costs $4 per month.
Features:
- As a youtube thumbnail maker, you also can touch up facial beautification
- Design tools make creative logos
- Provides 100+ designer-crafted thumbnail templates
Available :
Online
iPhone/iPad
Android
4. Fotor
It is possible to get something outstanding even out of your simple content without making much effort because Fotor serves you with all advanced features, and it covers attractive themes from all over the world. Fotor allows you to re-discover your art and skills without any limitation as it offers all quick editing services online. It is very interactive and simple to use with all rich features, so even beginners who haven’t made any thumbnail before can make a video thumbnail with it easily.
Features:
- Your thumbnail will be saved on the cloud
- Fast processing speed while exporting your work
- Provides YouTube thumbnail templates for different scenarios
Available :
Online
iPhone/iPad
Android
5. Fotojet
The fotojet.com online tool provides numerous facilities, whereas it is preferably used for collage making, graphic designing, and as a photo editor. With this advanced thumbnail creator tool, now you can easily rotate, crop, resize or filter your images while creating direct posts for social media pages such as Instagram, Facebook, etc. Fotojet.com possesses more than 600 stunning collage making templates that are suitable for your special events.
Features:
- It owns many templates for you to use
- Easy to have a high-quality thumbnail with only a few clicks
- 3 Steps to make a YouTube thumbnail
Available :
Online
Windows
Mac
6. Backgrounder
It allows you to design masterpieces of customized professional art, avatars, and thumbnails for videos on YouTube, Facebook, Twitter, etc. It is simple to use and contains an interactive user interface that is suitable for professionals as well as beginners.
Features:
- It owns a community that you can share works with other people
- The interface is extremely straightforward
Available :
Online
7. Pixlr:
It is a specially designs app version of well known Pixlr website where you can feel free to add overlays to your thumbnails. The choice of filters is also good for her with a high-end resolution as compared to available online solutions.
Features:
- Its free effects are a great source to come up with a new YouTube thumbnail
- Comprehensive editing tools are handy to use every day
Available :
Online
iPhone/iPad
Android
8. Photo Editor:
Photo Editor is one of the most popular applications that assist users in the easy addition of stickers, frames, etc while it makes adjustment of redeye, brightness, and sharpness much easier. Most people love this application more due to its ability to create memes with available images and text for those images can be adjusted easily. The photo editor also makes it much easier to share edited stuff on Instagram and the quality of edited images use to be very high in this case.
Features:
- Color splash is a great tool to brighten up your thumbnail
- You can easily crop, rotate and flip
Available :
iPhone/iPad
9. Insta Collage:
The name of this application describes its most special feature that is it allows users to create wonderful collages within very little time. This tool comes with easy editing and sharing features so that users can have an easy interface on other platforms too. There are lots of effects that can be added to images while designing thumbnails and it is rated to have an outstanding quality of results.
Features:
- The personalized layout will give you a catchy thumbnail
- It owns 30 patterns and 18 frames to select
Available :
Android
10. Cropic:
Here is one more application for you that you will need for easy customization as well as fast sharing to YouTube as well as Instagram. Users can bring all size types to this platform, and it is also possible to add text at the time of editing. This tool is suggested for beginners as well as professionals due to its great results.
Features:
- You can scale the image by hand and cut it
- Pro version is more powerful for supporting 1224x1224 pixels
Available :
iPhone/iPad
With all these available software tools, it becomes much easier to create video Thumbnails for YouTube. The easy-to-follow steps are well described in different articles on the internet, but first of all, you need to make a selection between whether you need to use the online tool or wish to download the app on your device.
For the second case, you need to spare some memory in your device, whereas for the first one it demands a fast internet connection for easy services. Besides those specially designed YouTube Thumbnail makers, you can also create a thumbnail in Filmora if you’ve already installed it.
11. Snappa:
If you’re looking for a tool that can be upgraded later, then Snappa could be for you. Offering users both free and paid functions, Snappa will allow users to generate some truly alluring thumbnails, while still being able to use the tools for work on other social media platforms.
Features:
- Pre-Made Templates Available
- Easily Customize Backgrounds
- Place Custom Text Anywhere You Want
- Create a Truly Bespoke YouTube Thumbnail
Available :
Online
iPhone/iPad
Android
12. Adobe Spark:
Not only is Adobe recognized for creating images in many different contexts, but it is also able to offer YouTubers a free tool to ensure that their video thumbnails are catching the eye of social network visitors.
Features:
- A Basic and Easy-To-Use Platform
- Ideal for Beginners
- Customize Colors, Backgrounds, and Text with Ease
- Add Additional Images if Needed
Available :
Windows 7 or newer
Mac OS X
Chromebook
Part 2: How to Make YouTube Thumbnails in Wondershare Filmora?
Filmora is easy to use and powerful video editing software for your YouTube videos, which allows you not only to cut, rotate, crop, reverse, or speed up your videos, but also to apply some advanced editing effects like green screen, PIP, audio editing, etc. within clicks.
Here are several creative ways of making thumbnails in Filmora. You can easily create a thumbnail in 30 seconds with Filmora’s new feature, AI portrait.
You can add your image or background image to Filmora and then add some filters, texts, overlay, or elements to the photo, and then take a snapshot, since Filmora features the snapshot tool which allows you to pick up the most attractive images from the video and use it as a video thumbnail.
Thumbnail created from a photo in Filmora
Or, you can extract frames from the video and use it as a thumbnail and upload it to YouTube later.
Thumbnail extracted from video footage in Filmora
One more creative way is to compositevideo footage with the green screen feature .
Use Green Screen to Create Video Thumbnail in Filmora
Where to find the thumbnail photo in Wondershare Filmora?
After clicking the Camera icon in Filmora to take a screenshot, you can find the photos by right-clicking the image in the Media library and then selecting Reveal in Explorer to check it.
Download Mac Version ](https://tools.techidaily.com/wondershare/filmora/download/ )
Part 3: FAQs About YouTube Thumbnail
1. What Does Thumbnail Mean on YouTube?
Thumbnails are reduced-size versions of images or videos. The name is an allusion to images being reduced to roughly the size of a human thumbnail. Thumbnails have special significance in YouTube SEO. They are used for drawing the viewers’ attention. A well-made thumbnail can bring millions of views for a YouTuber .
2. Which Is the Best Thumbnail Maker for YouTube?
Besides the thumbnail maker introduced above, the Filmora video editor and be used as an excellent thumbnail maker as well. Instead of going through the hassle of installing or subscribing to a separate program or website, it is better to use the extensive features of Filmora. It can take free snapshots for you, which you can modify within Filmora. There are stunning title templates, effects, overlays, transitions, and a large library of stock content at your service. From Part 2 in this article, you can see that making a YouTube thumbnail in Filmora is easy and efficient.
Richard Bennett
Richard Bennett is a writer and a lover of all things video.
Follow @Richard Bennett
Also read:
- [New] Essential FreeFire Hashtags to Skyrocket Video Views on YouTube
- Navigating YouTube's Tagging System Tips for Finding Prime Video Labels
- StudyHistory 10 Essential YouTube Historical Channels
- [Updated] Efficient Editing for Creators - Top 10 Online Trimmers
- Perfecting Your Vids A Comprehensive YouTube Studio Tutorial
- 2024 Approved Elevate Engagement Posting YouTube Video on FB
- Top Gear for YouTube Beginners Essential Tech Guide
- In 2024, Alternative Cinema Highlights Audiences
- Inject Energy Into YouTube Snapshots
- Mastering the Visual Storyteller YouTube Cinematic Training
- 2024 Approved How to Convert YouTube to MP4 Safely?
- Discover the Best 11 No-Fee Name Crafting for Channels
- Unified Platform Dimensions Guide
- In 2024, Comfortable Viewing Looping YouTube Videos on Big Displays
- Most Influential Gamers on YouTube
- A Compre Written in Sounds YouTube Playlists Decoded for 2024
- Phenomenal Flair YouTube’s Ultimate Video Magic
- Peak Performance Best Post Times Unveiled
- [Updated] Best Bites Outside the Box New Film Favorites
- [Updated] Erase Unwanted Black Fringes on YouTube Tracks
- [Updated] Enhancing YouTube Beauty Mastering Video Color Dynamics
- [New] Best Flip-Screen Cam Picks Your Guide to Excellent Vlogging
- In 2024, The Best Laptops For Video Editing You Should Know
- Essential Tips for YouTube Audio Optimization
- [New] Dispatching Dreadful Green Screen Distortion on Mac-Editing Sessions
- Seamless TV Integration Looping Videos From YouTube on Large Screens
- Locating YouTube's Content Creation Hub Essential Guide
- [New] Binge-Free Bliss YouTube's Ultimate Guide to No-Cost Movies
- Calm Cursor 3 Pathways to Mellow Watching Videos on YouTube (57 Chars)
- The Minimum View Count for YouTube Success Stories
- Discover The 10 Best Yoga Platforms For Enhanced Fitness for 2024
- Profitability Probe DailyMovement Versus YouTube's Financial Edge
- [New] Captivating Startups Discovering the Best 15 Video Intros
- [Updated] A Taste of Film Home Cook's Visual Journey
- [New] Decoding Digital Dollars An Effective Triple Step Process to Determine Your Subscriber Profits
- [New] Elevating Audience Excitement with Top Ideas
- Your Guide to the Best Budget-Friendly Editors
- From Conceptualization to Production A Guide to Making Mukbang
- Mobile Sound Shakers The Ultimate Playlist
- 2024 Approved Amplify Views & Engagement Through Google Analytics Expertise
- In 2024, Deciphering Digital Dominance YouTube Content Strategy Comparison
- Elevating the Cold with Five Cozy Cinematic Elements for 2024
- [New] Awakening with Animation The Cutest and Brightest Channels
- The Complete Playbook for YouTube Beginners
- In 2024, Detailed Review of doctorSIM Unlock Service For iPhone XR
- In 2024, Can I use iTools gpx file to catch the rare Pokemon On Lava Agni 2 5G | Dr.fone
- In 2024, The Ultimate List of Android-Compatible Multitrack Digital Recorders
- [New] In 2024, Syncing Soundtracks with Vimeo Video Content
- In 2024, Why does the pokemon go battle league not available On Tecno Camon 20 Pro 5G | Dr.fone
- In 2024, Aural Adventures Tech Updates
- [Updated] In 2024, Instagram's Secret Fine-Tuning FCPX for High Aspect Videos
- Indulge in These 15 Influencer-Led TikTok Recipes That Are a Hit Online for 2024
- How To Transfer Data From iPhone 14 Plus To Other iPhone 13 Pro devices? | Dr.fone
- Crafting Unique Cellphone Alerts From Popular TikTok Music
- Updated Make Viral Reaction Videos Best iOS and Android Apps
- In 2024, 4 solution to get rid of pokemon fail to detect location On Tecno Phantom V Fold | Dr.fone
- [Updated] Speak and Record IPhone Voice Memo Basics
- Lenovo ThinkPhone Screen Unresponsive? Heres How to Fix It | Dr.fone
- Can't play .mov files on Xiaomi Redmi 13C
- Full Guide on Mirroring Your Poco M6 5G to Your PC/Mac | Dr.fone
- In 2024, How To Bypass iCloud By Checkra1n Even From iPhone 6 If Youve Tried Everything
- Possible solutions to restore deleted pictures from Blade A73 5G.
- Spectral Footage Innovation in Cams
- [New] Essential Video Calls Phone & PC's Finest Tools for 2024
- [Updated] Protecting Your Privacy A Curated List of Cam Covers
- How to Reverse A TikTok Video with Ease An Ultimate Guide
- Title: "2024 Approved Accelerate Video Processing for YouTube Uploads"
- Author: Steven
- Created at : 2024-05-25 18:23:46
- Updated at : 2024-05-26 18:23:46
- Link: https://youtube-clips.techidaily.com/2024-approved-accelerate-video-processing-for-youtube-uploads/
- License: This work is licensed under CC BY-NC-SA 4.0.
