
:max_bytes(150000):strip_icc()/GettyImages-735894879-59a33461519de20010087422.jpg)
"2024 Approved 10 Online Tools to Retrieve YouTube Graphics"
10 Online Tools to Retrieve YouTube Graphics
10 Free YouTube Thumbnail Downloaders/Savers Online-Download YouTube Thumbnail

Shanoon Cox
Mar 27, 2024• Proven solutions
YouTube thumbnails can be required for download for various reasons ranging from personal to professional. Some thumbnails are very attractive, and users might want to download YouTube thumbnail to use as wallpaper or as inspiration. Whereas other times, thumbnails are required to be added to blogs.
In either case, you can take help from a YouTube thumbnail downloader that can save your day. As the name suggests, a YouTube thumbnail saver can let you save any thumbnail you like, and sometimes you can also custom select the quality. For your ease, we have rounded up the best tools to download YouTube thumbnail.
Let’s dive in.
- 10 Free Online YouTube Thumbnail Downloaders/Savers
- Bonus Tip: The Best YouTube Video Editor-Wondershare Filmora
10 Free Online YouTube Thumbnail Downloaders/Savers
There are tons of tools on the web that let you download YouTube thumbnail. But, not all of them are reliable and secure. Choosing the best YouTube thumbnail downloaders that offer all the features you are looking for can be time taking and tedious. So, we are here to save the day by listing the top YouTube thumbnail saver tools.
1. ThumbnailSave
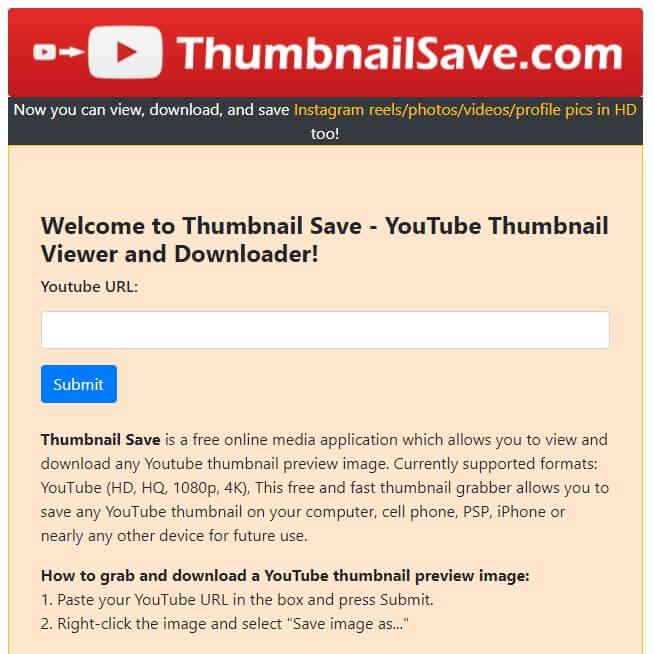
As a free YouTube thumbnail downloader, ThumbnailSave is frequently used by people. It enables users to download YouTube thumbnail without any hassle. There a variety of resolutions available, and you can choose the quality you like, ranging from HD to 360p. The simple interface of this downloader further makes it an excellent tool. All you have to do is enter the URL link and click Save As after the thumbnail is loaded. Also, this versatile YouTube thumbnail downloader works on almost every kind of device. Whether you are using a desktop PC or an iPhone, ThumbnailSave is compatible with all.
2. YouTube Thumbnail Grabber

Another powerful and free YouTube thumbnail downloader is this one, which can download both YouTube and Vimeo thumbnails. After you copy-paste the link of the video whose thumbnail you wish to save, you can press on Get Thumbnail Images. After that, you can choose the quality of the thumbnail as per your requirements. Moreover, you can also get a free extension of this YouTube thumbnail saver on both Chrome and Firefox browsers. This will allow fast and easy use of the YouTube thumbnail downloader. What’s more, unlike other downloaders, this one doesn’t bombard the user with pesky ads.
3. Youthumbnail.com
YouThumbnail, also known as YT YouTube thumbnail downloader, is a robust tool that allows users to quickly download YouTube thumbnail absolutely free of cost. It requires no installation. Three different sizes, namely medium, small, and HD, are available for download. By clicking on the desired quality, you can quickly and safely download YouTube thumbnail. Also, there is no limit to the number of downloads. Better yet, there are multiple languages available. So, a diverse population can use this online YouTube thumbnail saver with great ease.
4. YouTube-thumbnails.com

As a free and open for all YouTube thumbnail saver, this one lets users get the thumbnail of their choice in the quality of their choice. Using this YouTube thumbnail downloader won’t cost a penny, no matter how many thumbnails are downloaded. It also has a very simple user interface. Just enter the YouTube video link and press Find. The qualities of the thumbnail supported by this tool are MQ 320x180, HQ 480x360, SD 640x480, and HD 1280x720 , and will be almost instantly displayed. Click on the quality you wish to save locally, and your download will start immediately.
5. YT Thumbnail Downloader
YT Thumbnail Downloader is an excellent and lightning-fast tool to download YouTube thumbnail. It poses no limitations or charges on the use. Moreover, you can custom select the resolution of the thumbnail before you click to save. This YouTube thumbnail downloader prides itself on being the fastest in the market. The thumbnail processing time is just 2 seconds, after which you can download YouTube thumbnail. Besides, this YouTube thumbnail saver is safe and secure as it doesn’t display tons of ads and also does not save the user’s data.
6. BoingBoing
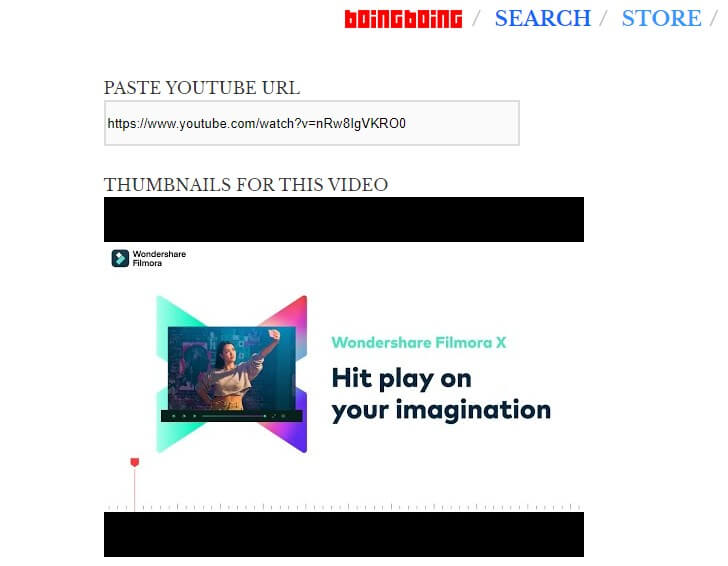
BoingBoing is also a free and very easy-to-use YouTube thumbnail saver. All you have to do is paste the URL you copied, and this YouTube thumbnail downloader will take care of the rest. There is no button to press to start the process. The thumbnails are almost instantly loaded. However, BoingBoing displays a lot of annoying ads. Also, the different qualities that are displayed don’t mention the size, and you will have to press and hold the image to download. All in all, this YouTube thumbnail saver is worth your time and effort as it is fast at what it does.
7. Get YouTube Thumbnail
Get YouTube Thumbnail is a very simple tool to download YouTube thumbnail. It comes with no extra features. But, it is widely used due to the fact that it is a very straightforward YouTube thumbnail downloader. It doesn’t even display intrusive ads or pop-ups. But, the downside is that the quality options are limited. There are only 2 qualities available for download, and no size is mentioned on them. To download YouTube thumbnail, you will have to right-click and open the image URL created and then save it in the next tab.
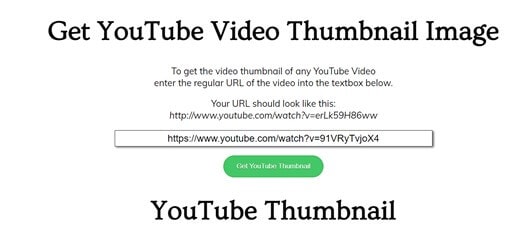
8. YouTube Thumbnail Image
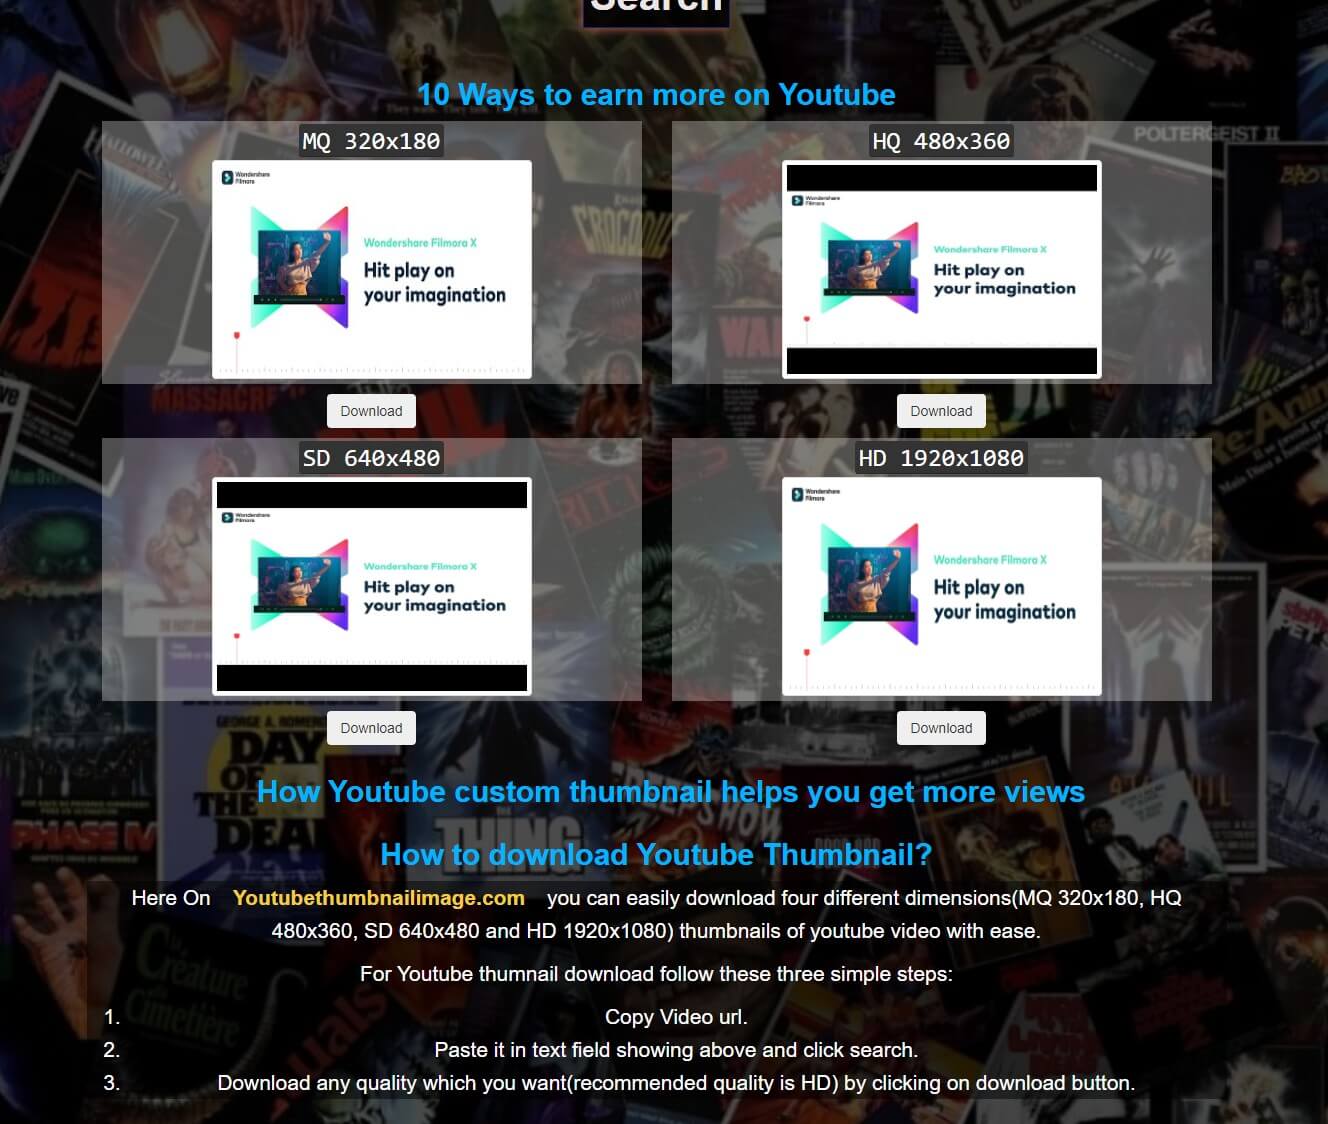
A fast and easy way to download YouTube thumbnail is by using this powerful tool available online. Without any hassle of downloading or registering an account, you can easily copy-paste the link of your favorite video and click on Search. You will be displayed with four qualities such as 1920x1080 (HD), 640X480 (SD), 480X360 (HQ), and 320x180 (MQ). This feature makes it a versatile YouTube thumbnail downloader as users can choose the quality depending on the space they have available. Other than this, the YouTube thumbnail saver offers round-the-clock customer support. So, in case you face any technical issue or are unable to download YouTube thumbnail, this tool will be present for prompt assistance.
9. Thumbnail-download.com
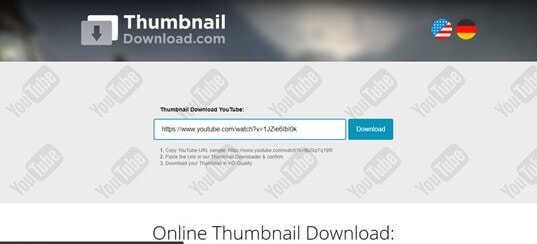
Another addition to the list of top YouTube thumbnail downloader tools is this one. Like the other tools, this one is also free for use and is renowned for being super fast. No matter which YouTube video you want to save the thumbnail from, this tool will allow you easy access to download it in HD quality. The website is SSL encrypted, so the user’s data is protected, and thus this is a safe site to download YouTube thumbnail. What’s more, this YouTube thumbnail downloader is robust. Although there a few ads displayed, they aren’t very intrusive and do not disrupt the user experience.
Bonus Tip: The Best YouTube Video Editor-Wondershare Filmora
With Wondershare Filmora, you can create captivating videos by using one-click tools. This powerful yet intuitive video editor is loaded with various high-end editing features that can help you add striking and cinematic effects to your videos. Motion tracking, color matching, and even keyframing are made easy through Filmora.
1.After you download and install Filmora on your PC, launch it. Then, click on File and tap on Import Media Files.

2.The Audio tab of Filmora offers a variety of music. Just click on the plus icon on any audio to add it to your video as background music. Cut the extra audio part to match your video length.
3.From the Titles tab, you can choose a preset template and then personalize it by double-clicking the title you have added to the timeline.

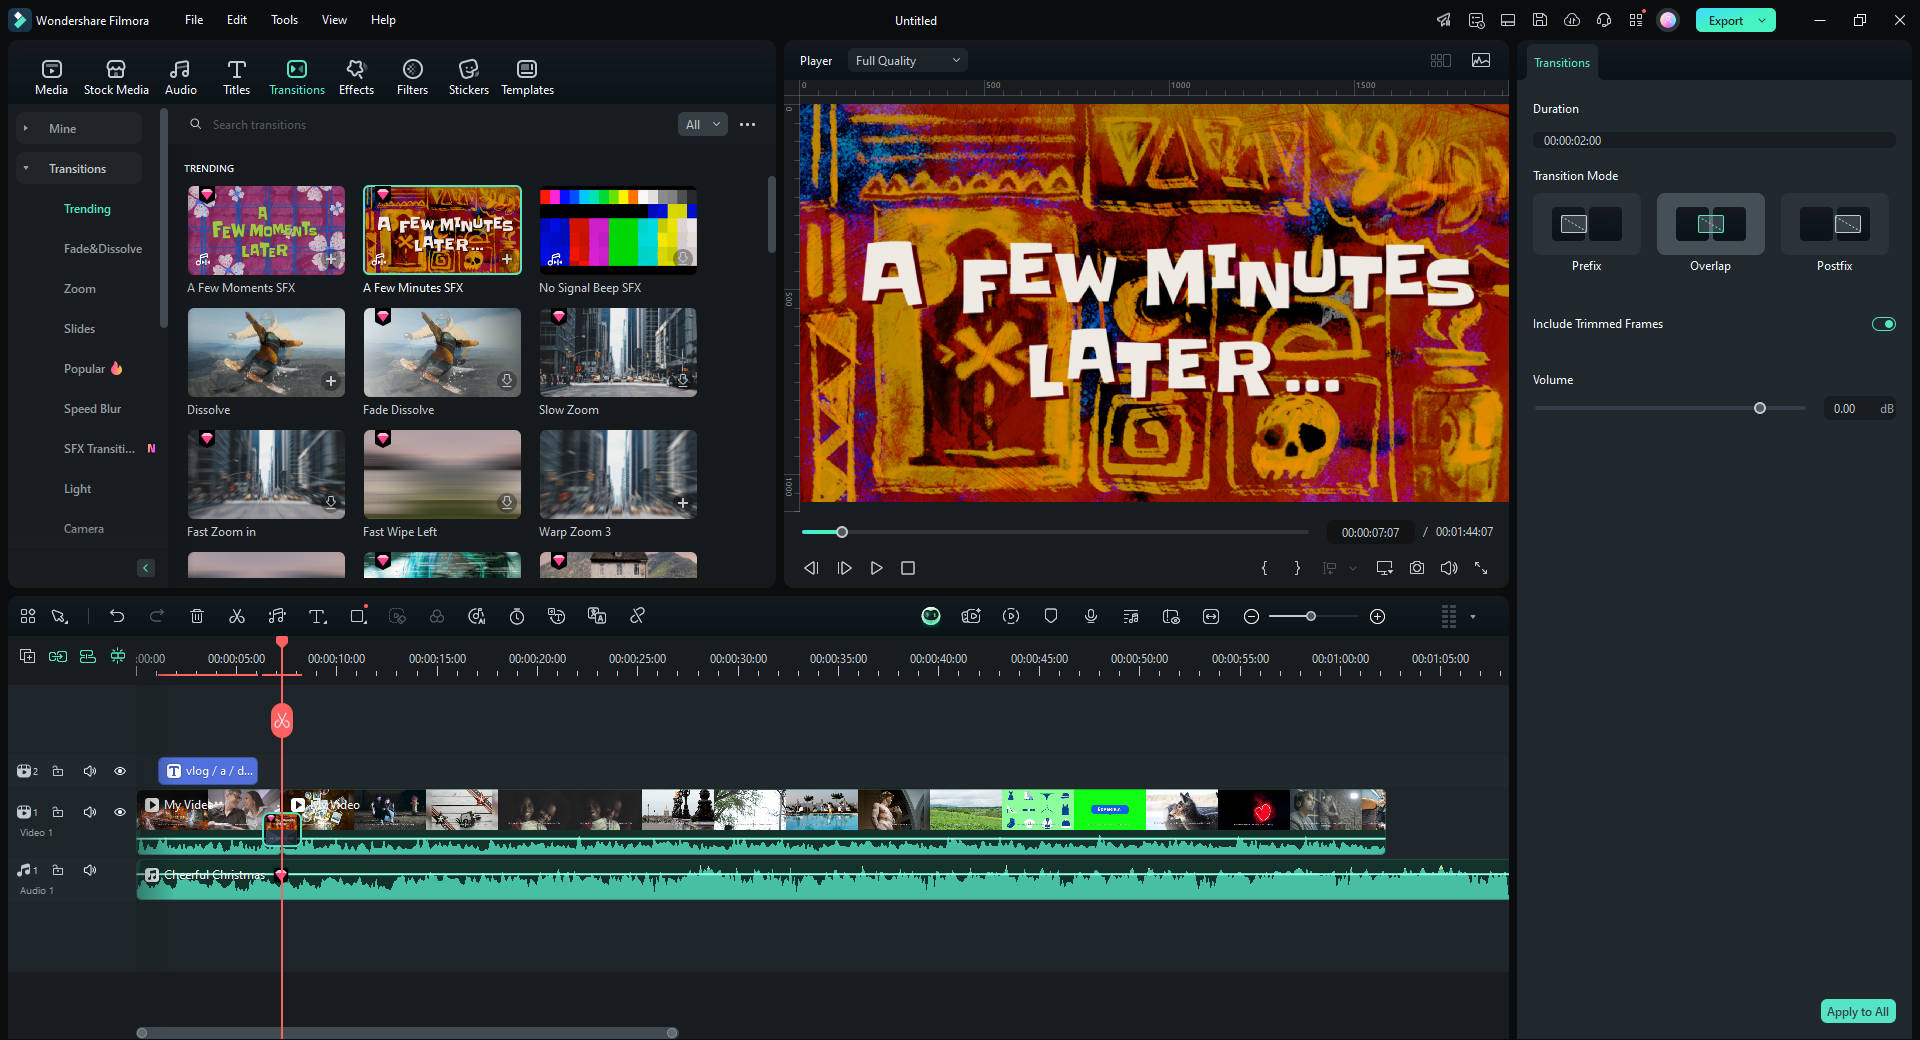
4.The Transition tab also displays multiple types of dynamic transitions; click to add to the timeline and then drag to adjust the duration of the effect.
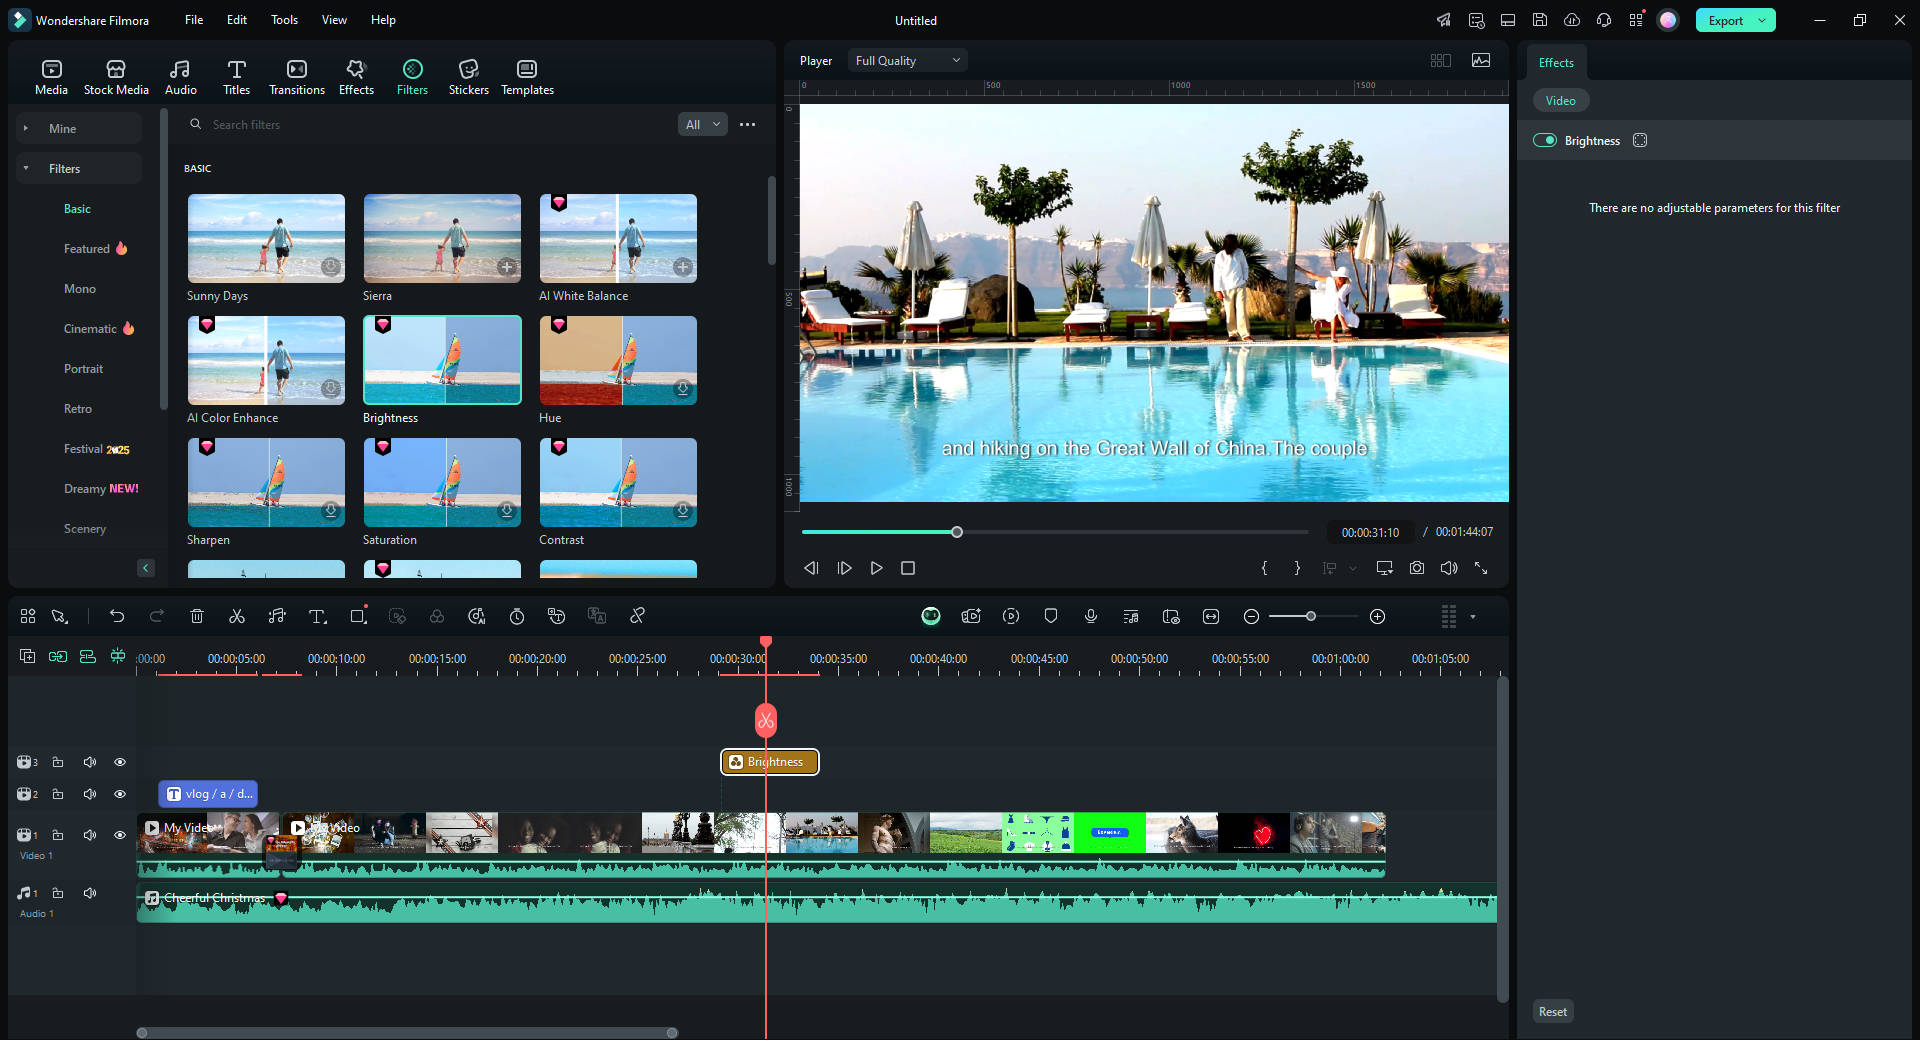
5.You can also choose an aesthetic filter or overlay from the Effects tab.
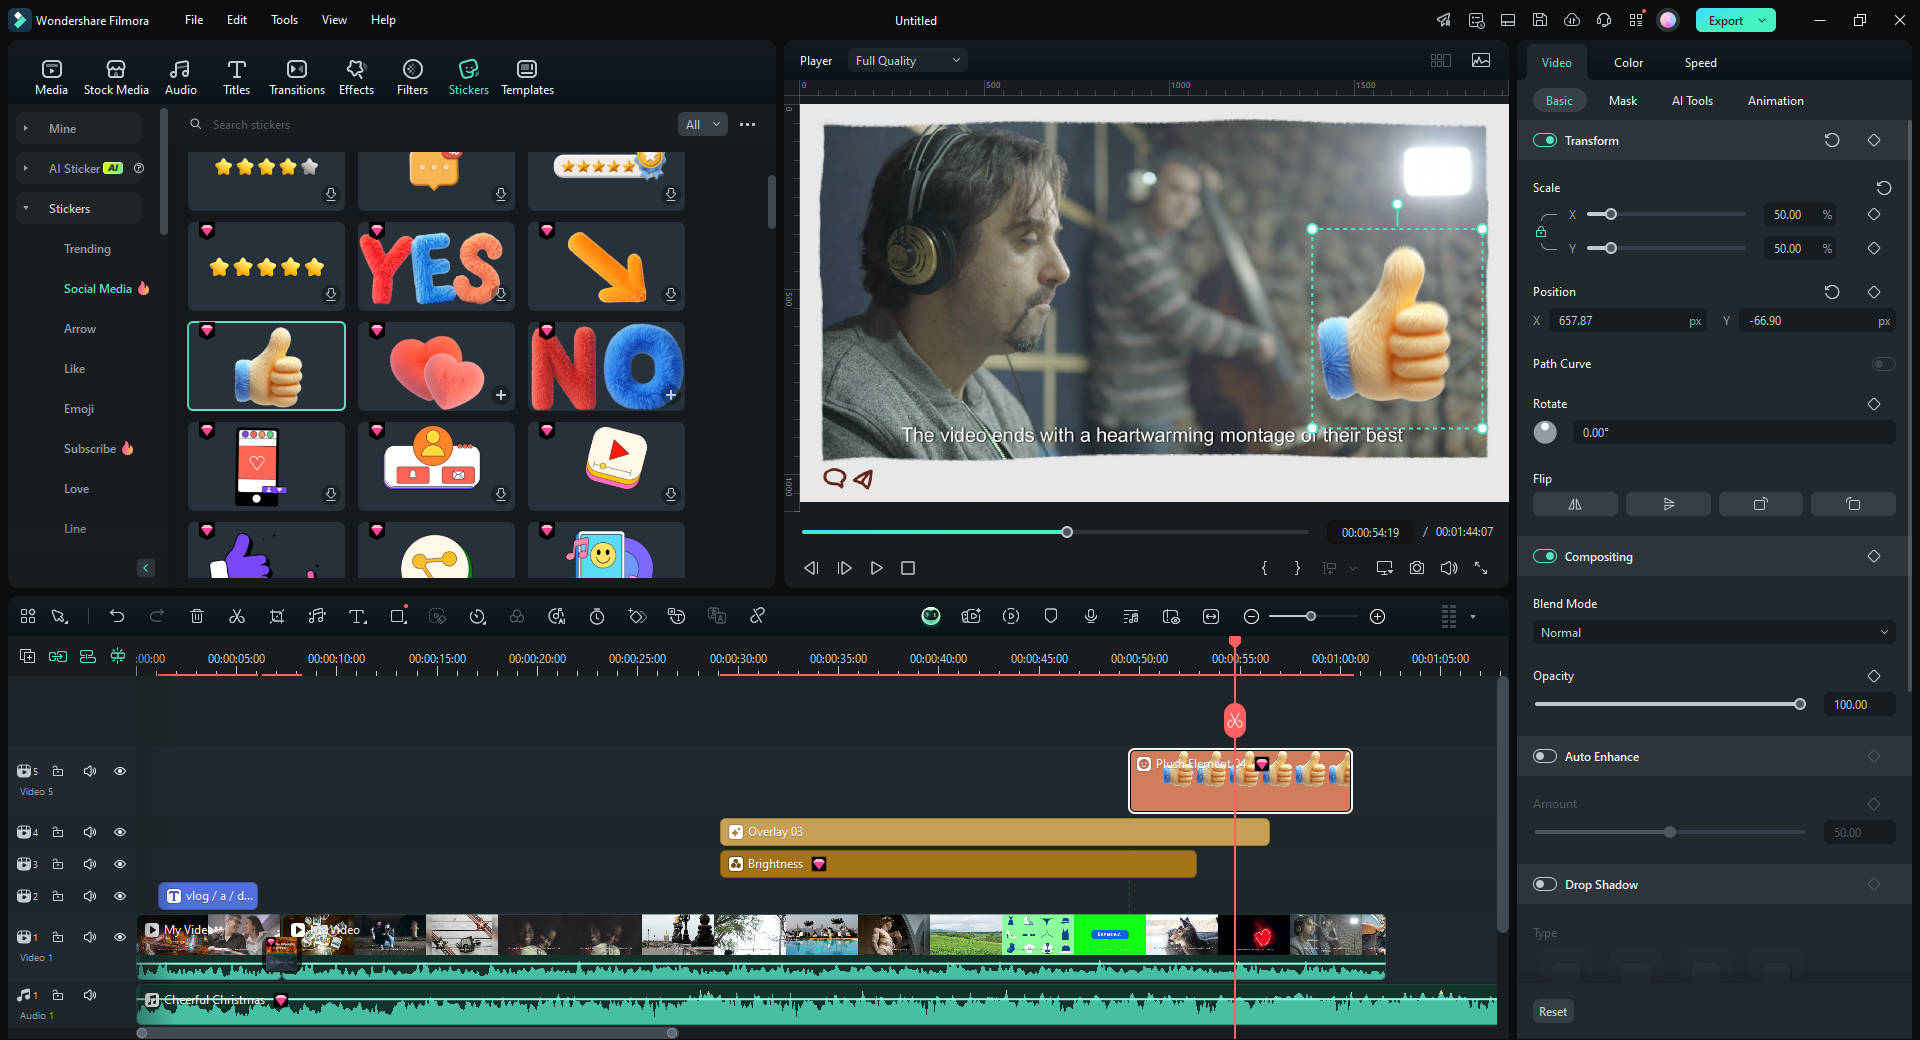
6.The Elements tab features numerous categories like Love, Journey, Badges, and many more. You can add these elements to your video and then adjust their size, rotation, opacity, and much more.
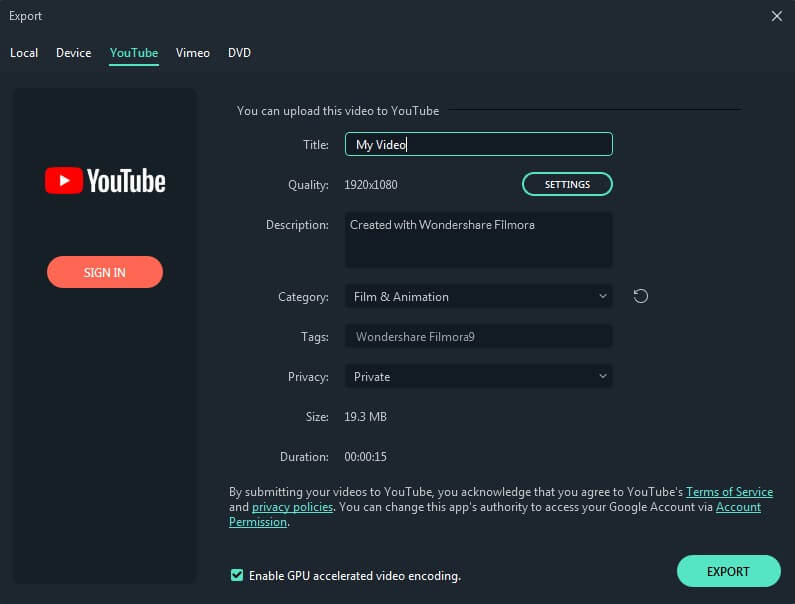
7.Lastly, you can click on Export and either save the video locally or share it directly on social media.
Conclusion
Finally, you can download YouTube thumbnail at the site of your choice. Whether you want to download it in HD or in a lower quality, one of the YouTube thumbnail downloaders mentioned above will be able to fulfill your requirements.
No more browsing through unsecured and ad-laden sites to find a reliable YouTube thumbnail downloader. We have hand-picked, tried, and tested all these tools. All you have to do is take your pick of the YouTube thumbnail saver that best fits your needs. Any tool you choose, you will be able to download YouTube thumbnail with ease and security.
Shanoon Cox
Shanoon Cox is a writer and a lover of all things video.
Follow @Shanoon Cox
Shanoon Cox
Mar 27, 2024• Proven solutions
YouTube thumbnails can be required for download for various reasons ranging from personal to professional. Some thumbnails are very attractive, and users might want to download YouTube thumbnail to use as wallpaper or as inspiration. Whereas other times, thumbnails are required to be added to blogs.
In either case, you can take help from a YouTube thumbnail downloader that can save your day. As the name suggests, a YouTube thumbnail saver can let you save any thumbnail you like, and sometimes you can also custom select the quality. For your ease, we have rounded up the best tools to download YouTube thumbnail.
Let’s dive in.
- 10 Free Online YouTube Thumbnail Downloaders/Savers
- Bonus Tip: The Best YouTube Video Editor-Wondershare Filmora
10 Free Online YouTube Thumbnail Downloaders/Savers
There are tons of tools on the web that let you download YouTube thumbnail. But, not all of them are reliable and secure. Choosing the best YouTube thumbnail downloaders that offer all the features you are looking for can be time taking and tedious. So, we are here to save the day by listing the top YouTube thumbnail saver tools.
1. ThumbnailSave
As a free YouTube thumbnail downloader, ThumbnailSave is frequently used by people. It enables users to download YouTube thumbnail without any hassle. There a variety of resolutions available, and you can choose the quality you like, ranging from HD to 360p. The simple interface of this downloader further makes it an excellent tool. All you have to do is enter the URL link and click Save As after the thumbnail is loaded. Also, this versatile YouTube thumbnail downloader works on almost every kind of device. Whether you are using a desktop PC or an iPhone, ThumbnailSave is compatible with all.
2. YouTube Thumbnail Grabber
Another powerful and free YouTube thumbnail downloader is this one, which can download both YouTube and Vimeo thumbnails. After you copy-paste the link of the video whose thumbnail you wish to save, you can press on Get Thumbnail Images. After that, you can choose the quality of the thumbnail as per your requirements. Moreover, you can also get a free extension of this YouTube thumbnail saver on both Chrome and Firefox browsers. This will allow fast and easy use of the YouTube thumbnail downloader. What’s more, unlike other downloaders, this one doesn’t bombard the user with pesky ads.
3. Youthumbnail.com
YouThumbnail, also known as YT YouTube thumbnail downloader, is a robust tool that allows users to quickly download YouTube thumbnail absolutely free of cost. It requires no installation. Three different sizes, namely medium, small, and HD, are available for download. By clicking on the desired quality, you can quickly and safely download YouTube thumbnail. Also, there is no limit to the number of downloads. Better yet, there are multiple languages available. So, a diverse population can use this online YouTube thumbnail saver with great ease.
4. YouTube-thumbnails.com
As a free and open for all YouTube thumbnail saver, this one lets users get the thumbnail of their choice in the quality of their choice. Using this YouTube thumbnail downloader won’t cost a penny, no matter how many thumbnails are downloaded. It also has a very simple user interface. Just enter the YouTube video link and press Find. The qualities of the thumbnail supported by this tool are MQ 320x180, HQ 480x360, SD 640x480, and HD 1280x720 , and will be almost instantly displayed. Click on the quality you wish to save locally, and your download will start immediately.
5. YT Thumbnail Downloader
YT Thumbnail Downloader is an excellent and lightning-fast tool to download YouTube thumbnail. It poses no limitations or charges on the use. Moreover, you can custom select the resolution of the thumbnail before you click to save. This YouTube thumbnail downloader prides itself on being the fastest in the market. The thumbnail processing time is just 2 seconds, after which you can download YouTube thumbnail. Besides, this YouTube thumbnail saver is safe and secure as it doesn’t display tons of ads and also does not save the user’s data.
6. BoingBoing
BoingBoing is also a free and very easy-to-use YouTube thumbnail saver. All you have to do is paste the URL you copied, and this YouTube thumbnail downloader will take care of the rest. There is no button to press to start the process. The thumbnails are almost instantly loaded. However, BoingBoing displays a lot of annoying ads. Also, the different qualities that are displayed don’t mention the size, and you will have to press and hold the image to download. All in all, this YouTube thumbnail saver is worth your time and effort as it is fast at what it does.
7. Get YouTube Thumbnail
Get YouTube Thumbnail is a very simple tool to download YouTube thumbnail. It comes with no extra features. But, it is widely used due to the fact that it is a very straightforward YouTube thumbnail downloader. It doesn’t even display intrusive ads or pop-ups. But, the downside is that the quality options are limited. There are only 2 qualities available for download, and no size is mentioned on them. To download YouTube thumbnail, you will have to right-click and open the image URL created and then save it in the next tab.
8. YouTube Thumbnail Image
A fast and easy way to download YouTube thumbnail is by using this powerful tool available online. Without any hassle of downloading or registering an account, you can easily copy-paste the link of your favorite video and click on Search. You will be displayed with four qualities such as 1920x1080 (HD), 640X480 (SD), 480X360 (HQ), and 320x180 (MQ). This feature makes it a versatile YouTube thumbnail downloader as users can choose the quality depending on the space they have available. Other than this, the YouTube thumbnail saver offers round-the-clock customer support. So, in case you face any technical issue or are unable to download YouTube thumbnail, this tool will be present for prompt assistance.
9. Thumbnail-download.com
Another addition to the list of top YouTube thumbnail downloader tools is this one. Like the other tools, this one is also free for use and is renowned for being super fast. No matter which YouTube video you want to save the thumbnail from, this tool will allow you easy access to download it in HD quality. The website is SSL encrypted, so the user’s data is protected, and thus this is a safe site to download YouTube thumbnail. What’s more, this YouTube thumbnail downloader is robust. Although there a few ads displayed, they aren’t very intrusive and do not disrupt the user experience.
Bonus Tip: The Best YouTube Video Editor-Wondershare Filmora
With Wondershare Filmora, you can create captivating videos by using one-click tools. This powerful yet intuitive video editor is loaded with various high-end editing features that can help you add striking and cinematic effects to your videos. Motion tracking, color matching, and even keyframing are made easy through Filmora.
1.After you download and install Filmora on your PC, launch it. Then, click on File and tap on Import Media Files.
2.The Audio tab of Filmora offers a variety of music. Just click on the plus icon on any audio to add it to your video as background music. Cut the extra audio part to match your video length.
3.From the Titles tab, you can choose a preset template and then personalize it by double-clicking the title you have added to the timeline.
4.The Transition tab also displays multiple types of dynamic transitions; click to add to the timeline and then drag to adjust the duration of the effect.
5.You can also choose an aesthetic filter or overlay from the Effects tab.
6.The Elements tab features numerous categories like Love, Journey, Badges, and many more. You can add these elements to your video and then adjust their size, rotation, opacity, and much more.
7.Lastly, you can click on Export and either save the video locally or share it directly on social media.
Conclusion
Finally, you can download YouTube thumbnail at the site of your choice. Whether you want to download it in HD or in a lower quality, one of the YouTube thumbnail downloaders mentioned above will be able to fulfill your requirements.
No more browsing through unsecured and ad-laden sites to find a reliable YouTube thumbnail downloader. We have hand-picked, tried, and tested all these tools. All you have to do is take your pick of the YouTube thumbnail saver that best fits your needs. Any tool you choose, you will be able to download YouTube thumbnail with ease and security.
Shanoon Cox
Shanoon Cox is a writer and a lover of all things video.
Follow @Shanoon Cox
Become a Freelance Transcriber: Tips and Tricks for YouTube Content
How to Transcribe a YouTube Video for FREE

Richard Bennett
Mar 27, 2024• Proven solutions
If you want to transcribe your videos to make the dialogs and speeches available in text format, you can use YouTube Transcribe feature that the streaming site offers for free. In this article, I’ll share with you a couple of methods to transcribe a YouTube video for free.
- Part 1: Transcribe YouTube Video Automatically for Free [2 Ways]
- Part 2: Transcribe YouTube Video to Text Online with Third-Party Service
- Part 3: Benefits of Transcribing YouTube Videos
- Part 4: YouTube Video Transcription FAQs
Part 1: How to Transcribe YouTube Video Automatically for Free [2 Ways]
Besides the basic video editing features on the YouTube platform, you can now quickly transcribe YouTube videos to the text as well. The good thing is, you can either use the automatic transcription feature that YouTube offers, or upload it manually while adjusting the timing as you go further.
Below are the two methods to transcribe your YouTube videos for free:
Method 1: Use the Automated Transcription Service on YouTube
As the name suggests, YouTube automatic transcription service works automatically. This means you don’t even have to click the ‘Transcribe’ button anymore to transcribe a YouTube video, and the website takes care of it on its own. All you need to do is, choose English as the language of the video when setting up subtitles. You can follow the instructions given below to do so:
Step 1 Upload a Video
Sign in to your YouTube account, click your profile picture from the top-right corner, and click YouTube Studio from the menu. Next, click CREATE from the upper-right corner, click Upload videos from the menu, and drag and drop a video from your computer to the Upload videos box that appears next.

Step 2 Select Transcription Language
On the Details page of the next box that appears, scroll down and click MORE OPTIONS, and select English in the Video language drop-down list under the Language, subtitles, and closed captions (CC) section.

Step 3 Publish the Video
Follow the on-screen instructions from this point to publish the video, and wait while YouTube automatically transcribes and adds the close captions to it.
Note: Depending on the duration of the clip, the time YouTube would take to transcribe may vary.
After YouTube has transcribed the video, you can download the transcription file in your preferred format. The instructions are given below explain how you can do so:
- Get to the Subtitles Window
While on the YouTube Studio page, click Subtitles from the left pane to go to the Channel subtitles page. And then click the video you want to modify.
- Get to Classic Studio
In the video subtitle page of the target video, hover mouse on the Published Automatic status under the Subtitles column, click the Options icon (with three vertical dots) that appears, and click Edit on Classic Studio.

- Download Transcription File
Click and open the Actions drop-down list from the top-left corner of the left pane, click your preferred transcription format including .vtt, .srt and .sbv from the list, and save the file on your local hard disk.

Method 2: Get YouTube Transcription when Watching
In addition, if you are watching any other video, you can make YouTube transcribe that for you as well. You can follow the instructions given below to get the YouTube video to text transcription:
Step 1: Play the Video
Go to the video on YouTube and start playing it. Make sure NOT to get to full-screen mode as doing so would hide the option to transcribe the clip.
Step 2: Enable Transcription
Click the More icon (with three horizontal dots) from under the bottom-right corner of the video player, and click Open transcript to see the video transcription in the Transcript pane that appears in the right.
Step 3: Manage Timestamps
Click the Options icon (with three vertical dots) from the top-right corner of the Transcript pane, and click Toggle timestamp to enable or disable the timestamps in the video transcription.
Limitations of Using YouTube Transcribe
Although YouTube’s automatic transcription is a decent feature that saves you a lot of time, since Google uses machine learning algorithms to convert the speech to text, the level of accuracy may vary depending on the accent of the speaker, and the clarity of the audio the video has. Also, even sometime you may not be satisfied with the end-results.
Alternatively, you can use Kapwing to transcribe a YouTube video and download the transcription file with the below step-by-step instructions:
Step 1: Add YouTube Video
Copy the URL of YouTube video you want to transcribe, go to https://www.kapwing.com/subtitles , paste the URL in the Paste a URL field, wait while Kapwing fetches the content of the video, and opens the Add subtitles to Video page.
Step 2: Transcribe the Video
Click Auto-generate from the right window, and follow the on-screen instructions to transcribe YouTube video to text.

Step 3: Download the Transcription File
Click Download SRT from the left pane, and follow the instructions from there to download the transcription file in *.srt format.

Pros
- Kapwing is free to use
- The auto-transcription process is quick and less tedious
- Kapwing also allows manual transcription and uploading of an existing *.srt file
Cons
- The auto-transcribed text might lack accuracy as the task is done by the speech-to-text tools that work in the background
You can follow the step-by-step instructions to transcribe a YouTube video and download the transcription file using Kapwing:
Step 1: Add YouTube Video
Copy the URL of YouTube video you want to transcribe, go to https://www.kapwing.com/subtitles , paste the URL in the Paste a URL field, wait while Kapwing fetches the content of the video, and opens the Add subtitles to Video page.
Step 2: Transcribe the Video
Click Auto-generate from the right window, and follow the on-screen instructions to transcribe YouTube video to text.
Step 3: Download the Transcription File
Click Download SRT from the left pane, and follow the instructions from there to download the transcription file in *.srt format.
Pros
- Kapwing is free to use
- The auto-transcription process is quick and less tedious
- Kapwing also allows manual transcription and uploading of an existing *.srt file
Cons
- The auto-transcribed text might lack accuracy as the task is done by the speech-to-text tools that work in the background
Part 3: Benefits of Transcribing YouTube Videos
You may need video transcriptions for several reasons, such as analyzing the summary of the entire speech in the video, extracting a single phrase or quote that was spoken in the clip, or making the video helpful even for those suffering from hearing impairment. When you transcribe a YouTube video, the transcript can be useful in many ways. Some of the most common benefits of transcribing a video include:
- Search Engine Optimization
When you add subtitles, the text can appear in Google search results when someone types a similar phrase in the search box. This helps get more views to your videos, thus giving your channel popularity, and you, monetary gains in the long run.
- Accent
If the speaker in the video is from a different region and is using an accent that you are not much comfortable with, you can turn on the subtitles and read the dialogs along with the video.
- Repurposing on Blogs
If you own a blog that you have embedded your video to, the transcription could be used to add text to it so the target audience can get a fair idea of what the video is all about. This is useful because many people prefer reading over watching.
YouTube Video Transcription FAQs
1. How to Transcribe YouTube Video to Text
Usually the transcription files have *.srt extension that are globally accepted and supported by almost all media players. However, there might be instances when you want to have the subtitles in plain text.
That said, to convert an SRT file to TXT, you can:
- Right-click the SRT file
- Go to Rename
- Replace srt with txt and press Enter
- Click OK on the confirmation box that appears next to convert SRT to TXT
After this, you can simply double-click the file, and read and modify the transcribed content as needed.
2. How to Edit and Upload Edited Transcript to YouTube
If you made any modifications to the transcript that was automatically generated by YouTube or any other third-party transcription tool, you can follow the steps given below to upload the new file to the YouTube video:
- Go to YouTube Studio and then to the Channel subtitles page as explained earlier
- Expand the Languages column of the target video
- Click the Options icon that appears under the Subtitles column when you hover mouse on to it
- Click Edit on Classic Studio
- On the next page, click Edit from the top-right corner

- Click to open the Actions drop-down list from the upper-left corner
- Click Upload a file
- Follow the on-screen instructions from there to upload the modified transcription file
- Click Save Changes from the top-right corner of the page when done
Conclusion
If you are looking for a quick and easy way of adding subtitles to your videos, letting YouTube transcribe for you could be a good approach. However, because these auto-generated transcriptions are created by machine learning algorithms, their accuracy cannot be counted on. Therefore, the best way to get the job done accurately is, let YouTube auto-transcribe your video, download the transcription file, make the necessary changes to it, and then upload the file back to the video.
Richard Bennett
Richard Bennett is a writer and a lover of all things video.
Follow @Richard Bennett
Richard Bennett
Mar 27, 2024• Proven solutions
If you want to transcribe your videos to make the dialogs and speeches available in text format, you can use YouTube Transcribe feature that the streaming site offers for free. In this article, I’ll share with you a couple of methods to transcribe a YouTube video for free.
- Part 1: Transcribe YouTube Video Automatically for Free [2 Ways]
- Part 2: Transcribe YouTube Video to Text Online with Third-Party Service
- Part 3: Benefits of Transcribing YouTube Videos
- Part 4: YouTube Video Transcription FAQs
Part 1: How to Transcribe YouTube Video Automatically for Free [2 Ways]
Besides the basic video editing features on the YouTube platform, you can now quickly transcribe YouTube videos to the text as well. The good thing is, you can either use the automatic transcription feature that YouTube offers, or upload it manually while adjusting the timing as you go further.
Below are the two methods to transcribe your YouTube videos for free:
Method 1: Use the Automated Transcription Service on YouTube
As the name suggests, YouTube automatic transcription service works automatically. This means you don’t even have to click the ‘Transcribe’ button anymore to transcribe a YouTube video, and the website takes care of it on its own. All you need to do is, choose English as the language of the video when setting up subtitles. You can follow the instructions given below to do so:
Step 1 Upload a Video
Sign in to your YouTube account, click your profile picture from the top-right corner, and click YouTube Studio from the menu. Next, click CREATE from the upper-right corner, click Upload videos from the menu, and drag and drop a video from your computer to the Upload videos box that appears next.
Step 2 Select Transcription Language
On the Details page of the next box that appears, scroll down and click MORE OPTIONS, and select English in the Video language drop-down list under the Language, subtitles, and closed captions (CC) section.
Step 3 Publish the Video
Follow the on-screen instructions from this point to publish the video, and wait while YouTube automatically transcribes and adds the close captions to it.
Note: Depending on the duration of the clip, the time YouTube would take to transcribe may vary.
After YouTube has transcribed the video, you can download the transcription file in your preferred format. The instructions are given below explain how you can do so:
- Get to the Subtitles Window
While on the YouTube Studio page, click Subtitles from the left pane to go to the Channel subtitles page. And then click the video you want to modify.
- Get to Classic Studio
In the video subtitle page of the target video, hover mouse on the Published Automatic status under the Subtitles column, click the Options icon (with three vertical dots) that appears, and click Edit on Classic Studio.
- Download Transcription File
Click and open the Actions drop-down list from the top-left corner of the left pane, click your preferred transcription format including .vtt, .srt and .sbv from the list, and save the file on your local hard disk.
Method 2: Get YouTube Transcription when Watching
In addition, if you are watching any other video, you can make YouTube transcribe that for you as well. You can follow the instructions given below to get the YouTube video to text transcription:
Step 1: Play the Video
Go to the video on YouTube and start playing it. Make sure NOT to get to full-screen mode as doing so would hide the option to transcribe the clip.
Step 2: Enable Transcription
Click the More icon (with three horizontal dots) from under the bottom-right corner of the video player, and click Open transcript to see the video transcription in the Transcript pane that appears in the right.
Step 3: Manage Timestamps
Click the Options icon (with three vertical dots) from the top-right corner of the Transcript pane, and click Toggle timestamp to enable or disable the timestamps in the video transcription.
Limitations of Using YouTube Transcribe
Although YouTube’s automatic transcription is a decent feature that saves you a lot of time, since Google uses machine learning algorithms to convert the speech to text, the level of accuracy may vary depending on the accent of the speaker, and the clarity of the audio the video has. Also, even sometime you may not be satisfied with the end-results.
Alternatively, you can use Kapwing to transcribe a YouTube video and download the transcription file with the below step-by-step instructions:
Step 1: Add YouTube Video
Copy the URL of YouTube video you want to transcribe, go to https://www.kapwing.com/subtitles , paste the URL in the Paste a URL field, wait while Kapwing fetches the content of the video, and opens the Add subtitles to Video page.
Step 2: Transcribe the Video
Click Auto-generate from the right window, and follow the on-screen instructions to transcribe YouTube video to text.
Step 3: Download the Transcription File
Click Download SRT from the left pane, and follow the instructions from there to download the transcription file in *.srt format.
Pros
- Kapwing is free to use
- The auto-transcription process is quick and less tedious
- Kapwing also allows manual transcription and uploading of an existing *.srt file
Cons
- The auto-transcribed text might lack accuracy as the task is done by the speech-to-text tools that work in the background
You can follow the step-by-step instructions to transcribe a YouTube video and download the transcription file using Kapwing:
Step 1: Add YouTube Video
Copy the URL of YouTube video you want to transcribe, go to https://www.kapwing.com/subtitles , paste the URL in the Paste a URL field, wait while Kapwing fetches the content of the video, and opens the Add subtitles to Video page.
Step 2: Transcribe the Video
Click Auto-generate from the right window, and follow the on-screen instructions to transcribe YouTube video to text.
Step 3: Download the Transcription File
Click Download SRT from the left pane, and follow the instructions from there to download the transcription file in *.srt format.
Pros
- Kapwing is free to use
- The auto-transcription process is quick and less tedious
- Kapwing also allows manual transcription and uploading of an existing *.srt file
Cons
- The auto-transcribed text might lack accuracy as the task is done by the speech-to-text tools that work in the background
Part 3: Benefits of Transcribing YouTube Videos
You may need video transcriptions for several reasons, such as analyzing the summary of the entire speech in the video, extracting a single phrase or quote that was spoken in the clip, or making the video helpful even for those suffering from hearing impairment. When you transcribe a YouTube video, the transcript can be useful in many ways. Some of the most common benefits of transcribing a video include:
- Search Engine Optimization
When you add subtitles, the text can appear in Google search results when someone types a similar phrase in the search box. This helps get more views to your videos, thus giving your channel popularity, and you, monetary gains in the long run.
- Accent
If the speaker in the video is from a different region and is using an accent that you are not much comfortable with, you can turn on the subtitles and read the dialogs along with the video.
- Repurposing on Blogs
If you own a blog that you have embedded your video to, the transcription could be used to add text to it so the target audience can get a fair idea of what the video is all about. This is useful because many people prefer reading over watching.
YouTube Video Transcription FAQs
1. How to Transcribe YouTube Video to Text
Usually the transcription files have *.srt extension that are globally accepted and supported by almost all media players. However, there might be instances when you want to have the subtitles in plain text.
That said, to convert an SRT file to TXT, you can:
- Right-click the SRT file
- Go to Rename
- Replace srt with txt and press Enter
- Click OK on the confirmation box that appears next to convert SRT to TXT
After this, you can simply double-click the file, and read and modify the transcribed content as needed.
2. How to Edit and Upload Edited Transcript to YouTube
If you made any modifications to the transcript that was automatically generated by YouTube or any other third-party transcription tool, you can follow the steps given below to upload the new file to the YouTube video:
- Go to YouTube Studio and then to the Channel subtitles page as explained earlier
- Expand the Languages column of the target video
- Click the Options icon that appears under the Subtitles column when you hover mouse on to it
- Click Edit on Classic Studio
- On the next page, click Edit from the top-right corner
- Click to open the Actions drop-down list from the upper-left corner
- Click Upload a file
- Follow the on-screen instructions from there to upload the modified transcription file
- Click Save Changes from the top-right corner of the page when done
Conclusion
If you are looking for a quick and easy way of adding subtitles to your videos, letting YouTube transcribe for you could be a good approach. However, because these auto-generated transcriptions are created by machine learning algorithms, their accuracy cannot be counted on. Therefore, the best way to get the job done accurately is, let YouTube auto-transcribe your video, download the transcription file, make the necessary changes to it, and then upload the file back to the video.
Richard Bennett
Richard Bennett is a writer and a lover of all things video.
Follow @Richard Bennett
Also read:
- Crafting Classic Cinematography Step-by-Step Guide
- [Updated] Dynamic Techniques for YouTube Promotional Videos
- [Updated] Add a Pop of Color to Your Videos Implementing Neons in YouTubes
- In 2024, Becoming a Youtube Star Utilizing the Power of Featured Channels
- In 2024, Crafting Perfect YouTube Short Content Lessons
- [Updated] Educational History Vlogs - The Ultimate List
- Elevate Creations - Get FREE High-Quality Templates Today!
- Becoming a Master at the Art of Engaging Thumbnails for 2024
- 2024 Approved Choosing a Champion DSLR or Mirrorless Camera?
- Gain Traction in the Digital Sphere - Explore the Quintessential Five YouTube Tactics
- Amplify Content Reach Essential Strategies to Skyrocket Views
- [New] Achieving Million-Sub Milestone The YouTube Guide
- Enhance YT Experience The Most Outstanding Reaction Ideas
- Discover Inspirational Hiring Vids #1-10
- 2024 Approved Dissecting Biggest FIFA Footage Trends in Graphs
- Speedy Tutorial Crafting YouTube Image Thumbnails From Scratch
- [New] Analyzing Channels Monetization Status at a Glance
- Enhancing User Interaction with Well-Sized Thumbnails
- Escaping YouTube Ranked List of 27 Alternative Streaming Services for 2024
- [New] Crafting Engaging Music Reactions The YouTube Enthusiast's Blueprint
- Capturing Contentment A Practical Guide to Daily Vlogging for 2024
- Journey to Digital Reach The Complete Process of Starting a YouTube Channel
- Paving the Way for YouTube Wealth Reaching a Threshold of 500 Subs
- Mastery in YouTube Ads Thumbnails & Banners
- Conquer YouTube with Creator Studio A Comprehensive Guide
- Enhancing Viewer Interest with Accurate Time Stamping for 2024
- Cut Down Clutter How to Efficiently Handle Unwanted YouTube Content (PC/Mobile) for 2024
- Updated How to Make an Animated Explainer Video for 2024
- 8 Solutions to Solve YouTube App Crashing on Vivo V29 Pro | Dr.fone
- Updated Auditory Refinement How to Subtract Reverberation From Your Recordings for Unblemished Quality
- How To Bypass Itel S23 FRP In 3 Different Ways
- Tips on How to Get Awesome Background for Slideshow in PowerPoint for 2024
- Screen Recorder Showdown Apoyser Vs Emerging Alternatives Review
- In 2024, Authenticating Your Instagram Photos
- Is GSM Flasher ADB Legit? Full Review To Bypass Your Oppo Reno 8T 5GFRP Lock
- In 2024, FB A Resource for Video Discovery Enthusiasts
- [New] Beyond Capture – Understanding MyCam's Advanced Features
- Updated Slowing Down GIF With The Best Available Methods
- In 2024, Facebook Videos Which Aspect Ratio Fits?
- [Updated] 2024 Approved Gain More Traction on TikTok A Compendium of Unique Username Concepts
- In 2024, Life360 Learn How Everything Works On Oppo K11 5G | Dr.fone
- Title: "2024 Approved 10 Online Tools to Retrieve YouTube Graphics"
- Author: Steven
- Created at : 2024-05-25 18:22:13
- Updated at : 2024-05-26 18:22:13
- Link: https://youtube-clips.techidaily.com/2024-approved-10-online-tools-to-retrieve-youtube-graphics/
- License: This work is licensed under CC BY-NC-SA 4.0.
