
:max_bytes(150000):strip_icc()/12-pc.jpg.thumb-3e7162f1a64a47938ab2b8ffa5d6b02e.jpeg)
"Elevate Your Content SEO Mastery Starts Here!"
Elevate Your Content: SEO Mastery Starts Here
The 12-step YouTube SEO Guide for Beginners Who Want More Views

Shanoon Cox
Oct 26, 2023• Proven solutions
The joy of creating on YouTube is often dampened by the disappointment of underperforming videos. You have published your content and it’s not getting the views you had hoped.
Well, let’s change that!
In this guide, I’m going to walk you through YouTube SEO from the very start to the very end.
Nothing complicated. No paid programs or expensive apps needed. We are going back to basics and get your videos discovered.
Ready?
Let’s Go!
Part 1: Research Your Topic and Competitors
Come up with a video idea . Can’t come up with one? Let me help. I heard you can make a mean scrambled egg, why don’t you show the world how you do it?
Excellent! Let’s go with that idea.
Wait, don’t go making the video yet. First, we have to do some research. We need to know what videos already exist out there.
Step 1: Find Related Videos
Do a quick search on YouTube to see what videos already exist on your topic.

Uh oh… your video will be competing against celebrities like Gordon Ramsay and Jamie Oliver.
Okay, don’t panic! There is a fantastic quote, credited to bestselling author, Jon Acuff , that goes:

While researching your competition, you will feel overwhelmed, but remember, you are at the beginning, and Gordon Ramsay and Jamie Oliver are not even at their middle, they are way passed the finish line. You still have a long journey to go, so don’t get discouraged, get inspired!
Watch those videos and understand what they are all about.
Understand that people watch YouTube for 3 key reasons:
- To be entertained
- To learn something new
- To be inspired
A video that can hit all 3 marks is going to be positioned for success. Don’t fret too much about the competition, as long as your content is good, you will see improvement.
So if you think this scrambled egg idea can hit those 3 marks, then I encourage you to go to the next step. If you don’t, let’s regroup and brainstorm some more YouTube video ideas .
Step 2: Find Keywords
Now that we’ve decided that we are sticking with the video idea, we are ready to do some keyword research. Keywords are the words and phrases people type in the YouTube search bar to discover videos.
Come up with as many relevant keywords as you can. Start by entering a keyword into the YouTube search bar. This will tell you what are the most popular searches associated with that keyword:
Once you have an idea of what people are searching for related to your topic, you’ll want to find more relevant keywords. I like to use the free app, Ubersuggest to do that.

This app gives you a whole list of long-tail keywords, which are 3-4-word phrases which is specific to what your video is about.
Some you will use to dig deeper in and other you will deem irrelevant to your videos. A good way of determining the value of a keyword is by the stats the application shows.
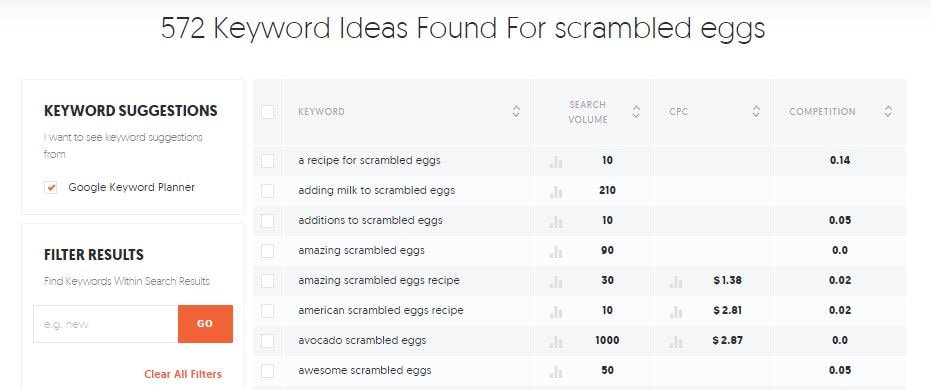
How to Read Keyword Suggestions
Once you have a list of keywords, you will see some numbers on the right-hand side. Here is what each one is about:
- Search volume is the number used to identify the popularity of the keyword. The higher the number the more people are searching for it.
- CPC is the value accredited by YouTube, determining how much advertisers are paying to target audiences who search for that keyword and click on the link.
- Competition is the number used to qualify how many other content are using that keyword.
The two categories that matter most to us right now is Search Volume and Competition. We want keywords with high search volume and low competition rate.
In the example above, you can see that the keyword “avocado scrambled eggs” has a Search Volume of 1,000 and a competition rate of 0.0. This is a good keyword to target, if you can incorporate an avocado to your dish… which of course you can!
Step 3: Write Title
I know you might want to deal with the Title, Description, and Tags after you’ve filmed and edited your video. But if you want to apply a YouTube SEO-focused strategy, then these should be addressed before you even pick up a camera as it can greatly dictate the content you end up creating.
A good YouTube title sparks curiosity, evokes emotional reaction, and promises value to your viewers.
Of course you can title your video simply: Making Scrambled Eggs
But does it spark curiosity? Not really… most people can make scrambled eggs.
Does it evoke any emotion? Maybe hunger… but even then, not really…
Finally, does it promise value? Well, assuming that most people can at least crack an egg into a pan, then hardly.
Your scrambled egg is special! Your video is special! We need to evoke that in the title — and as long as you are not writing any clickbait and deliver on what the title suggest, you can do this.
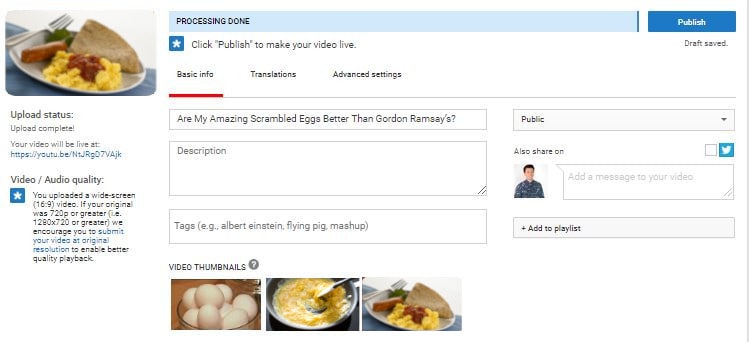
So, how about this: Are My Amazing Scrambled Eggs Better Than Gordon Ramsay’s?
Hmmm… Well, is it? We know that the Gordon Ramsay’s video has almost 30M views. Many people have already tried cooking it, I’m sure. There is only one way to find out, by encouraging others to try it over Gordon’s.
You don’t need to go for a somewhat contentious title like this, but that’s the idea, you want something that gets people curious, make them feel a certain way, and in the end, make them better for having watched your video.
See how a good title can guide the rest of your video?
Step 4: Write Description
You aren’t going to be writing the description for the viewers necessarily, you are going to be writing it for YouTube’s algorithms. The better YouTube understands what your video is about, the better they can show it to people searching for it.
This means you need to include the keywords you were researching at the beginning of your description, as YouTube will be using them to identify the content of your video. 1 or 2 keywords that best represent your video is enough. Don’t stuff the title with too many keywords or you’ll risk sounding like a robot.
But also use the description for practical uses too, if you have additional information such as supportive links, outline of the video’s content, a list of materials, step-by-step guide, or a recipe that you think your human viewers will find useful, you should input that in the description as well.
Step 5: Write Tags
Thank goodness we did the keyword research in Step 2, because coming up with tags is not as easy as it looks.
Pull 15 keywords from the list and keep it somewhere safe.
Note: The keywords you used in the title should be found in your tags, and since they are the most important ones, you should place them first.
Organize your keywords in the tag as such:
Have the specific keywords at the top, followed by more general keywords, and then branded ones:
Specific: How to make scrambled eggs
General: Scrambled eggs
Branded: Gordon Ramsay scrambled eggs
Part 2: Make The Best Darn Video Possible
It doesn’t matter how relevant your keywords are or how epic your title is, if you video sucks (i.e. your viewers click in and leave right away), YouTube will not show it in search.
Even if you haven’t created any videos yet, you can follow these next steps to ensure you are following the best practices to structure your video.
Step 6: Plan and Film the Hook
The first few seconds is where the largest percentage of your earned viewership will drop off. Odds are 20% of your viewers won’t even get past the first 10 seconds .
What you need is a hook, an intro that ensures this video is what they want to watch and let’s them know what they can expect.
Step 7: Film B-Roll
One static camera shot of you talking or cooking or giving a tutorial can cause your viewers to lose attention.
In order to keep your viewers interest, you will need b-roll, or supplemental footage you can cut to give you video more life.
While jump cuts (cuts made on a sequential clip of the same subject or in the same camera position) are fine, having additional footage to cut to will make your video feel more fluid.
So when you are filming your scrambled egg video, make sure you get some footage of you cracking the egg, scrambling it, and serving it on the plate.
Step 8: Encourage Viewers to Engage in Video
Liking, disliking, subscribing, and commenting on your video will all help your performance indirectly.
While YouTube wouldn’t rank your video higher simply because you have more likes subscribers, or comments, engagement from viewers help your video get discovered. If you get a like or comment from a YouTuber with a lot of subscribers, your video may be visible to those who are following that YouTuber for a while.
The best way to get engagement from your audience is to encourage them to like and subscribe or ask them a question or start a dialogue.
For example, in this scrambled egg video you are making, at the end you can ask, “So what do you think, is this better than Gordon Ramsay?”

Who knows, who will respond.
Step 9: Design a Thumbnail
You could have made a brilliant video, but if you have a poor quality thumbnail that is unattractive, then the overall performance of your video will suffer — and good SEO can only do so much after that.
Your viewers will absolutely judge your video by its cover so it’s important to put some thought into it and not solely rely on the three random thumbnail choices that YouTube picks for you.

Take a look at your competition. If they all look the same, do something different. Add text or a human face (preferably yours) to evoke emotion, as viewers are more likely to click into a video if they see an expressive image.
Don’t want to pay money for a photo editing software such as Photoshop?
You can use an online service called Canva or download GIMP , an open-source photo editor much like Photoshop, but far less powerful. These will help you get the job done as you are starting out.
Want to know more thumbnail maker? Check our picks of the best free YouTube thumbnail makers .
Part 3: Publishing With Attention to Optimization
Well done finishing the video! You are almost there… but not there yet.

Come on, keep going!
Step 10: Fill Out Your Videos Assets
The video is done, the thumbnail is designed, and you have all your title, description, and tags ready to go. This step is easy, upload the video, and fill out the assets, and give yourself a pat on the back.
Step 11: Add Transcripts
In addition to making your content accessible for people who don’t want to or can’t listen to the audio in your video, adding subtitles and closed captions will help YouTube understand the spoken content in your video.
While YouTube does have an automatic subtitle generator, it’s not reliable enough to be used for identifying the keywords you use in your video.
You can choose to write out the whole transcript of your video yourself, but if you are press on time, which of course you are, you can simply go and edit the automatic transcript already available in your video. By the way, you can also use some automatic transcription software.
Step 12: Add Video to Playlist
Finally the last thing you need to do for your video is to add it to a playlist. Even though it might be the first video in the playlist, it helps YouTube identify your video if you organize it in a playlist. As you accumulate more content, having videos in playlists makes content easier to find and keeps relevant videos together.
When viewers searches, having your videos in playlists increases the chance of it being discovered.
So if your first video is about scrambled eggs, maybe you next video can be about the awesome butter toasts.
I guess, you are on your way to making a pretty badass breakfast playlist. I personally can’t wait to see it!
If you treat SEO as an afterthought, only after your video is created, you are not using it to its full potential. If you follow these 12 steps during the course of your production, you will find that SEO doesn’t simply help your video perform at the end, but contributes in all the other phases of creating your video as well.
Besides considering YouTube SEO, you should make a good YouTube video as well. Filmora is a powerful video editing software that features lots of templates and effects. Get the free trial version below and have a try today.


Do you have any questions about SEO? Please leave us a comment below.
Shanoon Cox
Shanoon Cox is a writer and a lover of all things video.
Follow @Shanoon Cox
Shanoon Cox
Oct 26, 2023• Proven solutions
The joy of creating on YouTube is often dampened by the disappointment of underperforming videos. You have published your content and it’s not getting the views you had hoped.
Well, let’s change that!
In this guide, I’m going to walk you through YouTube SEO from the very start to the very end.
Nothing complicated. No paid programs or expensive apps needed. We are going back to basics and get your videos discovered.
Ready?
Let’s Go!
Part 1: Research Your Topic and Competitors
Come up with a video idea . Can’t come up with one? Let me help. I heard you can make a mean scrambled egg, why don’t you show the world how you do it?
Excellent! Let’s go with that idea.
Wait, don’t go making the video yet. First, we have to do some research. We need to know what videos already exist out there.
Step 1: Find Related Videos
Do a quick search on YouTube to see what videos already exist on your topic.
Uh oh… your video will be competing against celebrities like Gordon Ramsay and Jamie Oliver.
Okay, don’t panic! There is a fantastic quote, credited to bestselling author, Jon Acuff , that goes:
While researching your competition, you will feel overwhelmed, but remember, you are at the beginning, and Gordon Ramsay and Jamie Oliver are not even at their middle, they are way passed the finish line. You still have a long journey to go, so don’t get discouraged, get inspired!
Watch those videos and understand what they are all about.
Understand that people watch YouTube for 3 key reasons:
- To be entertained
- To learn something new
- To be inspired
A video that can hit all 3 marks is going to be positioned for success. Don’t fret too much about the competition, as long as your content is good, you will see improvement.
So if you think this scrambled egg idea can hit those 3 marks, then I encourage you to go to the next step. If you don’t, let’s regroup and brainstorm some more YouTube video ideas .
Step 2: Find Keywords
Now that we’ve decided that we are sticking with the video idea, we are ready to do some keyword research. Keywords are the words and phrases people type in the YouTube search bar to discover videos.
Come up with as many relevant keywords as you can. Start by entering a keyword into the YouTube search bar. This will tell you what are the most popular searches associated with that keyword:
Once you have an idea of what people are searching for related to your topic, you’ll want to find more relevant keywords. I like to use the free app, Ubersuggest to do that.
This app gives you a whole list of long-tail keywords, which are 3-4-word phrases which is specific to what your video is about.
Some you will use to dig deeper in and other you will deem irrelevant to your videos. A good way of determining the value of a keyword is by the stats the application shows.
How to Read Keyword Suggestions
Once you have a list of keywords, you will see some numbers on the right-hand side. Here is what each one is about:
- Search volume is the number used to identify the popularity of the keyword. The higher the number the more people are searching for it.
- CPC is the value accredited by YouTube, determining how much advertisers are paying to target audiences who search for that keyword and click on the link.
- Competition is the number used to qualify how many other content are using that keyword.
The two categories that matter most to us right now is Search Volume and Competition. We want keywords with high search volume and low competition rate.
In the example above, you can see that the keyword “avocado scrambled eggs” has a Search Volume of 1,000 and a competition rate of 0.0. This is a good keyword to target, if you can incorporate an avocado to your dish… which of course you can!
Step 3: Write Title
I know you might want to deal with the Title, Description, and Tags after you’ve filmed and edited your video. But if you want to apply a YouTube SEO-focused strategy, then these should be addressed before you even pick up a camera as it can greatly dictate the content you end up creating.
A good YouTube title sparks curiosity, evokes emotional reaction, and promises value to your viewers.
Of course you can title your video simply: Making Scrambled Eggs
But does it spark curiosity? Not really… most people can make scrambled eggs.
Does it evoke any emotion? Maybe hunger… but even then, not really…
Finally, does it promise value? Well, assuming that most people can at least crack an egg into a pan, then hardly.
Your scrambled egg is special! Your video is special! We need to evoke that in the title — and as long as you are not writing any clickbait and deliver on what the title suggest, you can do this.
So, how about this: Are My Amazing Scrambled Eggs Better Than Gordon Ramsay’s?
Hmmm… Well, is it? We know that the Gordon Ramsay’s video has almost 30M views. Many people have already tried cooking it, I’m sure. There is only one way to find out, by encouraging others to try it over Gordon’s.
You don’t need to go for a somewhat contentious title like this, but that’s the idea, you want something that gets people curious, make them feel a certain way, and in the end, make them better for having watched your video.
See how a good title can guide the rest of your video?
Step 4: Write Description
You aren’t going to be writing the description for the viewers necessarily, you are going to be writing it for YouTube’s algorithms. The better YouTube understands what your video is about, the better they can show it to people searching for it.
This means you need to include the keywords you were researching at the beginning of your description, as YouTube will be using them to identify the content of your video. 1 or 2 keywords that best represent your video is enough. Don’t stuff the title with too many keywords or you’ll risk sounding like a robot.
But also use the description for practical uses too, if you have additional information such as supportive links, outline of the video’s content, a list of materials, step-by-step guide, or a recipe that you think your human viewers will find useful, you should input that in the description as well.
Step 5: Write Tags
Thank goodness we did the keyword research in Step 2, because coming up with tags is not as easy as it looks.
Pull 15 keywords from the list and keep it somewhere safe.
Note: The keywords you used in the title should be found in your tags, and since they are the most important ones, you should place them first.
Organize your keywords in the tag as such:
Have the specific keywords at the top, followed by more general keywords, and then branded ones:
Specific: How to make scrambled eggs
General: Scrambled eggs
Branded: Gordon Ramsay scrambled eggs
Part 2: Make The Best Darn Video Possible
It doesn’t matter how relevant your keywords are or how epic your title is, if you video sucks (i.e. your viewers click in and leave right away), YouTube will not show it in search.
Even if you haven’t created any videos yet, you can follow these next steps to ensure you are following the best practices to structure your video.
Step 6: Plan and Film the Hook
The first few seconds is where the largest percentage of your earned viewership will drop off. Odds are 20% of your viewers won’t even get past the first 10 seconds .
What you need is a hook, an intro that ensures this video is what they want to watch and let’s them know what they can expect.
Step 7: Film B-Roll
One static camera shot of you talking or cooking or giving a tutorial can cause your viewers to lose attention.
In order to keep your viewers interest, you will need b-roll, or supplemental footage you can cut to give you video more life.
While jump cuts (cuts made on a sequential clip of the same subject or in the same camera position) are fine, having additional footage to cut to will make your video feel more fluid.
So when you are filming your scrambled egg video, make sure you get some footage of you cracking the egg, scrambling it, and serving it on the plate.
Step 8: Encourage Viewers to Engage in Video
Liking, disliking, subscribing, and commenting on your video will all help your performance indirectly.
While YouTube wouldn’t rank your video higher simply because you have more likes subscribers, or comments, engagement from viewers help your video get discovered. If you get a like or comment from a YouTuber with a lot of subscribers, your video may be visible to those who are following that YouTuber for a while.
The best way to get engagement from your audience is to encourage them to like and subscribe or ask them a question or start a dialogue.
For example, in this scrambled egg video you are making, at the end you can ask, “So what do you think, is this better than Gordon Ramsay?”
Who knows, who will respond.
Step 9: Design a Thumbnail
You could have made a brilliant video, but if you have a poor quality thumbnail that is unattractive, then the overall performance of your video will suffer — and good SEO can only do so much after that.
Your viewers will absolutely judge your video by its cover so it’s important to put some thought into it and not solely rely on the three random thumbnail choices that YouTube picks for you.
Take a look at your competition. If they all look the same, do something different. Add text or a human face (preferably yours) to evoke emotion, as viewers are more likely to click into a video if they see an expressive image.
Don’t want to pay money for a photo editing software such as Photoshop?
You can use an online service called Canva or download GIMP , an open-source photo editor much like Photoshop, but far less powerful. These will help you get the job done as you are starting out.
Want to know more thumbnail maker? Check our picks of the best free YouTube thumbnail makers .
Part 3: Publishing With Attention to Optimization
Well done finishing the video! You are almost there… but not there yet.
Come on, keep going!
Step 10: Fill Out Your Videos Assets
The video is done, the thumbnail is designed, and you have all your title, description, and tags ready to go. This step is easy, upload the video, and fill out the assets, and give yourself a pat on the back.
Step 11: Add Transcripts
In addition to making your content accessible for people who don’t want to or can’t listen to the audio in your video, adding subtitles and closed captions will help YouTube understand the spoken content in your video.
While YouTube does have an automatic subtitle generator, it’s not reliable enough to be used for identifying the keywords you use in your video.
You can choose to write out the whole transcript of your video yourself, but if you are press on time, which of course you are, you can simply go and edit the automatic transcript already available in your video. By the way, you can also use some automatic transcription software.
Step 12: Add Video to Playlist
Finally the last thing you need to do for your video is to add it to a playlist. Even though it might be the first video in the playlist, it helps YouTube identify your video if you organize it in a playlist. As you accumulate more content, having videos in playlists makes content easier to find and keeps relevant videos together.
When viewers searches, having your videos in playlists increases the chance of it being discovered.
So if your first video is about scrambled eggs, maybe you next video can be about the awesome butter toasts.
I guess, you are on your way to making a pretty badass breakfast playlist. I personally can’t wait to see it!
If you treat SEO as an afterthought, only after your video is created, you are not using it to its full potential. If you follow these 12 steps during the course of your production, you will find that SEO doesn’t simply help your video perform at the end, but contributes in all the other phases of creating your video as well.
Besides considering YouTube SEO, you should make a good YouTube video as well. Filmora is a powerful video editing software that features lots of templates and effects. Get the free trial version below and have a try today.
Do you have any questions about SEO? Please leave us a comment below.
Shanoon Cox
Shanoon Cox is a writer and a lover of all things video.
Follow @Shanoon Cox
Unlocking Profit: The Step-by-Step Guide to Assess Your YouTube Earnings
There have been lots of user queries similar to the one above about how to check YouTube income lately. Honestly, YouTube has made it easy for users to track their revenue analytics on the platform, thus making it easy for creators to track how much they make and other revenue data.
So, if you don’t know how to check YouTube income, don’t worry, this article will teach you the simple steps to check your YouTube. Plus, you’ll find out how your YouTube earnings are calculated. Just stick with us.
Part 1: Follow the steps below to check your YouTube earnings
The process of checking YouTube income is pretty straightforward. So, regardless of what device you’re using to check, we’ve briefly explained the step-by-step instructions to carry out your YouTube income check within a few clicks.
Check on a computer
To check YouTube income on your PC or Mac, you just have to do the following;
Step1 Open the browser app on your computer and sign in to your YouTube Studio .
Step2 Click Analytics from the left side of the screen.

Step3 On the Analytics screen, select Revenue from the top side of the screen to check your YouTube income.
There, you’ll find your YouTube income and other necessary data that you might need.
Check on a Mobile Device
The process of checking YouTube income on an Android or iOS device is also straightforward, and you can use either the YouTube app or the YouTube Studio app to perform the operation. The steps below explain the procedure;
YouTube App
Step1 Make sure you have the latest version of the YouTube app on your phone. If not, you can install it from Google Play Store or App Store.

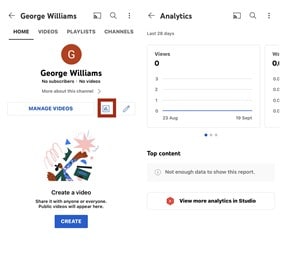
Step2 Log in to your YouTube account and tap on the Profile icon at the top side. Then, select Your Channel.

Step3 Tap the Analytics icon from the middle menu. Your YouTube channel income and other data will be displayed on your phone screen.
YouTube Studio App
Step1 Launch the YouTube Studio app on your Android or iPhone.
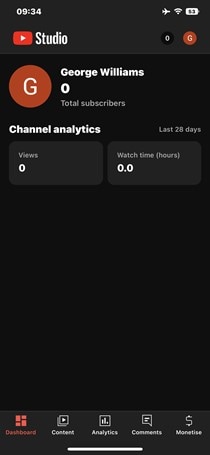
Step2 Tap Analytics from the bottom menu and select Revenue from the top of the screen.

The information that you’ll find in the YouTube revenue analytics includes the following;
- RPM (Revenue Per Mile); This is the metric that displays how much a creator has earned per 1000 video views.
- Playback-based CPM; This shows the average gross revenue per 1000 playbacks where an AD or more is displayed.
- Monthly Estimated Revenue; This report shows how much a YouTuber has earned from his/her channel in the last six months.
- Revenue Sources: Just as the name suggests, this shows you the data of how much is earned from each revenue source used on your YouTube channel.
- Transaction Revenue; The transaction revenue metric is a breakdown of how much a creator has earned from membership and merch.
- Top Earnings; It shows the data of the video with the highest estimated revenue.
- Ad Type; This displays the percentage of revenue earned from the different types of ads.
Part 2: How your YouTube earnings are calculated
Having known how to check YouTube income, if you’re still wondering how your earnings are calculated, here, we’ve discussed all the necessary information you need to know about how YouTube earnings are calculated.
YouTube earnings are calculated based on different factors. From CPC to CPM, estimated gross earnings per view, and more. Keep reading to find out more about how these factors affect your YouTube earnings;
CPM (Cost Per Mile): CPM is the amount an advertiser pays for every one thousand views of their ads. This means if an advertiser is paying you $10CPM, you’ll earn $10 on every 1000 views of their ads.
CPC (Cost Per Click): Most people think CPC is the same as CPM, but no they are not. Cost Per Click is the amount an advertiser pays for every viewer that clicks on their ads. If an advertiser is willing to pay $10, then you’ll earn $10 on every ad click.
Estimated Gross Earning Per Subscriber: You’ll notice whenever you watch a YouTube video, the creator always emphasizes you click the Subscribe button to get a notification on every new video he/she uploads. Well, they do this because the more subscribers they get, the more likely their videos appear in search results.
Also, if you have a huge Subscriber base, your videos tend to get more views, thereby increasing ad views, ad clicks, and your earnings.
All the factors explained above will determine how your YouTube earnings are calculated. However, keep in mind that you’ll receive only 55% of the total dollar advertisers pays while YouTube keeps the remaining 45%. If you get an average of $5 from an advertiser on every 1000 ad view, you’ll earn $5 x 55% which is approximately $2.75.
You can also calculate your YouTube channel total earnings by using the YouTube calculator .

Part 3: How do you increase your YouTube earnings?
1. Post quality videos
If your video is of low quality, then viewers might not find it interesting. For this reason, it’s important you post quality videos, and you need the Wondershare Filmora software for such an operation.
Filmora is one of the best video editing software that is trusted by millions of users globally because of its high efficiency. It supports lots of advanced tools that anyone can utilize to edit and spice up their videos. From adding transitions to applying effects, and more. It even offers a high-quality built-in preset that users can utilize for free to give their video the best quality they can ever think of.
Free Download For Win 7 or later(64-bit)
Free Download For macOS 10.14 or later
Step1 Install Filmora software on your computer.
Step2 Use the Import button to upload the video you created for your YouTube channel. You can also drag-n-drop it to the interface of the software.
Step3 Drag-n-drop the video you uploaded to the Timeline.

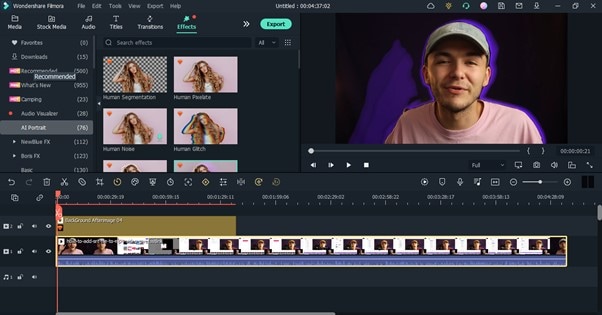
Step4 To remove unwanted background from your video, click Effects from the top side of the screen. Select AI Portrait from the left side of the screen and select a preferred AI Portrait effect that you’ll like to use in the video.

Step5 Next, drag-n-dop the chosen AI Portrait effect to the timeline. After that, adjust the AI Portrait effect from the timeline. You can also add multiple effects by dragging and dropping them to the timeline.
Step6 Double-click the AI Portrait effect from the Timeline. From the pop-up that appears, adjust the settings according to your requirements.

Step7 You can add Subscribe watermark by clicking the >> icon at the top of the screen, then select Element.

Choose the ‘Social Media Show Element 07’ Effects. Drag-n-drop the selected effect to the Timeline.

Step8 Preview the edited video. If you’re satisfied with the output, click the Export button at the top bar and choose Burn DVD from the drop-down list.

Step9 Enter file name in the box next to Label. Then, navigate to Folder Path and choose where you want the file to be saved. Afterward, click Export to Finish.

2. Upload videos regularly
Starting a YouTube channel can be quite hard from start, but make it a priority to upload at least two quality videos every week. Yes, the more quality videos you post, the more you attract the viewer to like your videos, and the higher your chances of getting new subscribers, thereby increasing your YouTube earnings.
3. Promote your Videos
Promoting your YouTube videos is a great way to increase your YouTube earnings. Once you post a new video on YouTube, you can share it to your other social media profiles or websites to increase views and attract new folks to watch the video. The more views you get the more money you’ll make.
Part 4: Hot FAQs on YouTube channel earnings check
Let’s take a look at some frequently asked questions from users like you.
1. Is monetizing on YouTube different from Google AdSense?
YouTube monetization involves making money from videos you upload on your YouTube channel. And Google AdSense is a means of monetizing your YouTube channel.
2. Why should you consider monetizing on YouTube creator?
Monetizing YouTube as a creator is a great way to earn passive income just by uploading videos. Research shows that an average YouTuber has the potential of earning $10,000 in revenue per year.
3. Which category is best for YouTube earnings?
The average CPM you earn from videos you upload on YouTube all depends on the niche of your video. The following are the best 5 categories best for YouTube earnings in 2022;
Make Money Online - $13.52
Social Media Marketing - $12.41
Finance & Investing - $12.25
Educational Videos - $9.89
Photography & Film Making - $7.31
Final Words
Checking YouTube income is not a big deal. This article has covered every necessary detail you need to know about checking your YouTube income on a PC or mobile phone. Also, if you don’t understand how YouTube earnings are calculated, we touched on that, and don’t hesitate to employ the tips discussed to increase your YouTube earnings.
Free Download For Win 7 or later(64-bit)
Free Download For macOS 10.14 or later
Part 1: Follow the steps below to check your YouTube earnings
The process of checking YouTube income is pretty straightforward. So, regardless of what device you’re using to check, we’ve briefly explained the step-by-step instructions to carry out your YouTube income check within a few clicks.
Check on a computer
To check YouTube income on your PC or Mac, you just have to do the following;
Step1 Open the browser app on your computer and sign in to your YouTube Studio .
Step2 Click Analytics from the left side of the screen.
Step3 On the Analytics screen, select Revenue from the top side of the screen to check your YouTube income.
There, you’ll find your YouTube income and other necessary data that you might need.
Check on a Mobile Device
The process of checking YouTube income on an Android or iOS device is also straightforward, and you can use either the YouTube app or the YouTube Studio app to perform the operation. The steps below explain the procedure;
YouTube App
Step1 Make sure you have the latest version of the YouTube app on your phone. If not, you can install it from Google Play Store or App Store.
Step2 Log in to your YouTube account and tap on the Profile icon at the top side. Then, select Your Channel.
Step3 Tap the Analytics icon from the middle menu. Your YouTube channel income and other data will be displayed on your phone screen.
YouTube Studio App
Step1 Launch the YouTube Studio app on your Android or iPhone.
Step2 Tap Analytics from the bottom menu and select Revenue from the top of the screen.
The information that you’ll find in the YouTube revenue analytics includes the following;
- RPM (Revenue Per Mile); This is the metric that displays how much a creator has earned per 1000 video views.
- Playback-based CPM; This shows the average gross revenue per 1000 playbacks where an AD or more is displayed.
- Monthly Estimated Revenue; This report shows how much a YouTuber has earned from his/her channel in the last six months.
- Revenue Sources: Just as the name suggests, this shows you the data of how much is earned from each revenue source used on your YouTube channel.
- Transaction Revenue; The transaction revenue metric is a breakdown of how much a creator has earned from membership and merch.
- Top Earnings; It shows the data of the video with the highest estimated revenue.
- Ad Type; This displays the percentage of revenue earned from the different types of ads.
Part 2: How your YouTube earnings are calculated
Having known how to check YouTube income, if you’re still wondering how your earnings are calculated, here, we’ve discussed all the necessary information you need to know about how YouTube earnings are calculated.
YouTube earnings are calculated based on different factors. From CPC to CPM, estimated gross earnings per view, and more. Keep reading to find out more about how these factors affect your YouTube earnings;
CPM (Cost Per Mile): CPM is the amount an advertiser pays for every one thousand views of their ads. This means if an advertiser is paying you $10CPM, you’ll earn $10 on every 1000 views of their ads.
CPC (Cost Per Click): Most people think CPC is the same as CPM, but no they are not. Cost Per Click is the amount an advertiser pays for every viewer that clicks on their ads. If an advertiser is willing to pay $10, then you’ll earn $10 on every ad click.
Estimated Gross Earning Per Subscriber: You’ll notice whenever you watch a YouTube video, the creator always emphasizes you click the Subscribe button to get a notification on every new video he/she uploads. Well, they do this because the more subscribers they get, the more likely their videos appear in search results.
Also, if you have a huge Subscriber base, your videos tend to get more views, thereby increasing ad views, ad clicks, and your earnings.
All the factors explained above will determine how your YouTube earnings are calculated. However, keep in mind that you’ll receive only 55% of the total dollar advertisers pays while YouTube keeps the remaining 45%. If you get an average of $5 from an advertiser on every 1000 ad view, you’ll earn $5 x 55% which is approximately $2.75.
You can also calculate your YouTube channel total earnings by using the YouTube calculator .
Part 3: How do you increase your YouTube earnings?
1. Post quality videos
If your video is of low quality, then viewers might not find it interesting. For this reason, it’s important you post quality videos, and you need the Wondershare Filmora software for such an operation.
Filmora is one of the best video editing software that is trusted by millions of users globally because of its high efficiency. It supports lots of advanced tools that anyone can utilize to edit and spice up their videos. From adding transitions to applying effects, and more. It even offers a high-quality built-in preset that users can utilize for free to give their video the best quality they can ever think of.
Free Download For Win 7 or later(64-bit)
Free Download For macOS 10.14 or later
Step1 Install Filmora software on your computer.
Step2 Use the Import button to upload the video you created for your YouTube channel. You can also drag-n-drop it to the interface of the software.
Step3 Drag-n-drop the video you uploaded to the Timeline.
Step4 To remove unwanted background from your video, click Effects from the top side of the screen. Select AI Portrait from the left side of the screen and select a preferred AI Portrait effect that you’ll like to use in the video.
Step5 Next, drag-n-dop the chosen AI Portrait effect to the timeline. After that, adjust the AI Portrait effect from the timeline. You can also add multiple effects by dragging and dropping them to the timeline.
Step6 Double-click the AI Portrait effect from the Timeline. From the pop-up that appears, adjust the settings according to your requirements.
Step7 You can add Subscribe watermark by clicking the >> icon at the top of the screen, then select Element.
Choose the ‘Social Media Show Element 07’ Effects. Drag-n-drop the selected effect to the Timeline.
Step8 Preview the edited video. If you’re satisfied with the output, click the Export button at the top bar and choose Burn DVD from the drop-down list.
Step9 Enter file name in the box next to Label. Then, navigate to Folder Path and choose where you want the file to be saved. Afterward, click Export to Finish.
2. Upload videos regularly
Starting a YouTube channel can be quite hard from start, but make it a priority to upload at least two quality videos every week. Yes, the more quality videos you post, the more you attract the viewer to like your videos, and the higher your chances of getting new subscribers, thereby increasing your YouTube earnings.
3. Promote your Videos
Promoting your YouTube videos is a great way to increase your YouTube earnings. Once you post a new video on YouTube, you can share it to your other social media profiles or websites to increase views and attract new folks to watch the video. The more views you get the more money you’ll make.
Part 4: Hot FAQs on YouTube channel earnings check
Let’s take a look at some frequently asked questions from users like you.
1. Is monetizing on YouTube different from Google AdSense?
YouTube monetization involves making money from videos you upload on your YouTube channel. And Google AdSense is a means of monetizing your YouTube channel.
2. Why should you consider monetizing on YouTube creator?
Monetizing YouTube as a creator is a great way to earn passive income just by uploading videos. Research shows that an average YouTuber has the potential of earning $10,000 in revenue per year.
3. Which category is best for YouTube earnings?
The average CPM you earn from videos you upload on YouTube all depends on the niche of your video. The following are the best 5 categories best for YouTube earnings in 2022;
Make Money Online - $13.52
Social Media Marketing - $12.41
Finance & Investing - $12.25
Educational Videos - $9.89
Photography & Film Making - $7.31
Final Words
Checking YouTube income is not a big deal. This article has covered every necessary detail you need to know about checking your YouTube income on a PC or mobile phone. Also, if you don’t understand how YouTube earnings are calculated, we touched on that, and don’t hesitate to employ the tips discussed to increase your YouTube earnings.
Free Download For Win 7 or later(64-bit)
Free Download For macOS 10.14 or later
Also read:
- Navigate and Neutralize Your Own Overly Green Spectrum in YouTube Videos (Mac)
- Optimizing Channel Branding to Skyrocket Subscriber Numbers
- 2024 Approved Completely Erase Your Connection with YouTube Shorts
- Fixed YouTube Shorts - Just Watch and Enjoy
- In 2024, Celebrating Matrimony The Best Wedding Movies From YouTube to Vimeo
- 2024 Approved Create, Captivate Independent Animation Innovations
- Secrets of Thriving in the Top 10 Business Channel Space
- [New] Elevating User Experience with Personalized YouTube Card Implementation
- [New] Decoding the Visual Language of Live Videos on YouTube
- [Updated] Best Practices for Designing an Engaging YouTube Teaser
- 2024 Approved Cut Beyond Youtube Unveiling the Top 5 Video Editor Options
- Daily Digital Domination Top 10 YouTube Viewership Ranking for 2024
- [Updated] Essential Guide Top 10 Free YouTube-to-MP3 Tools
- A Step-by-Step Guide for Creating Channel Trailers that Convert Viewers Into Customers for 2024
- Transform YT Video Quality Utilizing the Power of WM Maker
- Step-by-Step Guide to Creating Popular YouTube Openings
- Elevating YouTube Productions with Effective Video Lighting for 2024
- [New] Discovering 8 Honestly-Endorsed Promotional Strategies
- In 2024, Captivate Crowds Mastering Hashtag Use in High-Traffic Short Videos
- Online Visionaries Subscriber, Play Button Triumphs
- In 2024, Apex Artists Among Online Video Titans
- Stand Out on YouTube Innovative Title Brainstroms
- 2024 Approved Elevate Your Brand with AI-Enhanced Naming Solutions
- In 2024, Dominate the Scene The Best Hashtag Tactics for YouTube Gamers
- The Right Way to Raise Your Video's Reach Responsibly
- Decoding YouTube Premium Complete Information Inside
- Crafting a YouTube Empire 26 Successful Techniques
- [New] Champion of Cinematography Audio-Visual Artistry
- Uncover Top 15 Sci-Tech YouTube Channels for Learners
- Clip Weaver Workshop for 2024
- Explore Beyond Youtube with These Top 5 Video Tools
- How to Sign a Excel document online
- 2024 Approved Master the Art of Viral TikToks with These Best Quotes
- RestoreRite Professionals Insight
- In 2024, How can I get more stardust in pokemon go On Realme 12 5G? | Dr.fone
- In 2024, How to Remove a Previously Synced Google Account from Your Vivo Y200e 5G
- 2024 Approved Achieving Precision Audio Editing Step by Step Premiere Pro Methods
- [New] Unlock Cartoon Creativity Transforming Selfies Into Stories
- In 2024, Superior Methods for Silent Video Production
- The Unfiltered Truth Insights Into Instagram Reels
- New In 2024, The Ultimate Guide to Converting Text to Speech in MP3 Format
- In 2024, Why Your WhatsApp Live Location is Not Updating and How to Fix on your Apple iPhone 8 Plus | Dr.fone
- [Updated] In 2024, Ultimate Guide to Best Android Video Capture Software #5
- 7 Essential GIF Creation Techniques for 2024
- [Updated] Quick and Easy Methods for Including Emojis Into Discord Statements for 2024
- In 2024, Top 15 Augmented Reality Games Like Pokémon GO To Play On Apple iPhone SE | Dr.fone
- In 2024, How to Reset Gmail Password on Oppo Reno 11 Pro 5G Devices
- In 2024, How to Cartoonize Photo Photoshop in Simple Steps
- 5 Solutions For Infinix Note 30 5G Unlock Without Password
- Harmonious Sound Editing Guide Advantages, Disadvantages, and Substitutes for 2024
- In 2024, Best Ways on How to Unlock/Bypass/Swipe/Remove Realme C51 Fingerprint Lock
- 8 Best Apps for Screen Mirroring ZTE Nubia Z60 Ultra PC | Dr.fone
- New 2024 Approved Selecting the Optimal YouTube Video Downloader for MP4 Conversion
- In 2024, Bypass iCloud Activation Lock with IMEI Code From Apple iPhone 11 Pro
- New Harmonizing Your Library The Best Places to Stream and Save Background Music
- 8 Ultimate Fixes for Google Play Your Asus ROG Phone 8 Isnt Compatible | Dr.fone
- How to Unlock Infinix Smart 8 Phone Password Without Factory Reset?
- SuperFast FB Downloader MP4 Files in Minutes for 2024
- Superior Supplements to Enhance GoPro
- Title: "Elevate Your Content SEO Mastery Starts Here!"
- Author: Steven
- Created at : 2024-05-25 18:21:35
- Updated at : 2024-05-26 18:21:35
- Link: https://youtube-clips.techidaily.com/1716464722380-elevate-your-content-seo-mastery-starts-here/
- License: This work is licensed under CC BY-NC-SA 4.0.
