
:max_bytes(150000):strip_icc():format(webp)/Flack-6b3c3167132c467db22bae39689c44ef.jpg)
"10 Best YouTube To GIF Makers How to Create GIF From YouTube Video, In 2024"
10 Best YouTube To GIF Makers: How to Create GIF From YouTube Video?
10 Best YouTube To GIF Makers: How to Create GIF from YouTube Video?

Richard Bennett
Mar 27, 2024• Proven solutions
GIF (Graphic Interchange Format) is an image file format supporting both uniform and animated images. Before, GIF was a basic 8-bit colored image until PNG image format was introduced as a more feasible alternative. Today, you can find them being used on all the trending social media applications like WhatsApp, Instagram, Snapchat, Twitter, Facebook, and various others.
The good thing here is that you can make GIFs from YouTube videos or any of your favorite videos for that matter which you think can help express your sentiments or ideas in an enhanced manner. There is a huge market available of apps and web software that can help create GIFs from YouTube without much trouble.
In this short guide ahead, we’ve brought for you the best YouTube to GIF maker available in the digital market. Let’s go GIF-ing!
Part 1: Best Online YouTube to GIFs Makers
Here is our curated list of the best 11 YouTube to GIF Maker that you can use to make GIF from YouTube video.
1. GIFS
Gifs.com is one the best GIF maker site that makes crafting GIFs from YouTube videos incredibly easy and quick with no time. If you’re looking for some straight and simple video to gif converter to help you convert YouTube videos into GIFs, this is the smoothest editor that will do the job and craft interesting gifs for your blogging platforms.
All you have to do is enter the URL of the video you want to convert into a GIF. At this point, the site accepts Instagram, YouTube, Facebook, and Vine links. In addition to that, there is also an option that allows users to upload from the desktop computer.
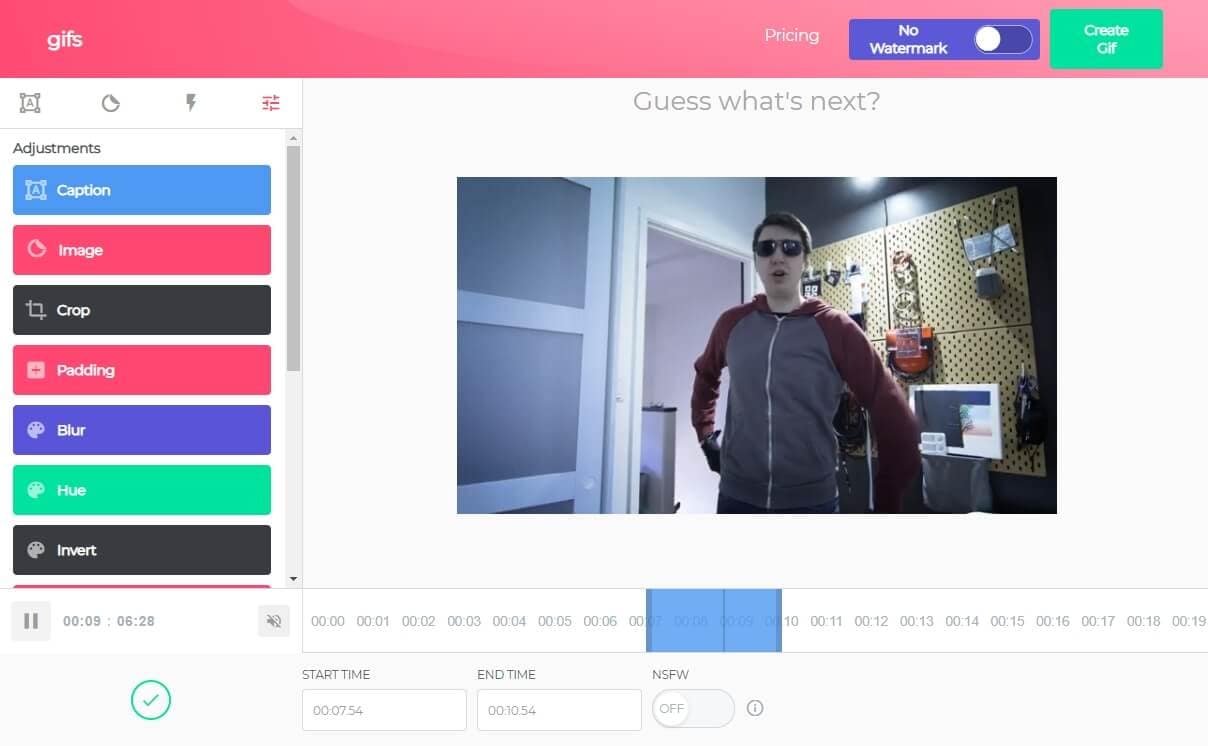
Once you’ve entered the YouTube video URL, it prompts a basic video editor wherein you select the frame and durations for your GIF. If you want to customize it further, you can add stickers, captions, and tools like blurring, cropping, and others.
Once you’re done exploring the filters and editing the GIF, you can directly share the URL on different platforms or just download it and store it on your device.
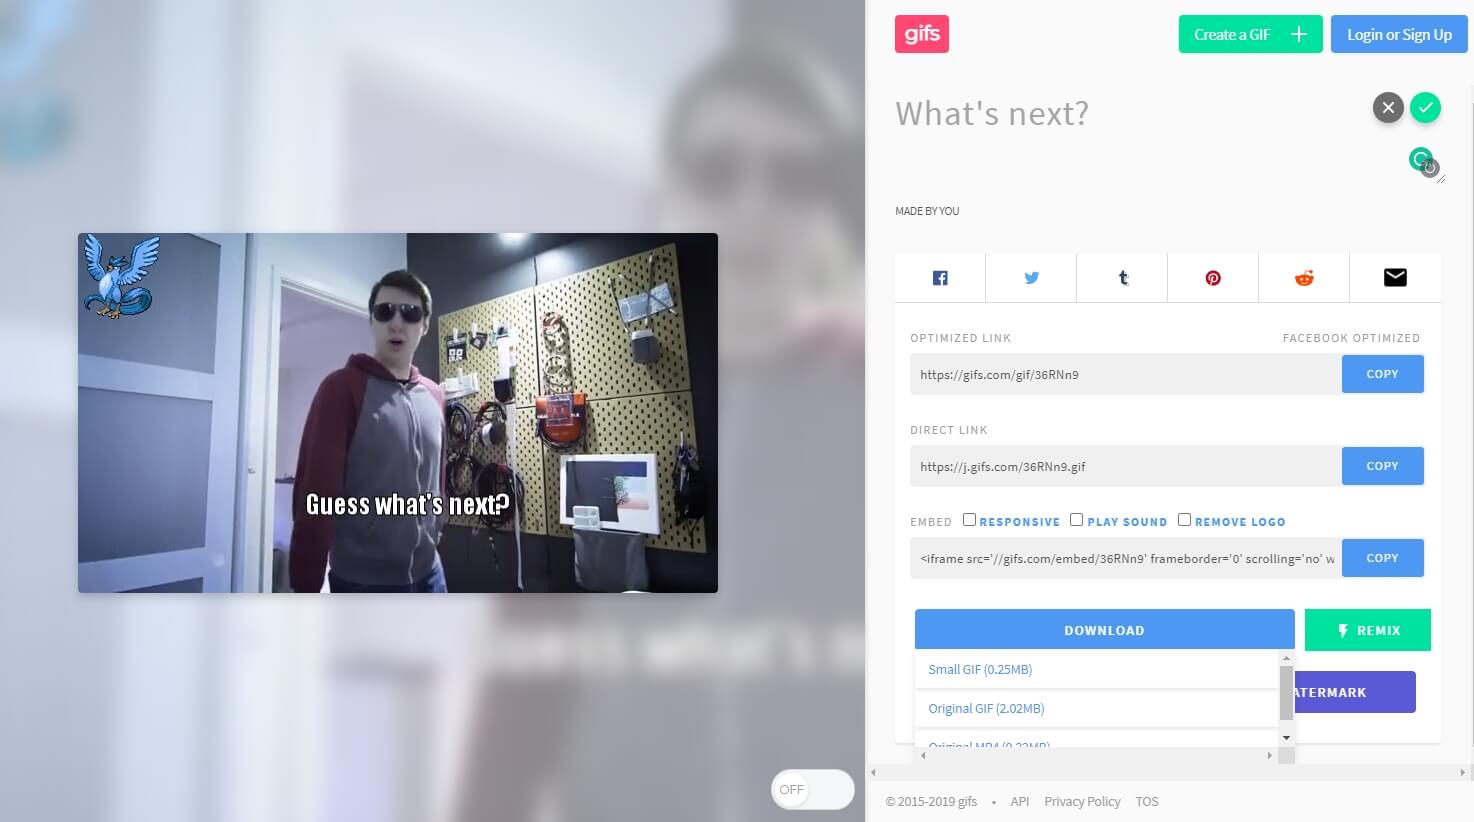
Note: If you want to remove the watermark and get full access to extra features, you may need to pay $1.99/month.
You can check the gif that I made from our YouTube video How to Edit Galaxy Effects with Green Screen | Wondershare FilmoraPro Tutorial on gifs.com here: https://gifs.com/gif/36RNn9 .
2. GIPHY
Giphy, as we all know, is the most used search engine for GIFs due to its limitless collection. Giphy here maintains its own GIF maker to create your customized GIFs effortlessly. The Giphy online GIF maker is quite simple and easy to use; it also has steadfast mobile applications for both Android and iOS devices.
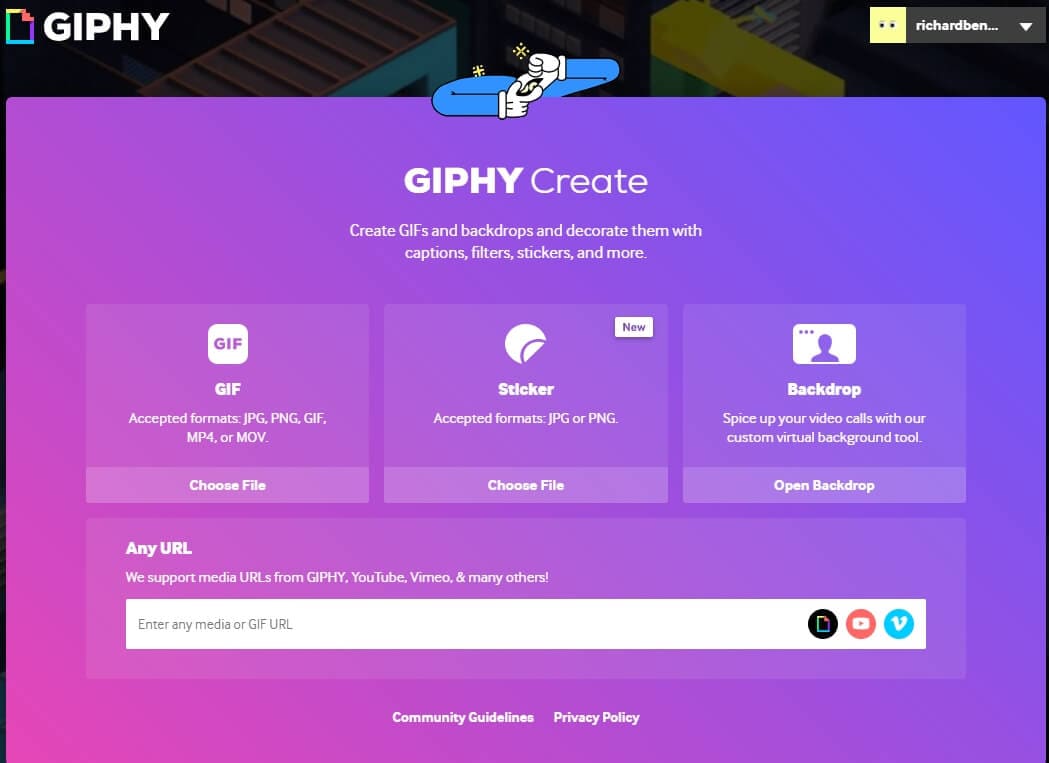
To begin converting YouTube videos into GIFs, click the Create button at the top and then you can either enter the URL or upload images/videos from local files. This GIF maker only accepts JPG, PNG, GIF, MP4, and MOV for people uploading images or videos.
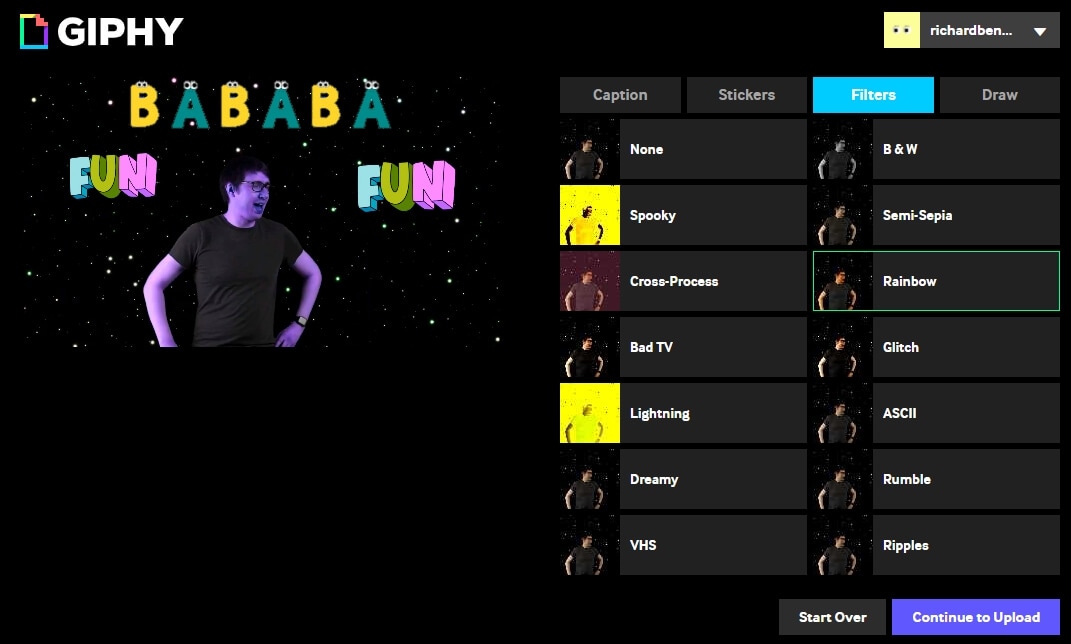
Then, trim the part from the video you want to convert into a GIF. Later, you can embellish your GIFs by adding filters, tags, text captions, and stickers to make them look eye-catching. If you’re looking for a clean and simple GIF maker, then Giphy GIF maker is the perfect choice for you.
Here is the gig that I made with Giphy: https://media.giphy.com/media/2Dtlp2MAXtoC0EyMsx/giphy.gif .
3. GIFit!
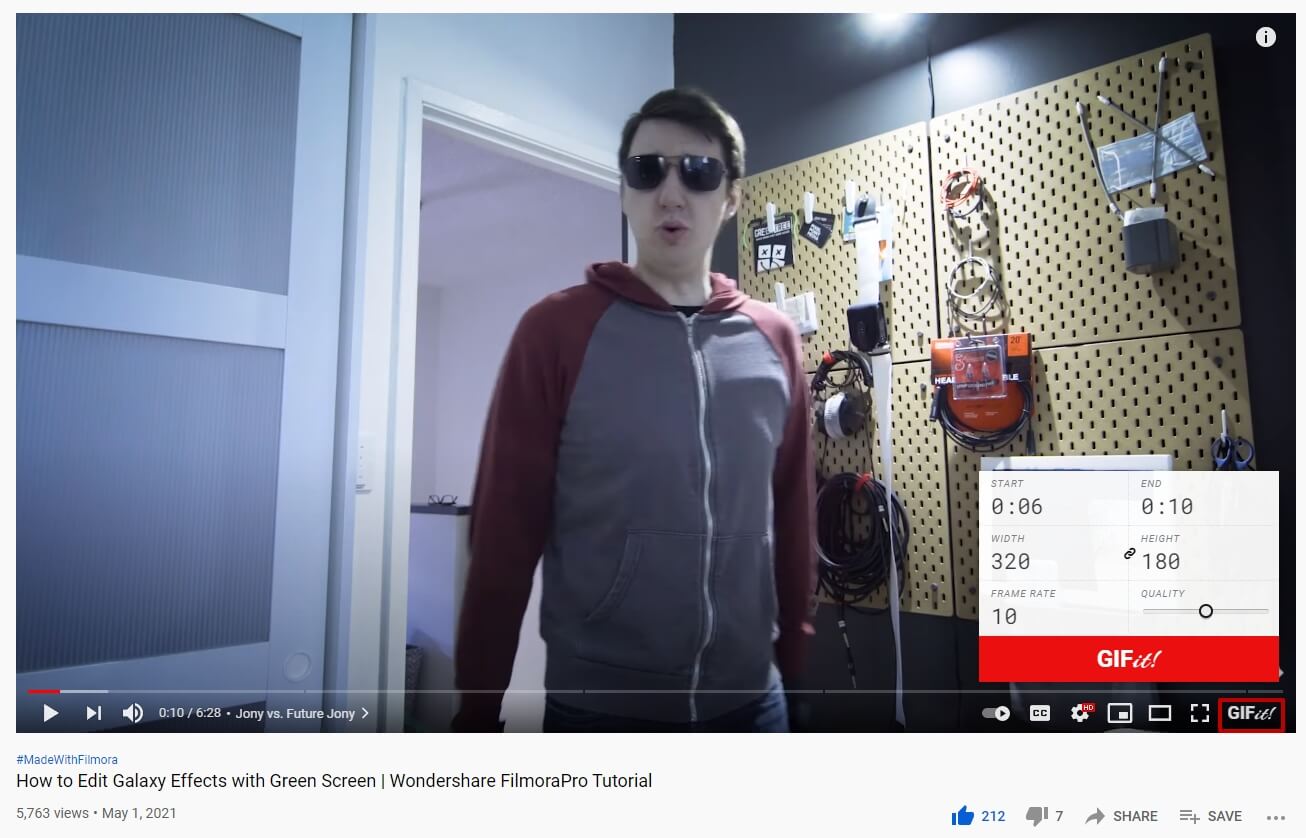
GIFit is a well-known online extension available on the Chrome Web Store for free that aids in making GIFs from YouTube videos. The GIFit extension has been recently updated to work with the new YouTube interface to help you craft Gifs smoothly. One thing to remember about GIFit is that with YouTube HTML5 mode only.
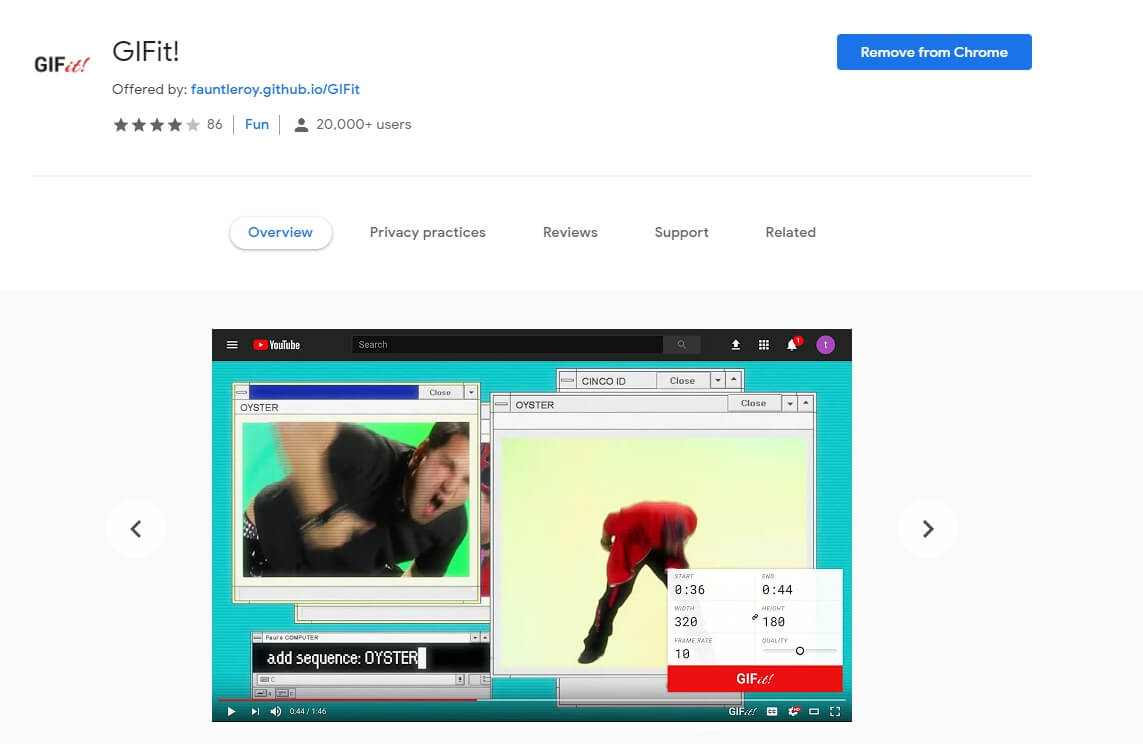
To use this Chrome extension, install it from the Chrome Web Store. Now, run the attachment and visit any video on YouTube that you would like to convert into GIF. Once decided, simply press on the GIFit icon in the YouTube toolbar. Then, edit according to your requirements and hit the red button with GIFit on it. After a few minutes, your GIF will be ready to be shared and saved. Currently, it offers convert YouTube to GIF feature only, so you can’t add stickers nor captions.
4. Make A GIF
Makeagif is an ideal online GIF maker for you that can convert videos into animated GIFs in no time. It allows you to create GIFs using local images, YouTube, Facebook, and Webcam. Makeagif even will enable you to develop new GIFs using the already existing ones.

The GIF maker also comes with a variety of free GIFs to download and add to your collection. Moreover, it allows you to edit existing GIFs by enhancing their quality, speed and adding filters to them. It offers functions that can enrich the standard of your GIFs.
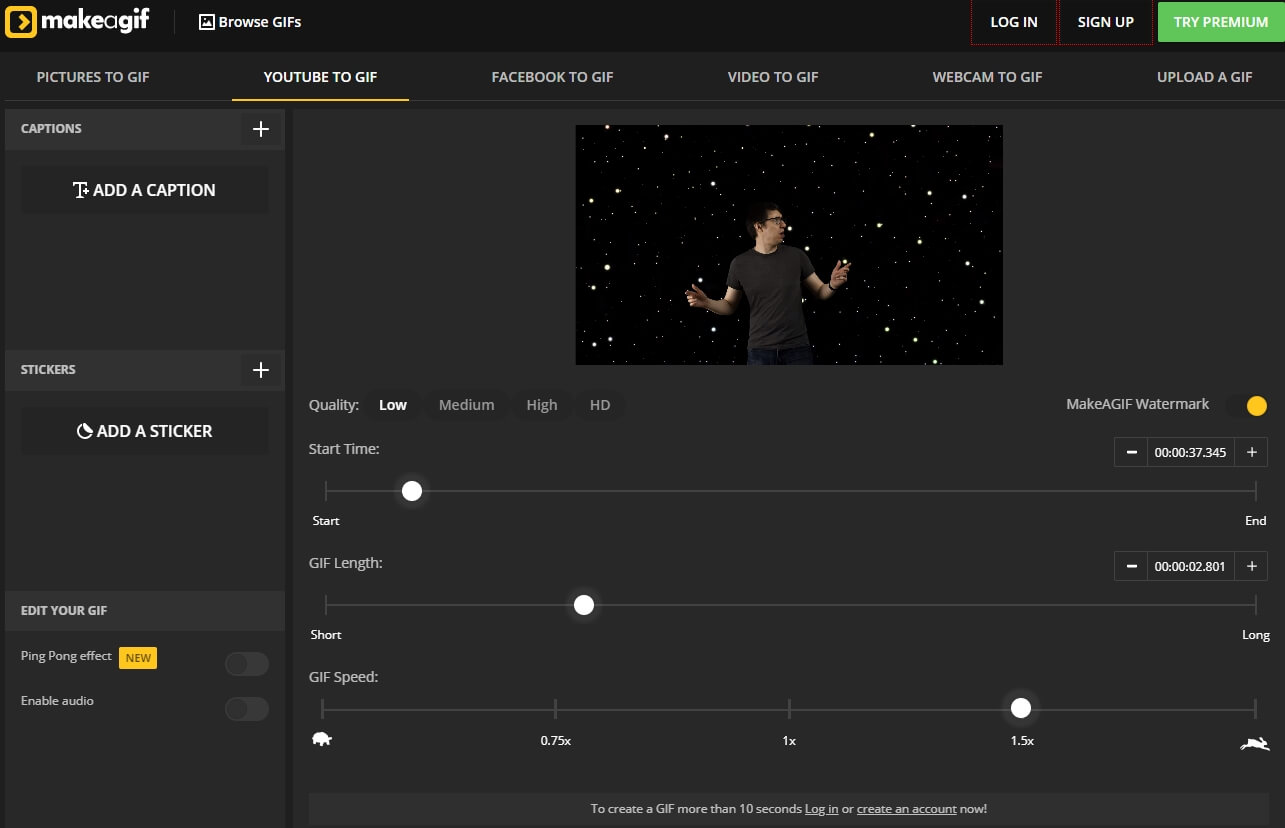
To create GIFs using this, first, create your account on the site. Next, select the ‘YouTube to GIF’ option from the drop-down menu, among other alternatives. Then, enter the link to the YouTube video that you wish to transfigure into GIF, after which you can tailor-make the gifs by adjusting the configuration settings, such as adding captions and sticker. Once done, simply download and share your newly crafted GIF.
5. Imgur
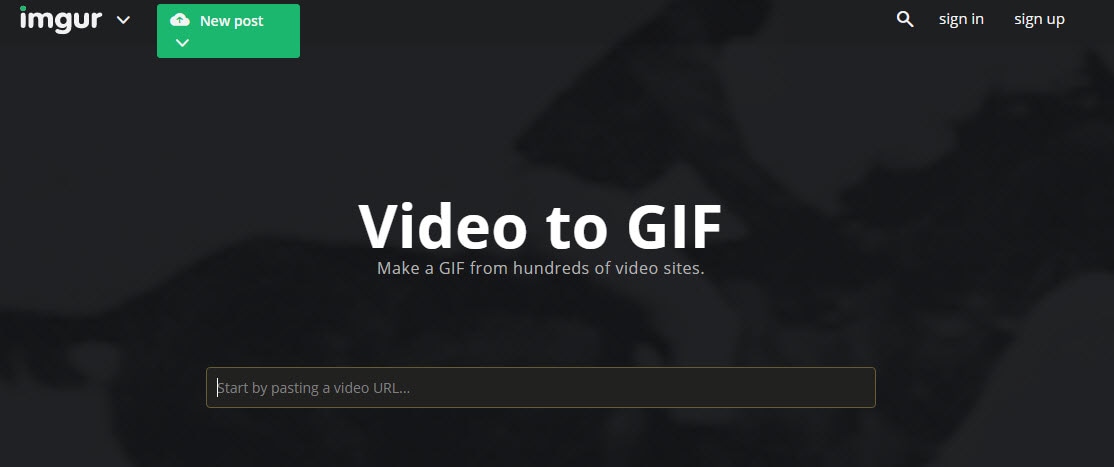
Imgur might not be the best application to be included in the list. But it is definitely an amazing site where you can go looking for all kinds of images, Gifs, memes, or other digital stories. Imgur’s wide collection of visuals can never disappoint you, no matter what you’re searching for, from funny to sad, inspiring to aspiring, everything can be discovered in this treasure.

Now, this might not be the best YouTube to gif maker, but it does have the potential to provide you with great ideas for GIF-making. Besides, you can download all the interesting GIfs from here and save them for future reference.
6. GiFRun
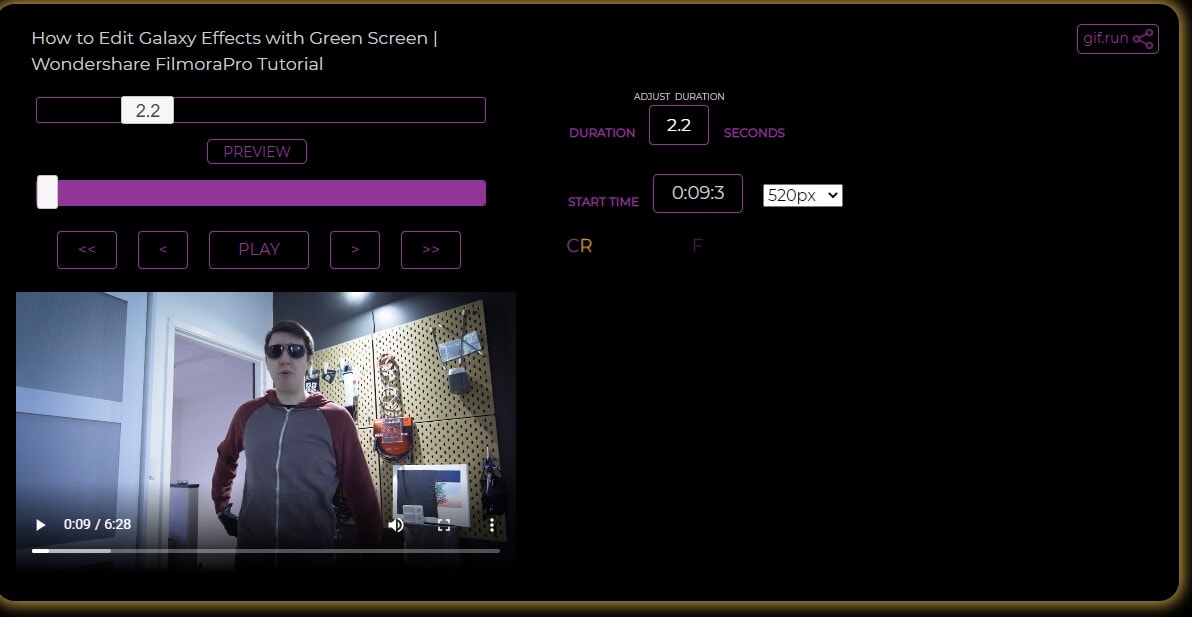
Are you worried about searching for a gif converter with no prior experience in editing? Don’t worry; this GiFRun Maker is the simplest online service that requires minimum to zero skill for creating GIFs. GifRun is an easy enough site to navigate through and produce quality GIFs for your blogging sites.
To convert a YouTube video to GIF, simply enter the link. After that, it will prompt you to the editing page, where you can set the start/end time, duration, and resolution for your gif. You can preview your edit before finalizing it, making necessary changes, and then downloading it on your device.
7. Free Gif Maker Me
Free Gif maker is one of the straightforward and easily manageable GIF-making applications. It offers YouTube to gif, reverse gif, and gif effects tools to enhance your GIF quality and make it effortless to create your own GIFs.
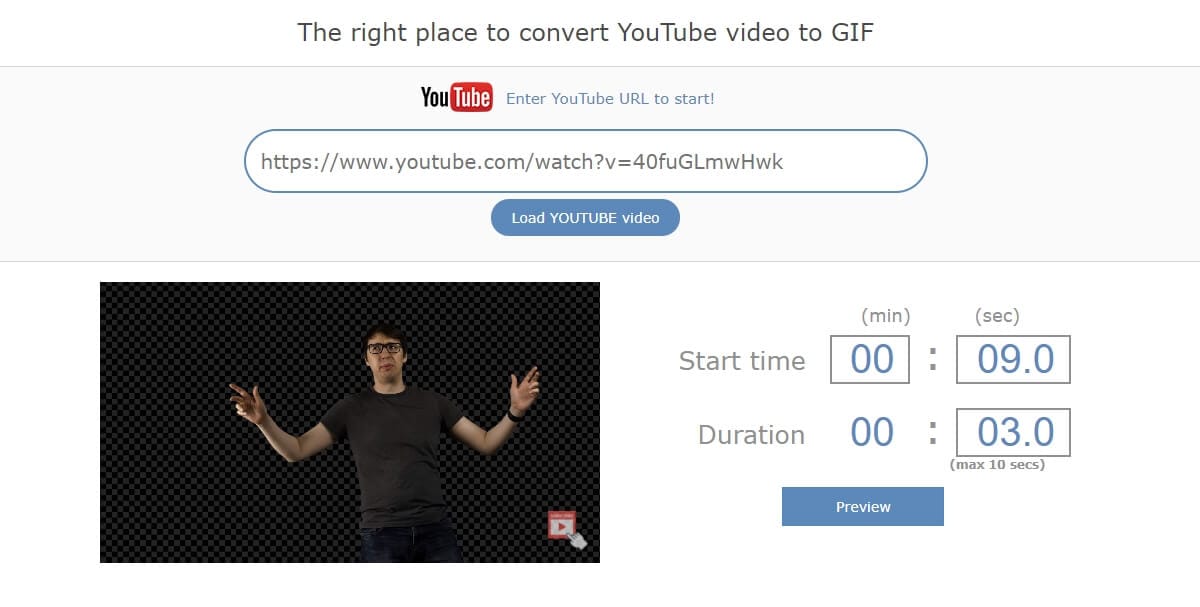
To make GIF from YT Video on free Gif Maker, copy the video link in the input text field in the middle of your screen and then tap on ‘Load YouTube Video.’ Within seconds you will be redirected to the video preview and GIF editing page. Now, set the duration, start time, resolution, output, and other details. Then, click on the ‘Make A GIF’ option and save it on your device once ready.
8. Imgflip
Another website is known for creating and sharing visual content on different social media channels. Imgflip allows you to make customized animations from YouTube and other digital platforms. The site is completely safe to use and produces good-quality memes and GIFs quickly without incurring a dime.
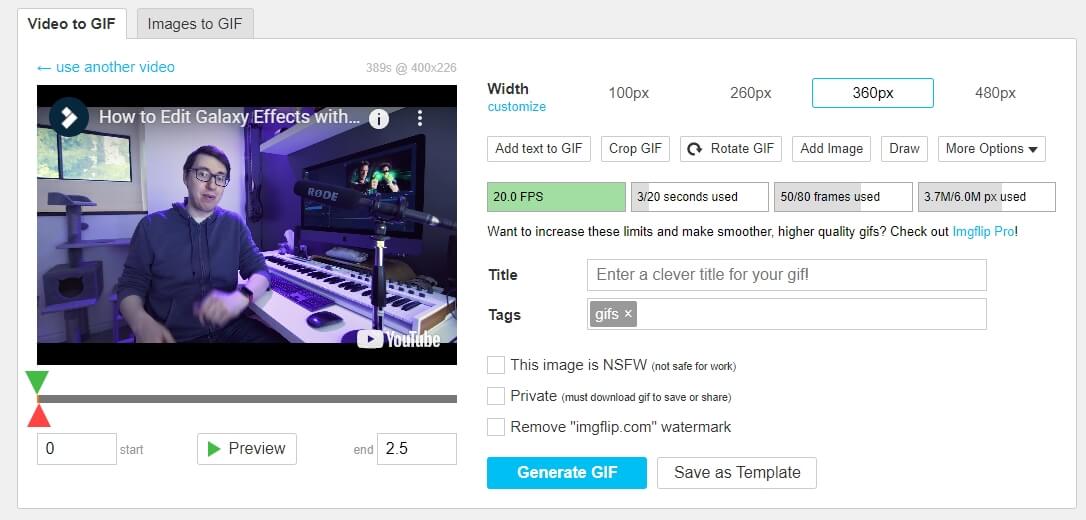
Imgflip supports all the popular video formats such as AVI, MP4, 3GP, OGG, FLV, MOV, and various other video formats. To produce a high-quality GIF, make sure your video is at least 480P or higher. More so, the Imgflip supports GIF with audio features of all the videos with audio that can only be accessed using the Imgflip Pro at a minimum price of $9.95/ month.
9. GIF Maker
GIF Maker is a pretty basic application that everyone can navigate with or without any expertise in the tech department. Along with GIF maker, it also has other tools such as GIF resizer, GIF compressor, and GIF cropper, all specifically designed tools to help you create riveting GIFs ever!
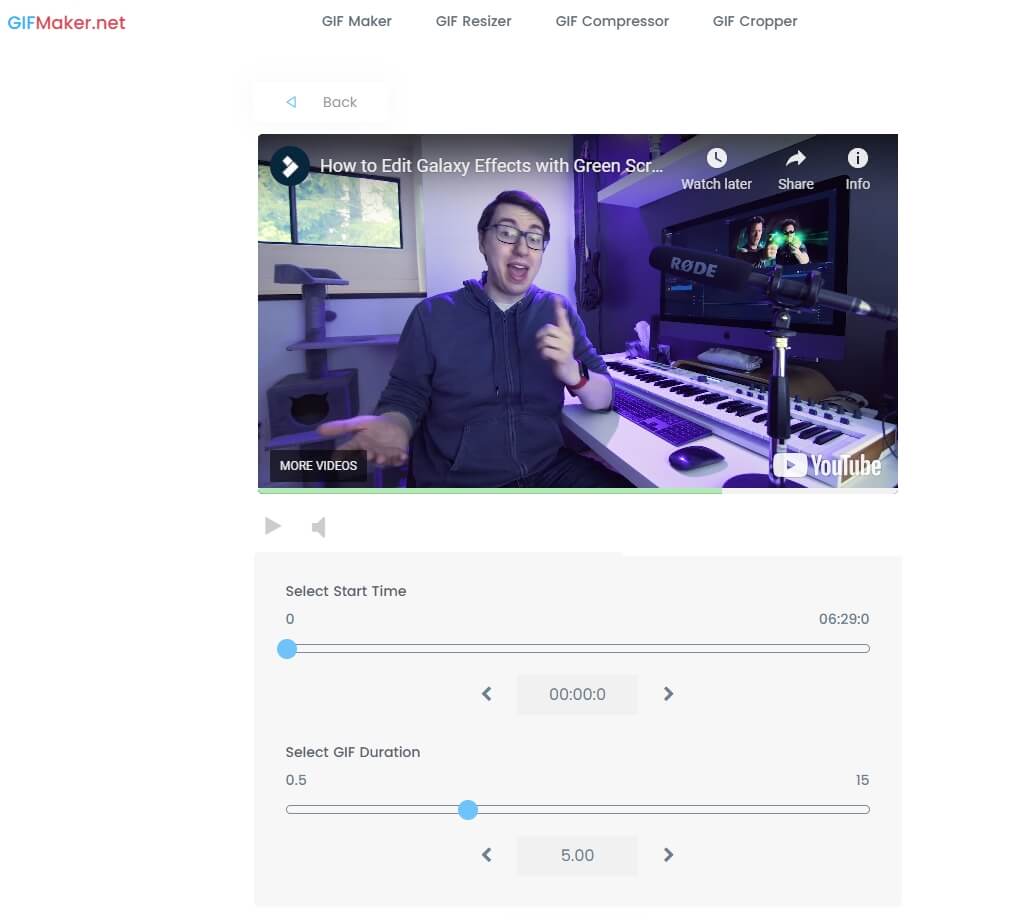
GIF Maker provides two options; one video to gif and second Images to gif that you can use as per their need. One simply is to enter the YT video link/upload video to the upload box. Next, alter the animation, filter, speed, duration, and set start and endpoint in the editor. You can upload files in all the popular formats and upload up to 25Mb image files and 30 Mb for animated GIFs.
Another point to remember while using this GIF Maker, it only supports YT videos that have not been copy-righted by the creator.
Part 2: Best YouTube to GIF Maker on Windows and Mac: Wondershare UniConverter
It happens so that you stumble upon a video that runs the hippocampus of your brain rigid with ingenious abstractions about converting the video into GIF to delineate those ideas through digital content on your blogs.
Now, you will require the best-quality GIF maker that is easy to navigate without any complications. Despite the plethora of GIF makers being available at hand, it could be a strenuous task to search for the ideal GIF maker for yourself.
Presently, Wondershare UniConverter is one of the best and easy-to-use YouTube to GIF makers for you. It is the handiest tool to help you accomplish your conversion, customization, compressing, and revamping goals like a professional with its effective editing features. Wondershare offers many benefits, from converting files in hundred different formats to crafting your one GIF out of videos along with other fundamental editing attributes.
How to User UniConverter Video to GIF Maker?
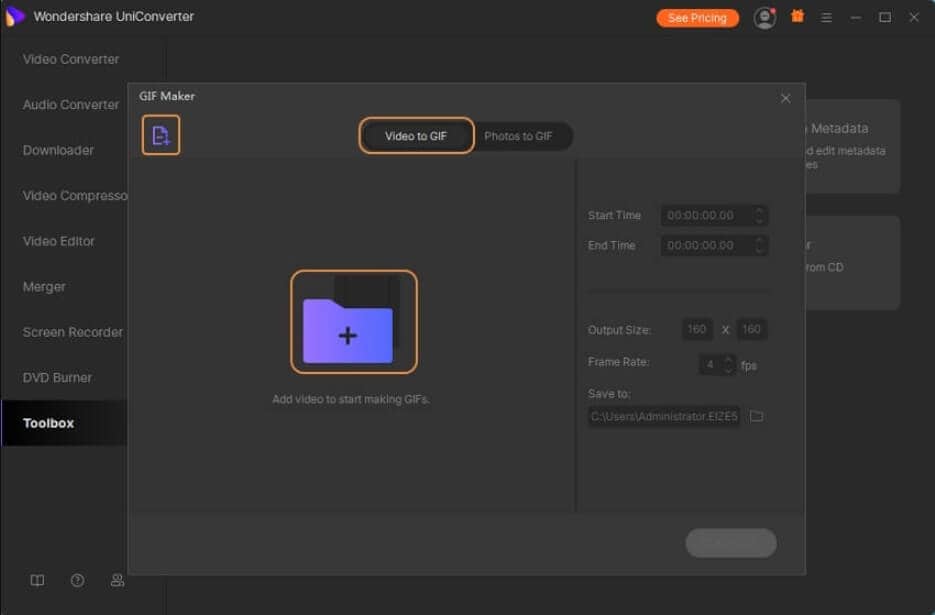
Step 1: Download and install the Wondershare Converter on your device. Now, run the app and launch the Wondershare GIF Maker by selecting the GIF Maker Icon on the toolbar.
Step 2: Click on the Video to GIF option before tapping on the Add File option to upload YT video for GIF conversion.
Step 3: Next, you can customize your uploaded video by setting the start and end time. In addition to that, you can enter the frame rate and output size according to your requirement.
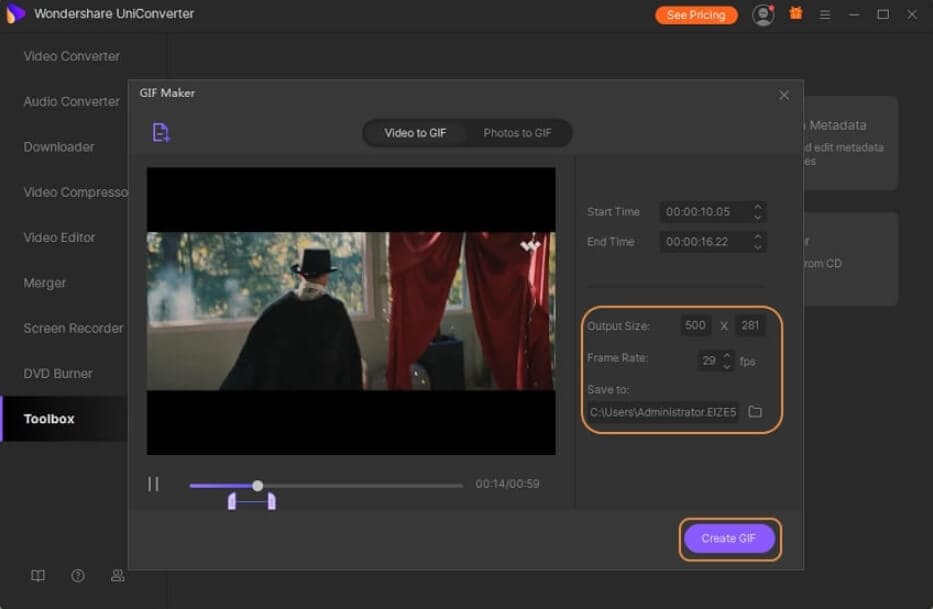
Step 4: Once finished with all the customization, convert the YouTube video into a GIF by tapping the Create GIF option.
Step 5: Ta-da! UniConverter will transform your YT video into a GIF within a minute or two. You can now export and share the GIF further.
That’s right, with five easy steps, you can convert all your favorite YouTube video into GIF with this YouTube to GIF maker.
Without any doubt, I can say that usage of GIFs during your regular texting and socialization can make your conversations more interesting. GIFs are the best shortcuts to express your mood, emotions, and humor without having to type much. No other digital medium provides an avenue that offers such proficiency in demonstrating your emotions, possibly the reason behind its escalating popularity.
With the help of this little guide, you can create gif from YouTube videos with a wave of your hand! I hope you’ve fun GIF-ing!
Richard Bennett
Richard Bennett is a writer and a lover of all things video.
Follow @Richard Bennett
Richard Bennett
Mar 27, 2024• Proven solutions
GIF (Graphic Interchange Format) is an image file format supporting both uniform and animated images. Before, GIF was a basic 8-bit colored image until PNG image format was introduced as a more feasible alternative. Today, you can find them being used on all the trending social media applications like WhatsApp, Instagram, Snapchat, Twitter, Facebook, and various others.
The good thing here is that you can make GIFs from YouTube videos or any of your favorite videos for that matter which you think can help express your sentiments or ideas in an enhanced manner. There is a huge market available of apps and web software that can help create GIFs from YouTube without much trouble.
In this short guide ahead, we’ve brought for you the best YouTube to GIF maker available in the digital market. Let’s go GIF-ing!
Part 1: Best Online YouTube to GIFs Makers
Here is our curated list of the best 11 YouTube to GIF Maker that you can use to make GIF from YouTube video.
1. GIFS
Gifs.com is one the best GIF maker site that makes crafting GIFs from YouTube videos incredibly easy and quick with no time. If you’re looking for some straight and simple video to gif converter to help you convert YouTube videos into GIFs, this is the smoothest editor that will do the job and craft interesting gifs for your blogging platforms.
All you have to do is enter the URL of the video you want to convert into a GIF. At this point, the site accepts Instagram, YouTube, Facebook, and Vine links. In addition to that, there is also an option that allows users to upload from the desktop computer.
Once you’ve entered the YouTube video URL, it prompts a basic video editor wherein you select the frame and durations for your GIF. If you want to customize it further, you can add stickers, captions, and tools like blurring, cropping, and others.
Once you’re done exploring the filters and editing the GIF, you can directly share the URL on different platforms or just download it and store it on your device.
Note: If you want to remove the watermark and get full access to extra features, you may need to pay $1.99/month.
You can check the gif that I made from our YouTube video How to Edit Galaxy Effects with Green Screen | Wondershare FilmoraPro Tutorial on gifs.com here: https://gifs.com/gif/36RNn9 .
2. GIPHY
Giphy, as we all know, is the most used search engine for GIFs due to its limitless collection. Giphy here maintains its own GIF maker to create your customized GIFs effortlessly. The Giphy online GIF maker is quite simple and easy to use; it also has steadfast mobile applications for both Android and iOS devices.
To begin converting YouTube videos into GIFs, click the Create button at the top and then you can either enter the URL or upload images/videos from local files. This GIF maker only accepts JPG, PNG, GIF, MP4, and MOV for people uploading images or videos.
Then, trim the part from the video you want to convert into a GIF. Later, you can embellish your GIFs by adding filters, tags, text captions, and stickers to make them look eye-catching. If you’re looking for a clean and simple GIF maker, then Giphy GIF maker is the perfect choice for you.
Here is the gig that I made with Giphy: https://media.giphy.com/media/2Dtlp2MAXtoC0EyMsx/giphy.gif .
3. GIFit!
GIFit is a well-known online extension available on the Chrome Web Store for free that aids in making GIFs from YouTube videos. The GIFit extension has been recently updated to work with the new YouTube interface to help you craft Gifs smoothly. One thing to remember about GIFit is that with YouTube HTML5 mode only.
To use this Chrome extension, install it from the Chrome Web Store. Now, run the attachment and visit any video on YouTube that you would like to convert into GIF. Once decided, simply press on the GIFit icon in the YouTube toolbar. Then, edit according to your requirements and hit the red button with GIFit on it. After a few minutes, your GIF will be ready to be shared and saved. Currently, it offers convert YouTube to GIF feature only, so you can’t add stickers nor captions.
4. Make A GIF
Makeagif is an ideal online GIF maker for you that can convert videos into animated GIFs in no time. It allows you to create GIFs using local images, YouTube, Facebook, and Webcam. Makeagif even will enable you to develop new GIFs using the already existing ones.
The GIF maker also comes with a variety of free GIFs to download and add to your collection. Moreover, it allows you to edit existing GIFs by enhancing their quality, speed and adding filters to them. It offers functions that can enrich the standard of your GIFs.
To create GIFs using this, first, create your account on the site. Next, select the ‘YouTube to GIF’ option from the drop-down menu, among other alternatives. Then, enter the link to the YouTube video that you wish to transfigure into GIF, after which you can tailor-make the gifs by adjusting the configuration settings, such as adding captions and sticker. Once done, simply download and share your newly crafted GIF.
5. Imgur
Imgur might not be the best application to be included in the list. But it is definitely an amazing site where you can go looking for all kinds of images, Gifs, memes, or other digital stories. Imgur’s wide collection of visuals can never disappoint you, no matter what you’re searching for, from funny to sad, inspiring to aspiring, everything can be discovered in this treasure.
Now, this might not be the best YouTube to gif maker, but it does have the potential to provide you with great ideas for GIF-making. Besides, you can download all the interesting GIfs from here and save them for future reference.
6. GiFRun
Are you worried about searching for a gif converter with no prior experience in editing? Don’t worry; this GiFRun Maker is the simplest online service that requires minimum to zero skill for creating GIFs. GifRun is an easy enough site to navigate through and produce quality GIFs for your blogging sites.
To convert a YouTube video to GIF, simply enter the link. After that, it will prompt you to the editing page, where you can set the start/end time, duration, and resolution for your gif. You can preview your edit before finalizing it, making necessary changes, and then downloading it on your device.
7. Free Gif Maker Me
Free Gif maker is one of the straightforward and easily manageable GIF-making applications. It offers YouTube to gif, reverse gif, and gif effects tools to enhance your GIF quality and make it effortless to create your own GIFs.
To make GIF from YT Video on free Gif Maker, copy the video link in the input text field in the middle of your screen and then tap on ‘Load YouTube Video.’ Within seconds you will be redirected to the video preview and GIF editing page. Now, set the duration, start time, resolution, output, and other details. Then, click on the ‘Make A GIF’ option and save it on your device once ready.
8. Imgflip
Another website is known for creating and sharing visual content on different social media channels. Imgflip allows you to make customized animations from YouTube and other digital platforms. The site is completely safe to use and produces good-quality memes and GIFs quickly without incurring a dime.
Imgflip supports all the popular video formats such as AVI, MP4, 3GP, OGG, FLV, MOV, and various other video formats. To produce a high-quality GIF, make sure your video is at least 480P or higher. More so, the Imgflip supports GIF with audio features of all the videos with audio that can only be accessed using the Imgflip Pro at a minimum price of $9.95/ month.
9. GIF Maker
GIF Maker is a pretty basic application that everyone can navigate with or without any expertise in the tech department. Along with GIF maker, it also has other tools such as GIF resizer, GIF compressor, and GIF cropper, all specifically designed tools to help you create riveting GIFs ever!
GIF Maker provides two options; one video to gif and second Images to gif that you can use as per their need. One simply is to enter the YT video link/upload video to the upload box. Next, alter the animation, filter, speed, duration, and set start and endpoint in the editor. You can upload files in all the popular formats and upload up to 25Mb image files and 30 Mb for animated GIFs.
Another point to remember while using this GIF Maker, it only supports YT videos that have not been copy-righted by the creator.
Part 2: Best YouTube to GIF Maker on Windows and Mac: Wondershare UniConverter
It happens so that you stumble upon a video that runs the hippocampus of your brain rigid with ingenious abstractions about converting the video into GIF to delineate those ideas through digital content on your blogs.
Now, you will require the best-quality GIF maker that is easy to navigate without any complications. Despite the plethora of GIF makers being available at hand, it could be a strenuous task to search for the ideal GIF maker for yourself.
Presently, Wondershare UniConverter is one of the best and easy-to-use YouTube to GIF makers for you. It is the handiest tool to help you accomplish your conversion, customization, compressing, and revamping goals like a professional with its effective editing features. Wondershare offers many benefits, from converting files in hundred different formats to crafting your one GIF out of videos along with other fundamental editing attributes.
How to User UniConverter Video to GIF Maker?
Step 1: Download and install the Wondershare Converter on your device. Now, run the app and launch the Wondershare GIF Maker by selecting the GIF Maker Icon on the toolbar.
Step 2: Click on the Video to GIF option before tapping on the Add File option to upload YT video for GIF conversion.
Step 3: Next, you can customize your uploaded video by setting the start and end time. In addition to that, you can enter the frame rate and output size according to your requirement.
Step 4: Once finished with all the customization, convert the YouTube video into a GIF by tapping the Create GIF option.
Step 5: Ta-da! UniConverter will transform your YT video into a GIF within a minute or two. You can now export and share the GIF further.
That’s right, with five easy steps, you can convert all your favorite YouTube video into GIF with this YouTube to GIF maker.
Without any doubt, I can say that usage of GIFs during your regular texting and socialization can make your conversations more interesting. GIFs are the best shortcuts to express your mood, emotions, and humor without having to type much. No other digital medium provides an avenue that offers such proficiency in demonstrating your emotions, possibly the reason behind its escalating popularity.
With the help of this little guide, you can create gif from YouTube videos with a wave of your hand! I hope you’ve fun GIF-ing!
Richard Bennett
Richard Bennett is a writer and a lover of all things video.
Follow @Richard Bennett
Visual Brand Integration: Embedding Watermarks and Logos Into Youtube Media
How to Add Logo or Watermark to YouTube Video
Richard Bennett
Mar 27, 2024• Proven solutions
A watermark is a still image that is usually plugged in the videos, for the purpose of claiming copyrights or publicity purpose. YouTube generally carries a “branding” option where you can brand your video with your channel. This doesn’t provide a stable watermark. Therefore, when someone downloads that video using a second party (YouTube downloader) it gets removed. For this purpose the legal author will have to put a Channel watemark on their YouTube videos. In this guide, we will show you how to add watermark to your YouTube videos, existing or new.
You May Also Like:
Best Watermark Apps for iPhone - How to Watermark Photos on iPhone >>
Wondershare AniEraser Seamless, Effortless, Intuitive.
AniEraser makes it easy to perfect any photo or video; no matter the device or platform - experience a smooth, effortless transformation of your image and maximize its potential with just one click.
Make your moment perfect.
Free Download Free Download Edit online

![]()
How to Add a Watermark to Your YouTube Videos
- Part 1: How to add logo or watermark to in existing YouTube videos
- Part 2: Add logos or watermarks to your videos before uploading
Part 1: How to add logo or watermark to in existing YouTube videos
To add a watermark to your previously uploaded videos you will need to have created and saved your watermark outside of your video editing program.
- Sign in to your YouTube account. Click on the thumbnail image of your account at the top right corner. This will give you a drop down menu. Then Click on the small gear (indicating settings)

- This will lead you to setting center. Click on “view additional features”

- To the left of the window, Click the third option of “branding”
- Click on “add watermark”. Then you can choose an image from your computer. After your image is uploaded, click save.

Notes
YouTube watermark size: Your watermark should be transparent, square, and larger than 50x50 pixels, which is the size it will be shrunk down to when it appears in the corner of your videos.
YouTube watermark starting time: you will have the option of choosing a start time for your watermark, making it appear only at the end of your video, or having it there for the entire length of your video. Once that is done click ‘Update’ and your watermark will be applied to your videos.
YouTube watermark color: Youtube suggests that your watermark have only one color. The point is that you should not use anything flashy that will take attention away from your video, so having two or three colors is not necessarily wrong if your design is subtle.
Here is a tutorial video for how to add watermark to Your YouTube videos:
Part 2: Add logos or watermarks to your videos before uploading
1. Wondershare Filmora
Wondershare Filmora which is one of the ideal video editing tools especially when it comes to watermarking your videos . It helps you in adding static and video watermarks over the video. The basic theme of the video watermarking is the concept of picture-in-picture .
![]()
The following steps have to be taken to add a watermark:
- Add the video and watermarking data by drag dropping it into the workspace
- Drag the required video on the timeline and the watermark on it as well
- Adjust the watermark and add pre-made special effects to it
- Mask the watermark in the shape you like
- Save the video
 Download Mac Version ](https://tools.techidaily.com/wondershare/filmora/download/ )
2. Windows movie maker
Windows movie maker is free default windows software that can easily add watermark to your videos to secure your copyrights. It can cater two types of watermarks; images and text. For images, it just supports PNG and GIF format files and generally doesn’t support transparency. Moreover, an external file, Windows Logo Locator is needed for placing the logo at different positions.
How to add watermark to video with Windows Movie Maker
Adding Text watermark:
- Open windows movie maker
- Click on ‘videos’ under the title of import.
- Import your video to the timeline.
- Right beneath imports under the category of edit you will find ‘titles and credits’. Click.
- Enter the text for watermark.
- Choose the title positioning, font and transparency.
- Add title. You will find it along the length of timeline. You may drag to expand it, for viewing it during the entire videos length. Select file and click publish video.
Adding image watermark:
The image should be in .PNG or .GIF format.
- Save the image in >C:\Program Files\Movie Maker\Shared\AddOnTFX\.
- Download a logo Locator as per your installed windows from FX archives.
- Select the location of the logo in your video where you want it to appear.
- Choose the screen size and the logo size
- Type the name of the file of the logo you had already saved with the extension. For e.g. logo.png
- Copy the text that appears underneath and paste it on the notepad and save the typed file in >C:\Program Files\Movie Maker\Shared\AddOnTFX\.
- Open windows movie maker again.
- Choose title and credits underneath the edit category.
- Press space bar once and then click ‘change the title animation’.
- You will see your image there. Click on ad title and press Ctrl+p to publish.

Part 3: How to Create a Transparent logo for Youtube Channel
Do you want to make a transparent image as logo for your YouTube? If you want to brand your YouTube channel, we believe it is a must to add transparent logo for YouTube branding. Actually, you can do this in Filmora just with a green screen image. Check the steps below to know the secret.
Step 1: Import video and image to Filmora
Open Filmora. Choose Create New Project. Click import media files here in Media library. Select your video and a green screen image. In fact, a green screen video is also accessable, but usually brand logo is image. Now drag them onto timeline.

Step 2: Import video and image to Filmora
Right click on the image clip in the timeline. Choose Green Screen. You will see the image is transparent in the preview window. Now, you need to adjust some details. You can adjust edge thickness and edge feather to better edge. If the green screen background is not totally removed, drag tolerance to adjust it.

Step 3: Scale the logo
You can clip the image clip first and go to preview window to scale it down or up by dragging the green dot. You can put the YouTube logo at corner.
![]()
Richard Bennett
Richard Bennett is a writer and a lover of all things video.
Follow @Richard Bennett
Richard Bennett
Mar 27, 2024• Proven solutions
A watermark is a still image that is usually plugged in the videos, for the purpose of claiming copyrights or publicity purpose. YouTube generally carries a “branding” option where you can brand your video with your channel. This doesn’t provide a stable watermark. Therefore, when someone downloads that video using a second party (YouTube downloader) it gets removed. For this purpose the legal author will have to put a Channel watemark on their YouTube videos. In this guide, we will show you how to add watermark to your YouTube videos, existing or new.
You May Also Like:
Best Watermark Apps for iPhone - How to Watermark Photos on iPhone >>
Wondershare AniEraser Seamless, Effortless, Intuitive.
AniEraser makes it easy to perfect any photo or video; no matter the device or platform - experience a smooth, effortless transformation of your image and maximize its potential with just one click.
Make your moment perfect.
Free Download Free Download Edit online
![]()
How to Add a Watermark to Your YouTube Videos
- Part 1: How to add logo or watermark to in existing YouTube videos
- Part 2: Add logos or watermarks to your videos before uploading
Part 1: How to add logo or watermark to in existing YouTube videos
To add a watermark to your previously uploaded videos you will need to have created and saved your watermark outside of your video editing program.
- Sign in to your YouTube account. Click on the thumbnail image of your account at the top right corner. This will give you a drop down menu. Then Click on the small gear (indicating settings)
- This will lead you to setting center. Click on “view additional features”
- To the left of the window, Click the third option of “branding”
- Click on “add watermark”. Then you can choose an image from your computer. After your image is uploaded, click save.
Notes
YouTube watermark size: Your watermark should be transparent, square, and larger than 50x50 pixels, which is the size it will be shrunk down to when it appears in the corner of your videos.
YouTube watermark starting time: you will have the option of choosing a start time for your watermark, making it appear only at the end of your video, or having it there for the entire length of your video. Once that is done click ‘Update’ and your watermark will be applied to your videos.
YouTube watermark color: Youtube suggests that your watermark have only one color. The point is that you should not use anything flashy that will take attention away from your video, so having two or three colors is not necessarily wrong if your design is subtle.
Here is a tutorial video for how to add watermark to Your YouTube videos:
Part 2: Add logos or watermarks to your videos before uploading
1. Wondershare Filmora
Wondershare Filmora which is one of the ideal video editing tools especially when it comes to watermarking your videos . It helps you in adding static and video watermarks over the video. The basic theme of the video watermarking is the concept of picture-in-picture .
![]()
The following steps have to be taken to add a watermark:
- Add the video and watermarking data by drag dropping it into the workspace
- Drag the required video on the timeline and the watermark on it as well
- Adjust the watermark and add pre-made special effects to it
- Mask the watermark in the shape you like
- Save the video
Download Mac Version ](https://tools.techidaily.com/wondershare/filmora/download/ )
2. Windows movie maker
Windows movie maker is free default windows software that can easily add watermark to your videos to secure your copyrights. It can cater two types of watermarks; images and text. For images, it just supports PNG and GIF format files and generally doesn’t support transparency. Moreover, an external file, Windows Logo Locator is needed for placing the logo at different positions.
How to add watermark to video with Windows Movie Maker
Adding Text watermark:
- Open windows movie maker
- Click on ‘videos’ under the title of import.
- Import your video to the timeline.
- Right beneath imports under the category of edit you will find ‘titles and credits’. Click.
- Enter the text for watermark.
- Choose the title positioning, font and transparency.
- Add title. You will find it along the length of timeline. You may drag to expand it, for viewing it during the entire videos length. Select file and click publish video.
Adding image watermark:
The image should be in .PNG or .GIF format.
- Save the image in >C:\Program Files\Movie Maker\Shared\AddOnTFX\.
- Download a logo Locator as per your installed windows from FX archives.
- Select the location of the logo in your video where you want it to appear.
- Choose the screen size and the logo size
- Type the name of the file of the logo you had already saved with the extension. For e.g. logo.png
- Copy the text that appears underneath and paste it on the notepad and save the typed file in >C:\Program Files\Movie Maker\Shared\AddOnTFX\.
- Open windows movie maker again.
- Choose title and credits underneath the edit category.
- Press space bar once and then click ‘change the title animation’.
- You will see your image there. Click on ad title and press Ctrl+p to publish.
Part 3: How to Create a Transparent logo for Youtube Channel
Do you want to make a transparent image as logo for your YouTube? If you want to brand your YouTube channel, we believe it is a must to add transparent logo for YouTube branding. Actually, you can do this in Filmora just with a green screen image. Check the steps below to know the secret.
Step 1: Import video and image to Filmora
Open Filmora. Choose Create New Project. Click import media files here in Media library. Select your video and a green screen image. In fact, a green screen video is also accessable, but usually brand logo is image. Now drag them onto timeline.
Step 2: Import video and image to Filmora
Right click on the image clip in the timeline. Choose Green Screen. You will see the image is transparent in the preview window. Now, you need to adjust some details. You can adjust edge thickness and edge feather to better edge. If the green screen background is not totally removed, drag tolerance to adjust it.
Step 3: Scale the logo
You can clip the image clip first and go to preview window to scale it down or up by dragging the green dot. You can put the YouTube logo at corner.
![]()
Richard Bennett
Richard Bennett is a writer and a lover of all things video.
Follow @Richard Bennett
Also read:
- [Updated] Elevate Your Media Content via YouTube Studio Editing Skills
- Step-by-Step Guide to Creating Popular YouTube Openings
- Unique Channels Generating Top-Notch Video Naming
- [Updated] Elevate Video Production The Audio Edition on YouTube
- The Rise of Virtual Personalities in Gaming Worlds
- In 2024, Dissecting TSeries Profits From YouTube Platforms
- Transforming Zero to Hundred The Ultimate Guide to Boosting Video Views
- Achieving Financial Independence on YouTube via Views
- Cutting-Edge Editing Meets Online Video Sharing
- Time Warp in Media YouTube Content Upside Down
- Social Signals and Their Role in YouTube Popularity
- Effortless YouTube Content Crafting 10 Basic Video Ideas for All for 2024
- 2024 Approved Essential Mobile Privacy The Best 7 AdBlocker Apps for Android
- [New] A Step-by-Step Expedition to YouTube's Unseen Layers
- 2024 Approved Engaging Presentations Tips for Uploading YouTube Videos Into Slides
- [Updated] Decrypting YouTube’s View-Count Calculation System
- [New] Designing Direct Access to Your Channel's Subscribe Page
- Updated In 2024, How To Export Video in Filmora
- [New] In 2024, Maximizing Engagement with YouTube on Facebook Platforms
- Pokemon Go Error 12 Failed to Detect Location On Motorola Moto G34 5G? | Dr.fone
- 2024 Approved The Most Acclaimed Digital Voice Synthesis Services
- 9 Mind-Blowing Tricks to Hatch Eggs in Pokemon Go Without Walking On Realme C53 | Dr.fone
- In 2024, Life360 Circle Everything You Need to Know On Apple iPhone 8 Plus | Dr.fone
- New In 2024, For Artists Who Are Making Videos for Show Their Knowledge or Projects, Add some Effects for the Video Can Always Provoke Interests and Attention. This Article Will Show You How to Do that Easily
- In 2024, Downloading SamFw FRP Tool 3.0 for Realme 12+ 5G
- [Updated] Mastering the Airwaves DJI Drones and Social Media Live for 2024
- [Updated] 2024 Approved VideoTwitterConverter Direct Media Conversion
- New The Secret to Affordable Final Cut Pro Education Bundles Revealed for 2024
- 2024 Approved Inverting Motion on Snapchat A Complete Breakdown
- Title: "10 Best YouTube To GIF Makers How to Create GIF From YouTube Video, In 2024"
- Author: Steven
- Created at : 2024-05-25 21:05:46
- Updated at : 2024-05-26 21:05:46
- Link: https://youtube-clips.techidaily.com/10-best-youtube-to-gif-makers-how-to-create-gif-from-youtube-video-in-2024/
- License: This work is licensed under CC BY-NC-SA 4.0.
